A lot has changed in Project Server workflows in the past few years, with the release of SharePoint 2013 and Office 365 the world of workflow completely changed. Fortunately SharePoint Designer’s (SPD) evolution into an actual usable tool for creating Project Server workflows filled the huge gap that previously existed for Project Server consultants and implementers, however at the same time the changes created a new major gap by completely blocking any sort of custom code in any workflows!
All is not lost though, with the changes in workflow we also received a handy set of new RESTful API’s to use so in theory at least we should be able to do a fair bit that previously required C# code via pure non-code-based SharePoint Designer workflows.
Putting the theory to the test
I have a theory with working with customers, that whatever is possible through the out-of-the-box features of a Microsoft product will never be enough after the first workshop. It seems that I like saying yes to customers. ;)
Scenario
My customer’s business process dictates that based on the result of an approval gateway the Microsoft Project schedule will require changes, specifically additional tasks need to be added to the schedule based on custom fields (or even a SharePoint list).
As there are no SharePoint Designer workflow actions that update project tasks, this would fall into the category of workflow built with Visual Studio (based on the MSDN: Decision tree: SharePoint Designer vs. Visual Studio), however the reality is that when you get down to it Visual Studio workflows share fundamentally the same limitation as those built in SPD i.e. declarative, no code workflows only (See the bottom of this article about some more practical limitations).
Solution
Let’s use my new favourite workflow action – the Call HTTP Web Service activity – in conjunction with the RESTful CSOM API for Project Server to actually create some tasks directly from SPD as follows;
- Get our task data – We’ll need task name, duration, start date, etc.
- Prepare our REST request – a bit of HTTP request header / body knowledge will be required but can be borrowed from some other examples like this one: Create a project site based on a custom field value.
- Post the http request and handle the result.
I’m going to skip a lot of details for this article and just focus on the above interesting bits, of course in the real world you’ll have to worry about publishing and checking out the project and although I don’t include those I will discuss check-out at least below as it is important. Additionally I will just create a single static task in this example, ideally you would get the values from custom fields, or better yet get a list of tasks to create using a separate OData http request then loop through creating each one.
PWA Workflow Configuration
Let’s keep this simple, you can use your imagination as to how this would fit into your requirement but I will even omit the approval and any other normal phases and stages.
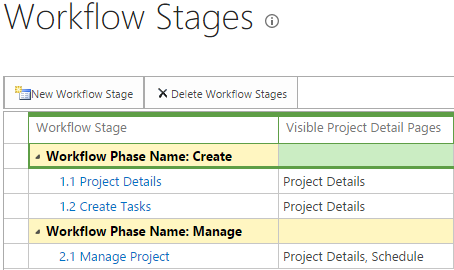
Phases (Using Defaults):
1. Create
2. Manage
Stages:
1.1 Project Details – where we will get basic project details.
1.2 Create Tasks – where we will create the task(s) in the workflow.
2.1 Manage – we’re done, as you were..
Begin the SharePoint Designer Workflow
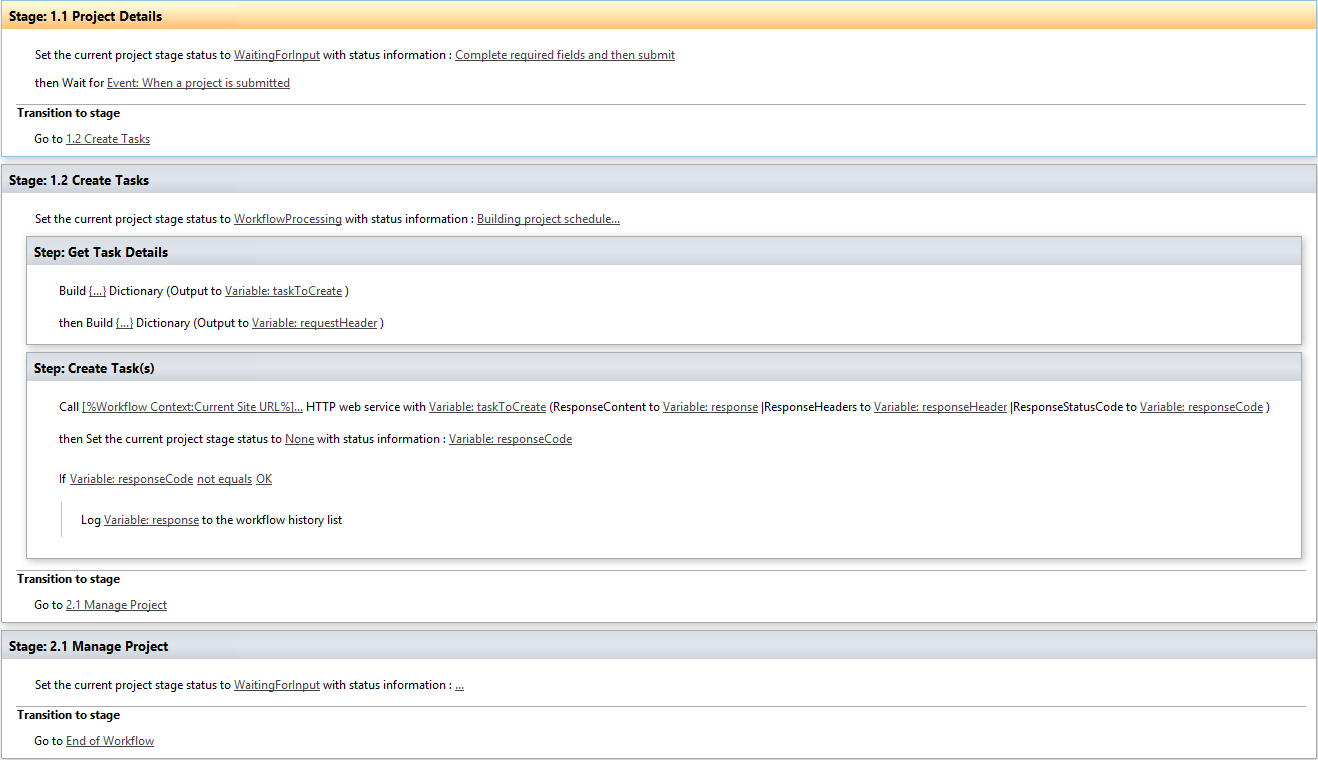
Here’s one I prepared earlier:
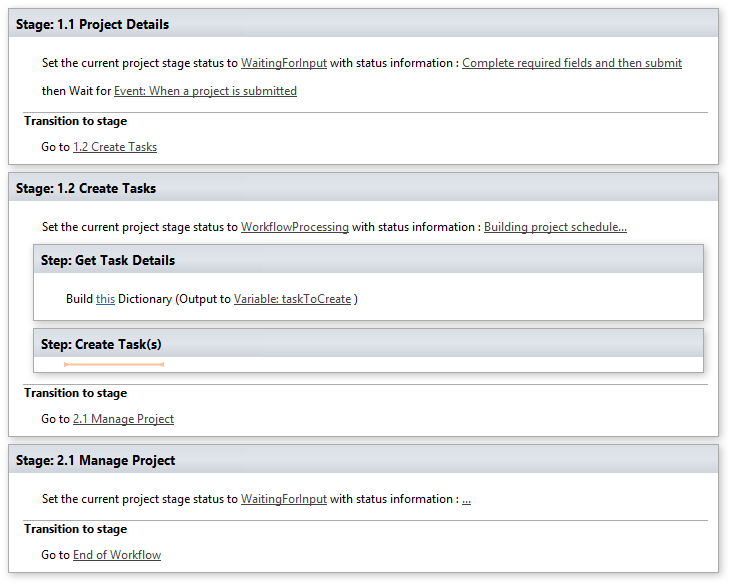
Okay so I’m assuming that this is not your first ever workflow, so the above is the following: Stage transition including basic history / status messages, plus in [stage 1.2] we are manually (and statically!) creating a dictionary of properties for the task we are going to add. (This is static and as per my comment above you probably want to dynamically populate this dictionary even by just setting the value(s) to the value of specific custom fields.)
Note on Check-in / Check-out
The project will need to be checked out to update the schedule, fact. However SPD workflow runs in the context of the user who started it, i.e. the PM in most cases. So in this example I’m going to assume that the project is currently checked-out by the PM and just go ahead and do the update. You may be surprised but this will actually work, of course in reality you will have to check for this and if an error occurs then retry after checking-out – or conversely you could require the project be checked in before submitting and then do the check-out / check-in every time.
Preparing the new task dictionary
SPD uses extensively the Dictionary object in the HTTP Activity, both for the headers, body and return values, so to create our task we are going to need a dictionary formatted in the format expected by the Project Server REST API for creating new tasks. This is where it starts getting interesting.
It turns out that this is easier that you might have guessed, see those properties of the task; Name, Duration, ParentId, etc? Guess what dictionary values we’ll need? :)
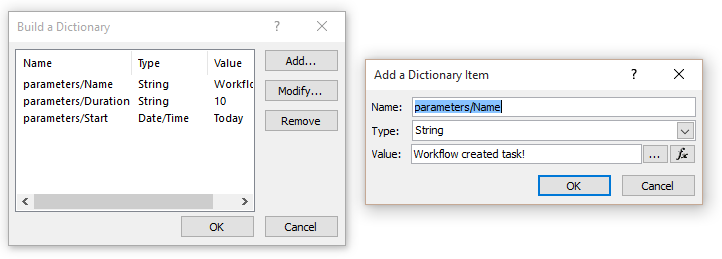
On the left is the complete dictionary, and on the right is the properties of the first “Name” row expanded. Surely it’s not that simple? For once yes it is.
So create the dictionary from the menu Action – Build Dictionary, populate the dictionary with the fields you want, specifically you’ll need Task Name as a minimum, and importantly pay attention to the data-type, for this the MSDN link above is handy, names are strings, dates are dates, parent task Id is a GUID, etc. (Note: Duration is text! Hello manual tasks!)
Prepare the HTTP request
Now we’ll need another dictionary for the request header, if you’ve previously read the MSDN article on using the Bulk update of custom field values, or my article on creating a Project Site based on a custom field, then you’ll see here we need the same thing.
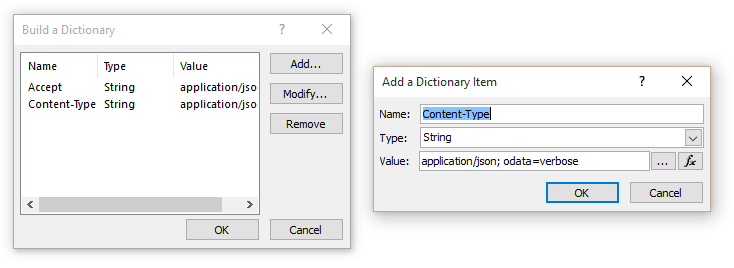
Two string entries needed:
Accept: application/json; odata=verbose
Content-Type: application/json; odata=verbose
The great thing about SPD workflows is that it takes care of the authentication and any other headers, so that is everything that we need.
Submitting the HTTP request
Now we get to use my favourite activity: Call HTTP Web Servie.
Insert the activity, first click the this URL and we’ll build the request URL by basically calling the following REST resource endpoint: MSDN: PS.DraftTaskCollection.add Method, note from MSDN the syntax is as follows:
POST http://<sitecollection>/<site>/_api/ProjectServer/Projects('projectid')/Draft/Tasks/add(parameters)
So we need to dynamically create the URL as follows;
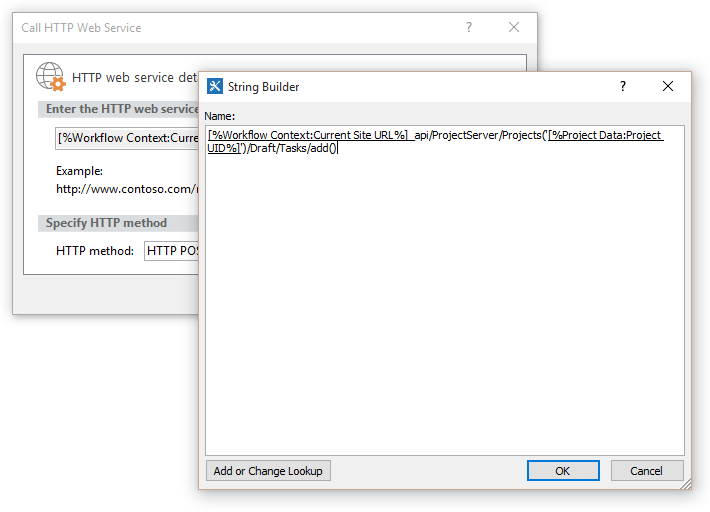
- Use lookup params to insert the Workflow context: Current Site URL
- Append the text “_api/ProjectServer/Projects(”)/Draft/Tasks/add()“
- Then insert the Project Data:Project UID into the text.
- Finally (importantly) Select HTTP POST as the HTTP method.
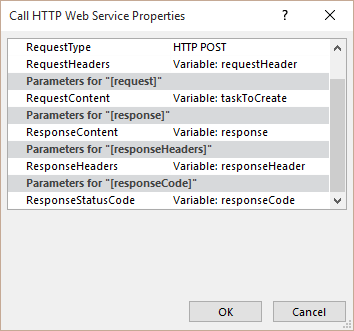
Next right click the activity and open properties to assign the request header and body, and while there specify something for at least the response content (so we can check the return http code).
Check the Response
Okay we’ve made our REST call, now we just log the response to the status field, and to help with troubleshooting in the case where “responseCode” is not equal to “OK”, I actually log the full response to the history list.
(Warning! Logging to the history list like this has a max length of 255 characters, so if the error message exceeds that you will get another error and the workflow will fail! Use the Extract Substring activity to avoid this.)
You should now have something looking like this:
Finally save and publish the workflow and you’re ready to go.
Time to test
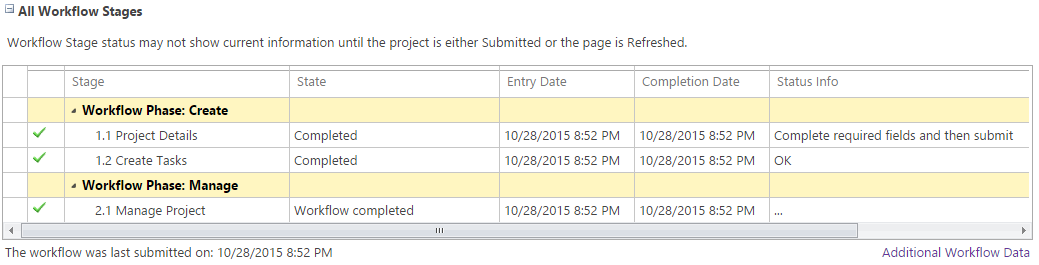
Associate the workflow to an EPT, then create a project. As we’re not doing anything special in the first stage submit and you should see the workflow status info as “Building project schedule…” (looking good so far!).
Give it a minute and then refresh the page:
Better yet, open the Schedule PDP and you will see our new task:
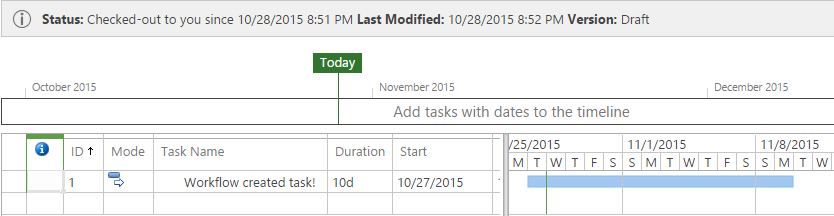
Neat.
Further Thoughts, Experiences and Limitations
This method opens up quite a few options when it comes to SharePoint Designer workflows, the ability to interact with all levels of the Project Server API via a workflow opens the possibility of working with any aspect of project data (tasks, assignments, resources, etc?).
However my experience of pushing this to the limit does raise some significant limitations:
- SPD Workflows can contain a maximum of 50 local variables.
This sounds like a lot but it doesn’t take long before you’re needing to re-use variables, especially if you’re like me and you like nice verbose and unmistakable variable names. (Fifty max is killing me! ;))
- Dictionaries are great but you can’t dynamically update them.
This is where we see the true limitations of SPD vs Visual Studio, doing a simple loop in code then adding the results to the end of a collection (array / dictionary etc) is pretty basic stuff, but with SPD can’t be done. You can loop yes sure, but you can only build a dictionary either statically (like I did above), or from the results of a query such as a http OData request.
- Finally as a developer I’m going to call out this as a major limitation; single concern / no source control. (Ahhh!)
While creating some large workflows you don’t know how many times I have panic’ed thinking that an overly-long and unresponsive save or publish of my work has just crashed SPD and corrupted the whole workflow (it actually happened at least once), give me source control and a proper separation of concerns and let me sleep at night, please. :)
Recommended Reading
Here’s a great article on working with SPD dictionaries that I’d recommend: How to work with dictionaries in SharePoint 2013 and Office 365 workflow)
Complete basic operations using SharePoint 2013 REST endpoints
PS namespace MSDN reference (want to know what REST endpoints are available for Project Server?)
Download the solution
Create-Project-Tasks-Workflow.zip
Enjoy!
Hi Martin,
I can successfully create tasks with REST but I cannot create assignments. I am using “…Draft/Assignments/add()” with dictionary “parameters/taskID:GUID; parmaters/resourceId:GUID’ etc.”
Would you be able to shed any light? Thanks!
Hi,
I’ve not done that myself but as the MS documentation on PS.JS can be incomplete or confusing I would suggest also referring to the CSOM documentation on this topic.
What I can see quickly there is a AssignmentCreationInformation object used by the DraftAssignmentCollection.Add method, so it sounds like the Add method you were using may not be the one you need.
See:
https://msdn.microsoft.com/en-us/library/office/microsoft.projectserver.client.draftassignmentcollection.add.aspx
https://msdn.microsoft.com/en-us/library/office/microsoft.projectserver.client.assignmentcreationinformation_di_pj14mref_members.aspx
HTH,
Hi Martin,
Thanks for sharing. I am trying to update an existing task instead of creating one. I think the change in this case would be HTTP PUT in place of POST. Do you think of any other changes besides that? or have you ever tried to update tasks on schedule through workflow? Thanks
Hi Ankur,
I have tested updating tasks, it is quite easy to update standard task properties, ie anything that comes back from the normal /DraftProject/Tasks(‘guid’) REST call.
Simply use HTTP PATCH (ie MERGE) to do the call to update just a specific property.
Something like this will do it (RAW HTML Code snippet from POSTMAN follows):
PATCH /PWA/_api/ProjectServer/Projects(’36ead592-ee70-e611-8162-000d3a2402b4′)/Draft/Tasks(‘150aca09-ef70-e611-8162-000d3a2402b4’) HTTP/1.1
Host: project
Accept: application/json; odata=verbose
Content-Type: application/json; odata=verbose
Origin: https://project
X-RequestDigest: [digest]
X-Http-Method: PATCH
If-Match: *
Cache-Control: no-cache
{
“__metadata”: {
“type”: “PS.DraftTask”
},
“Name”: “New name for task”
}
Note though, the above does NOT work for custom fields, that seems to be (ridiculously) more difficult! :(
Cheers,
Martin
Thanks Martin
I am trying to update a custom task field based on your explanation using workflow. The approach I am using is similar to the way we update Project custom fields.
There are two steps in my workflow
1)First build a dictionary as follows
{“customFieldDictionary”:[{“__metadata”:{“type”:”PS.DraftTask”},”Key”:”Custom_d370b697-e284-e611-80c7-00155d205401″,”Value”:”CNP”,”ValueType”:”Edm.String”}]}
The KEY here contains the internal name of the custom task field
2) Make a REST call with HTTP:POST to PWA/_api/ProjectServer/Projects(‘guid’)/Draft/Tasks(‘guid’)
passing the above content in requestbody and Header as
Accept: application/json; odata=verbose
Content-Type: application/json; odata=verbose
However, this is not working :( could you please help me figure out what’s wrong.
Also do you have any example where you made it work to update a custom task field?
Many Thanks,
Ankur
Hi Ankur,
I have had a chance now to look into this, and as you found it is not so simple to update task custom field values.
The standard method that works for normal task fields simply does not work for custom fields. As far as I could tell it is not supported.
The only way I was able to do it was to use Fiddler to trace the JSOM SetCustomFieldValue() method’s internal “Process Query” POST call, and then by duplicating that call I was able to update a task field.
This is a very difficult method to use and technically undocumented, although after previously speaking with some MS people it is not “unsupported”.
I’ll post an example of this here that updates a single task custom field via a POST request for illustration, however I can’t give you much support for this one I’m afraid. (Suggest learning to love POSTMAN and use this request in there)
POST /PWA/_vti_bin/client.svc/ProcessQuery HTTP/1.1

Host: project.hostname.com

Accept: application/json; odata=verbose

Content-Type: text/xml

Origin: https://project.hostname.com

X-RequestDigest: 0xB84C4A43A8C6D685...05F4C0C8727C4B,02 Sep 2016 11:35:43 -0000

Cache-Control: no-cache

Postman-Token: 9114c838-b2c0-3129-8dfe-2613eb3ad45b
<?xml version="1.0" ?>
<Request ApplicationName="Javascript Library" LibraryVersion="15.0.0.0" SchemaVersion="15.0.0.0" xmlns="http://schemas.microsoft.com/sharepoint/clientquery/2009">
<Actions>
<ObjectPath Id="1" ObjectPathId="0"/>
<ObjectPath Id="3" ObjectPathId="2"/>
<ObjectPath Id="5" ObjectPathId="4"/>
<ObjectPath Id="7" ObjectPathId="6"/>
<ObjectPath Id="9" ObjectPathId="8"/>
<ObjectPath Id="11" ObjectPathId="10"/>
<ObjectPath Id="13" ObjectPathId="12"/>
<Method Id="14" Name="SetCustomFieldValue" ObjectPathId="12">
<Parameters>
<Parameter Type="String">Custom_976b57c4b836e51180cd000d3a201c32</Parameter>
<Parameter Type="String">Hi</Parameter>
</Parameters>
</Method>
<ObjectPath Id="16" ObjectPathId="15"/>
<Query Id="17" ObjectPathId="15">
<Query SelectAllProperties="true">
<Properties/>
</Query>
</Query>
</Actions>
<ObjectPaths>
<Constructor Id="0" TypeId="{3a609e5f-e2a1-497c-87a2-e5e8a781c096}"/>
<Constructor Id="2" TypeId="{f256f605-bb33-4d62-b206-72a06a765075}">
<Parameters>
<Parameter ObjectPathId="0"/>
</Parameters>
</Constructor>
<Property Id="4" Name="Projects" ParentId="0"/>
<Method Id="6" Name="GetByGuid" ParentId="4">
<Parameters>
<Parameter Type="String">36ead592-ee70-e611-8162-000d3a2402b4</Parameter>
</Parameters>
</Method>
<Property Id="8" Name="Draft" ParentId="6"/>
<Property Id="10" Name="Tasks" ParentId="8"/>
<Method Id="12" Name="GetByGuid" ParentId="10">
<Parameters>
<Parameter Type="String">150aca09-ef70-e611-8162-000d3a2402b4</Parameter>
</Parameters>
</Method>
<Method Id="15" Name="Update" ParentId="8"/>
</ObjectPaths>
</Request>
Hope that helps,
Martin
Did this POST /PWA/_vti_bin/client.svc/ProcessQuery hack work for you on MSPS 2016?
All I get is HTTP 403 Forbidden when attempting this via POSTMAN.
Possible that support for this was removed in newer version?
Hi James,
I do use that in a solution running on Project Online so it definitely still works for me.
I guess the error might be related to the POST body, check all the GUIDs and other entries match your environment as unfortunately with this method error messages you get back are totally unhelpful so 403 could mean just about anything. :(
If all else fails use Fiddler to watch the POST calls generated by a javascript .setCustomField() method call and compare with the above.
HTH,
Martin
Hi Martin
Nice job laying this whole process out!! I’m trying to execute a task create from a change in a SharePoint list. My customer has a service request system and I am taking those service requests and loading them to a SharePoint list within PWA. They will triage the list and then either create projects or add a new task to a service request plan. Everything seems to work fine (no errors coming back in history) but project server doesn’t post the new task and gives me an error “An unknown error has occurred” when I try to publish or check in the project.
I’m figuring the task create has to be placed in a project server site workflow so my question is do you know of a way to trigger a project server site workflow from a change in a SharePoint List. I have to demo this Friday so hopefully you have an idea on how this could work.
Thanks
Don
Any ideas would be helpful. I’m trying to avoid having the client go into project server to create the task.
Hi Don,
From my experience the errors returned from PS from the REST api are typically unhelpful, ‘An unknown error has occurred” being the usual message.
If the error you are seeing is coming not from the REST request itself but later when you publish then I think I have seen similar issues. In my case I found some projects, specifically ones that had been previously modified in PWA on the scheduled PDP to come up with “An unknown error has occurred” when I tried to use this solution to add additional tasks to the same plan.
In that case I was able to resolve the issue by doing a publish checkin / check-back-out before doing my REST update, also doing a publish of that project manually in MS Project client (but not PWA interestingly) also fixed this issue.
Seems it is possible for the API’s either used via REST / JSOM or via PWA directly can leave the project data in a “bad” state. Publishing fortunately sorts it out.
Hope that helps,
Martin
HI Martin, Have you tried to associate workflow with SharePoint tasks list which is synced with Project Tasks dynamically when project is published.
I want to send custom emails to task owners and PM when task is critical/non critical and I think I can only do via SPD Workflows.
I am blocked by PWA limitations where Workflow is executed in context of System account and do not have permissions to make REST Calls from SPD Workflow.
Wonder if there are any suggestions how we can do this.
Hi Pryank,
The best I can suggest is to try and create the actions inside of an App Step, if you use that and then activate the appropriate site collection features then the permissions context for the REST calls is changed.
I haven’t done much with it to be honest, so I can’t tell you exactly if it will fix your issue but it’s worth further investigation.
Regards,
Martin.