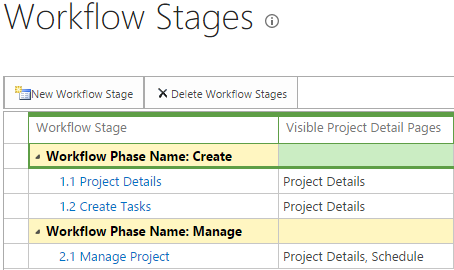
Updating resource custom field values via REST in Microsoft Flow

Flow is a great (one day) replacement for SharePoint Designer workflows, however at the moment the Project Online connectors are still in “preview” and as such as woefully inadequate. In my view the biggest omission is the inability to set custom fields, among many other failings this one is pretty much always step one or two on any workflow I have ever needed to create for Project Server.

You may have seen some MS demos where they show a quick easy way to circumvent this by using the HTTP action, unfortunately I’ve yet to find any online examples of that so I’m going to write one myself. This article focuses on Enterprise Resource custom fields but applies equally well to Task custom fields. However, the process is actually simpler for Project level custom fields and Paul Mather has blogged on the topic before here. Although he doesn’t cover Flow in that article, you can convert his JavaScript code to a JSON body and use it as as below. There’s also this StackExchange post that covers Project fields using a different method.

Updating Enterprise Resource fields via REST

It turns out this is not supported!

Please correct me if I’m wrong here, I’ve spent many hours looking for a solution for this from MS to no avail!

Well for me I figure if MS released an API 5 years ago and never got around to finishing it then supported or not I need a way to do my job. Fortunately it is possible via CSOM/JSOM to do this, and by understanding how all the client side API’s work you will see that it is possible and (arguably) fully supported to do this via REST using the internal methods used by CSOM/JSOM.

Updated Enterprise Resource default fields via REST

Before we look at custom fields lets cover how to set the default fields such as; Group, Email, etc. These can be set via the normal REST endpoint, and frankly this is how it also *should* be possible to set custom fields.

Assuming the resource exists and you want to update it by GUID, the following HTTP PATCH request will do it:

PATCH /sites/pwa/_api/ProjectServer/EnterpriseResources('[guid]') HTTP/1.1
Host: contoso.sharepoint.com
Accept: application/json; odata=verbose
Content-Type: application/json; odata=verbose

{
    "__metadata": {
      "type": "PS.EnterpriseResource"
    }, 
    "Group": "Test group",
    "Email": "[email protected]"
}

That’s a raw HTTP request from PostMan, the important bits are the JSON and the PATCH type of request, yes a standard POST or PUT request will not work. In that JSON body of the request you can list multiple custom fields as long as you adhere to correct JSON syntax, for the full list of field names, browse to the endpoint in your browser: /sites/pwa/_api/ProjectServer/EnterpriseResources.

However if you look at the endpoints you’ll see the custom field values referenced by internal name, e.g.: Custom_x005f_000039b78bbe4ceb82c4fa8c0c400284

Unfortunately it is not possible to add to your JSON the CF value, like: Custom_x005f_000039b78bbe4ceb82c4fa8c0c400284″: “Text value for field” as a result we have to work a bit harder.

Enter the ProcessQuery endpoint

(If you’re not interested in the why, but just the how to do this, you may want to skip to the next section!)

If you’re familiar with Fiddler traces of any of the SharePoint client side object models then you will have seen that all of the API calls made are translated into HTTP calls to an internal endpoint: _vti_bin/client.svc/ProcessQuery while not documented anywhere I have found, you can see that basically this is where the ClientContext.ExecuteQueryAsync(…) call from either CSOM or JSOM is performing the requested operation.

The ProcessQuery endpoint accepts a HTTP POST request with a body that looks something like this:

<Request xmlns="http://schemas.microsoft.com/sharepoint/clientquery/2009" SchemaVersion="15.0.0.0" LibraryVersion="16.0.0.0" ApplicationName="Javascript Library">
    <Actions>
        <Method Name="SetCustomFieldValue" Id="9" ObjectPathId="6">
            <Parameters>
                <Parameter Type="String">Custom_f825c154928ae81180da00155df8aa23</Parameter>
                <Parameter Type="String">text field value</Parameter>
            </Parameters>
        </Method>
        <Method Name="Update" Id="10" ObjectPathId="6" />
    </Actions>
    <ObjectPaths>
        <Method Id="6" ParentId="4" Name="GetById">
            <Parameters>
                <Parameter Type="String">5e658680-838a-e811-80df-00155df8b01b</Parameter>
            </Parameters>
        </Method>
        <Property Id="4" ParentId="0" Name="EnterpriseResources" />
        <Constructor Id="0" TypeId="{3a609e5f-e2a1-497c-87a2-e5e8a781c096}" />
    </ObjectPaths>
</Request>

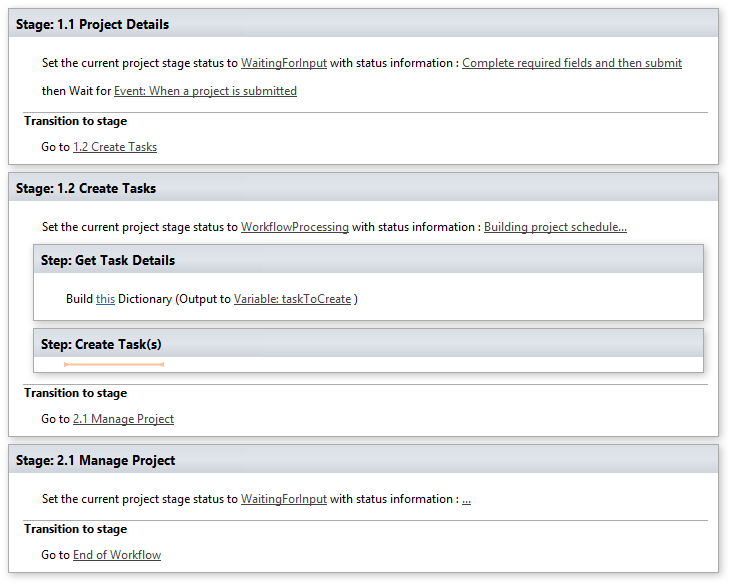
That happens to be the query syntax to set a single text custom field for a resource. If you read through the content you can see (in order of Id properties) what is happening, in short the above translates to the following (pseudo) CSOM code:

var res = EnterpriseResources.GetById([guid]);
res.SetCustomFieldValue("Custom_f825...", "text field value");
EnterpriseResources.Update();

Pretty cool huh? :)

It get’s better, as if you trace in fiddler some code that does multiple things, like for example setting 3 or 4 custom field values, you will see that they are all batched into a single POST query just as you’d expect when using ExecuteQueryAsync in your code. The change in the method above is simply additional <Action> elements in the XML, one for each call to SetCustomFieldValue (note: incrementing the Id property is also necessary).

The remainder of that XML deserves a short explanation, ignoring the XML schema stuff the only other variable defined in the above example is a GUID: {3a609e5f-e2a1-497c-87a2-e5e8a781c096}. This GUID refers to the ServerTypeId that is defined in the Microsoft.ProjectServer.Client.dll file specifically the PS.ProjectServer constructor, and importantly “EnterpriseResources” is a public property of that class. So with that in mind you could re-use this GUID and make calls to any other public property to construct the call you need.

I prefer to cheat, and simply write a small snippet of JSOM (or CSOM) code that makes the call I want in REST, then use fiddler to get the XML body created when I make that call.

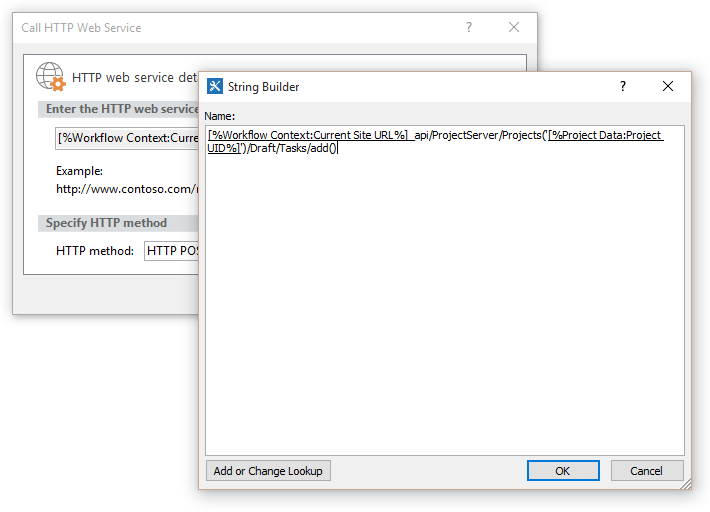
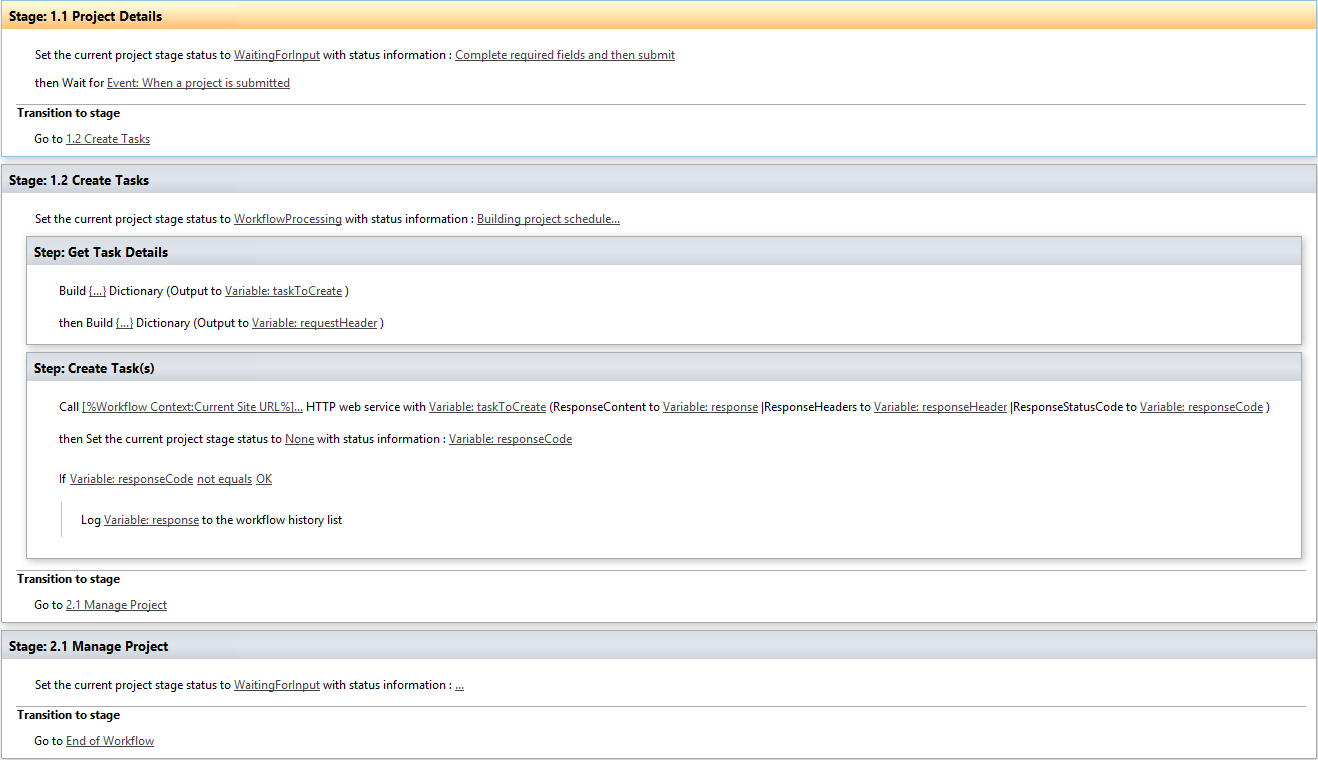
Calling a Project Online API from Flow

Now that we know what the HTTP request needs to look like we can start building a flow. Not so long ago this was much more difficult as we had to worry about OAuth2 and AzureAD apps and such, but now thankfully MS have added a new action to the SharePoint actions list which we are going to use:

SharePoint - Send an HTTP request to SharePoint action

I’ve created a new flow with a Project Online trigger “When a new resource is created”, and then added the above HTTP request action.

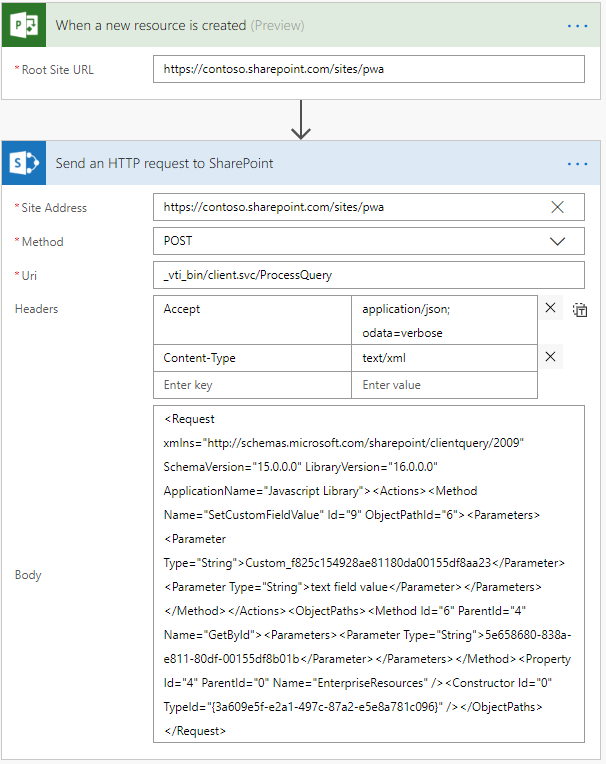
You need to populate the following values:

  • Site Address: URL to your PWA
  • Method: POST (for custom fields, or if out of the box fields PATCH)
  • Uri: _vti_bin/client.svc/ProcessQuery
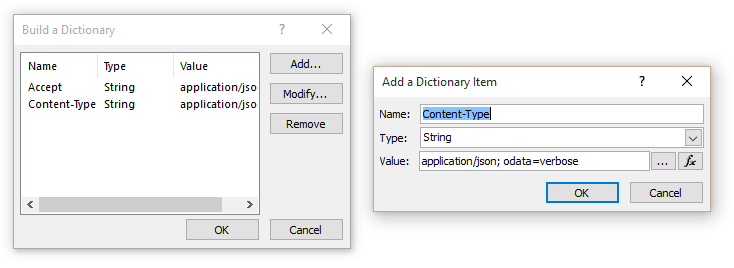
  • Headers:
    • Accept: application/json; odata=verbose
    • Content-Type: text/xml
  • Body: [Our XML body from the previous step]

Note: The header for Content-Type must be “text/xml” to match the content, if you were updating a default field using the JSON body from the beginning of this article, this would also be set to “application/json; odata=verbose”.

Thanks to the SharePoint HTTP action we don’t have to worry about authentication here, so actually that is it! Well almost.

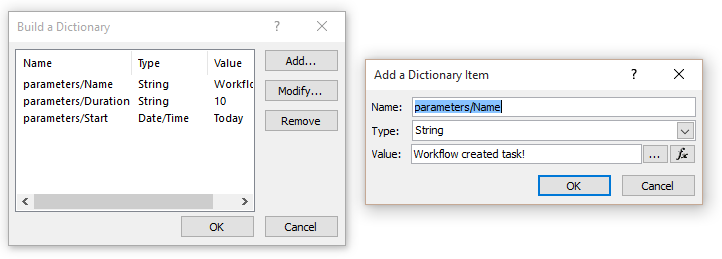
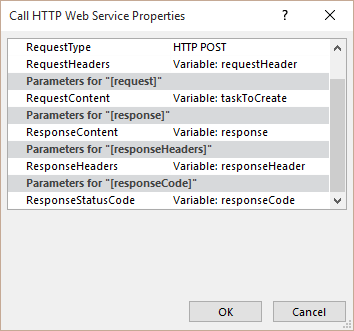
Parameterizing the Flow action

Adding some variables to the flow allows us to parameterize the action based on whatever logic you want, once that’s done replace the values in the XML like this:

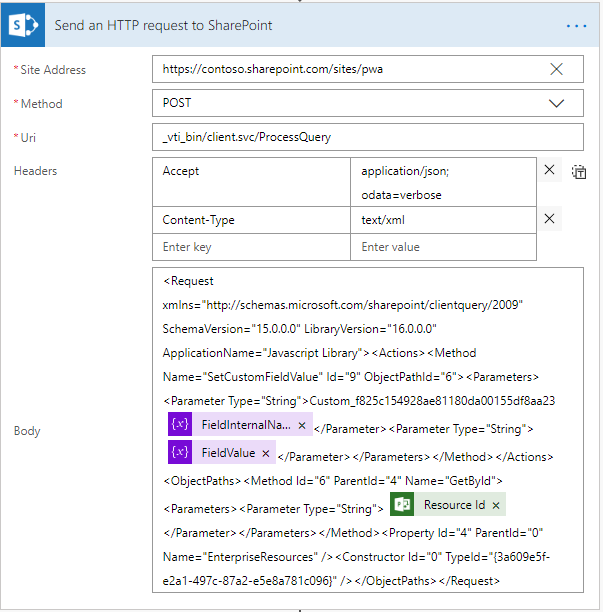
Important: Notice I have stripped the XML of tabs, spaces and line endings! This is required, if you don’t do that you will get an Unknown Error on larger query bodies.
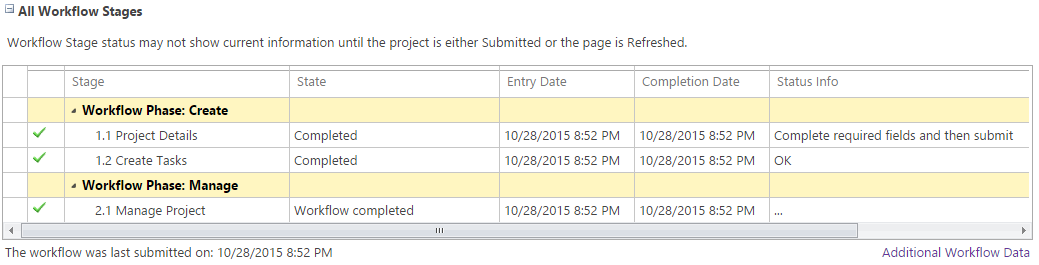
Done.

What about default fields?

For completeness if you wanted to update the internal Group field for a resource, the http request action would look like this:

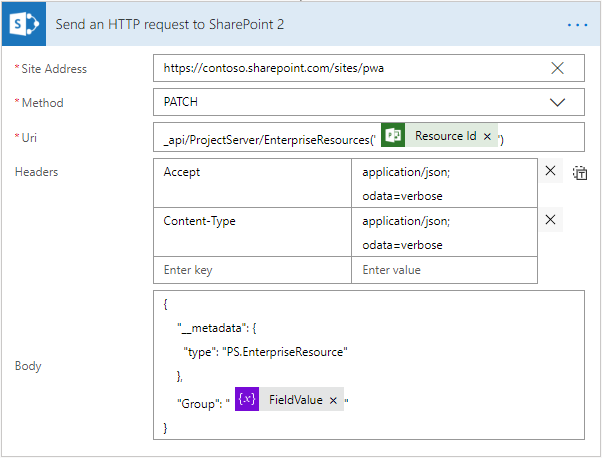
Note the resource GUID is in the URI and both the Method and Headers are different!

What about Lookup Table Values?

Lookup table value updates via REST have the same requirements as updating those values via JSOM (or CSOM), see my earlier post – Updating Lookup Table values using JSOM – for more on that.

In summary though, we need to first identify the lookup entry internal name, something like “Entry_412bb4bd5661e711a989000d3a28f1ff” then we need to pass that to the request as an array.

The request body now will look like this:

<Request xmlns="http://schemas.microsoft.com/sharepoint/clientquery/2009" SchemaVersion="15.0.0.0" LibraryVersion="16.0.0.0" ApplicationName="Javascript Library">
    <Actions>
        <Method Name="SetCustomFieldValue" Id="13" ObjectPathId="8">
            <Parameters>
                <Parameter Type="String">Custom_f825c154928ae81180da00155df8aa23</Parameter>
                <Parameter Type="String">text field value</Parameter>
            </Parameters>
        </Method>
        <Method Name="SetCustomFieldValue" Id="14" ObjectPathId="8">
            <Parameters>
                <Parameter Type="String">Custom_000039b78bbe4ceb82c4fa8c0c400284</Parameter>
                <Parameter Type="Array">
                    <Object Type="String">Entry_412bb4bd5661e711a989000d3a28f1ff</Object>
                </Parameter>
            </Parameters>
        </Method>
        <Method Name="Update" Id="15" ObjectPathId="6" />
    </Actions>
    <ObjectPaths>
        <Property Id="6" ParentId="0" Name="EnterpriseResources" />
        <Method Id="8" ParentId="6" Name="GetById">
            <Parameters>
                <Parameter Type="String">0bd67eed-538e-e811-aadb-000d3a28f1ff</Parameter>
            </Parameters>
        </Method>
        <Constructor Id="0" TypeId="{3a609e5f-e2a1-497c-87a2-e5e8a781c096}" />
    </ObjectPaths>
</Request>

I’ve left in the previous example to demonstrate how to set two custom fields at once, but the important part here is lines 9 – 16 which include the additional syntax you will need to set an array type value. Once again passing the value as an array is required for both single value lookups as well as multi-value.

Final words

This ProcessQuery endpoint is not publicly documented by Microsoft but a long time ago I discussed this with some people from the product group and their response was that while not officially supported, it is supported in the sense that it will not change until JSOM and CSOM are both disabled, as that’s how they internally work.

So use it with the usual warnings, but biggest of all: I take no responsibility or offer no support for how you use the above. Feel free to ask a question in the comments below, if I can help I will, but no guarantees.


Share and Enjoy !

Shares

Creating Project Tasks in a SPD Workflow

A lot has changed in Project Server workflows in the past few years, with the release of SharePoint 2013 and Office 365 the world of workflow completely changed. Fortunately SharePoint Designer’s (SPD) evolution into an actual usable tool for creating Project Server workflows filled the huge gap that previously existed for Project Server consultants and implementers, however at the same time the changes created a new major gap by completely blocking any sort of custom code in any workflows!

All is not lost though, with the changes in workflow we also received a handy set of new RESTful API’s to use so in theory at least we should be able to do a fair bit that previously required C# code via pure non-code-based SharePoint Designer workflows.


Putting the theory to the test

I have a theory with working with customers, that whatever is possible through the out-of-the-box features of a Microsoft product will never be enough after the first workshop. It seems that I like saying yes to customers. ;)

Scenario

My customer’s business process dictates that based on the result of an approval gateway the Microsoft Project schedule will require changes, specifically additional tasks need to be added to the schedule based on custom fields (or even a SharePoint list).

As there are no SharePoint Designer workflow actions that update project tasks, this would fall into the category of workflow built with Visual Studio (based on the MSDN: Decision tree: SharePoint Designer vs. Visual Studio), however the reality is that when you get down to it Visual Studio workflows share fundamentally the same limitation as those built in SPD i.e. declarative, no code workflows only (See the bottom of this article about some more practical limitations).

Solution

Let’s use my new favourite workflow action – the Call HTTP Web Service activity – in conjunction with the RESTful CSOM API for Project Server to actually create some tasks directly from SPD as follows;

  1. Get our task data – We’ll need task name, duration, start date, etc.
  2. Prepare our REST request – a bit of HTTP request header / body knowledge will be required but can be borrowed from some other examples like this one: Create a project site based on a custom field value.
  3. Post the http request and handle the result.

I’m going to skip a lot of details for this article and just focus on the above interesting bits, of course in the real world you’ll have to worry about publishing and checking out the project and although I don’t include those I will discuss check-out at least below as it is important. Additionally I will just create a single static task in this example, ideally you would get the values from custom fields, or better yet get a list of tasks to create using a separate OData http request then loop through creating each one.


PWA Workflow Configuration

Let’s keep this simple, you can use your imagination as to how this would fit into your requirement but I will even omit the approval and any other normal phases and stages.

Phases (Using Defaults):

1. Create

2. Manage

Stages:

1.1 Project Details – where we will get basic project details.

1.2 Create Tasks – where we will create the task(s) in the workflow.

2.1 Manage – we’re done, as you were..

wfstages


Begin the SharePoint Designer Workflow

Here’s one I prepared earlier:

basicSPD


Okay so I’m assuming that this is not your first ever workflow, so the above is the following: Stage transition including basic history / status messages, plus in [stage 1.2] we are manually (and statically!) creating a dictionary of properties for the task we are going to add. (This is static and as per my comment above you probably want to dynamically populate this dictionary even by just setting the value(s) to the value of specific custom fields.)


Note on Check-in / Check-out

The project will need to be checked out to update the schedule, fact. However SPD workflow runs in the context of the user who started it, i.e. the PM in most cases. So in this example I’m going to assume that the project is currently checked-out by the PM and just go ahead and do the update. You may be surprised but this will actually work, of course in reality you will have to check for this and if an error occurs then retry after checking-out – or conversely you could require the project be checked in before submitting and then do the check-out / check-in every time.


Preparing the new task dictionary

SPD uses extensively the Dictionary object in the HTTP Activity, both for the headers, body and return values, so to create our task we are going to need a dictionary formatted in the format expected by the Project Server REST API for creating new tasks. This is where it starts getting interesting.

It turns out that this is easier that you might have guessed, see those properties of the task; Name, Duration, ParentId, etc? Guess what dictionary values we’ll need? :)

dict1a

On the left is the complete dictionary, and on the right is the properties of the first “Name” row expanded. Surely it’s not that simple? For once yes it is.

So create the dictionary from the menu Action – Build Dictionary, populate the dictionary with the fields you want, specifically you’ll need Task Name as a minimum, and importantly pay attention to the data-type, for this the MSDN link above is handy, names are strings, dates are dates, parent task Id is a GUID, etc. (Note: Duration is text! Hello manual tasks!)


Prepare the HTTP request

Now we’ll need another dictionary for the request header, if you’ve previously read the MSDN article on using the Bulk update of custom field values, or my article on creating a Project Site based on a custom field, then you’ll see here we need the same thing.

dic2

Two string entries needed:

Accept: application/json; odata=verbose

Content-Type: application/json; odata=verbose

The great thing about SPD workflows is that it takes care of the authentication and any other headers, so that is everything that we need.


Submitting the HTTP request

Now we get to use my favourite activity: Call HTTP Web Servie.

Insert the activity, first click the this URL and we’ll build the request URL by basically calling the following REST resource endpoint: MSDN: PS.DraftTaskCollection.add Method, note from MSDN the syntax is as follows:

POST http://<sitecollection>/<site>/_api/ProjectServer/Projects('projectid')/Draft/Tasks/add(parameters)

So we need to dynamically create the URL as follows;

urlbuilder

  1. Use lookup params to insert the Workflow context: Current Site URL
  2. Append the text “_api/ProjectServer/Projects(”)/Draft/Tasks/add()
  3. Then insert the Project Data:Project UID into the text.
  4. Finally (importantly) Select HTTP POST as the HTTP method.

Next right click the activity and open properties to assign the request header and body, and while there specify something for at least the response content (so we can check the return http code).

httpReq


Check the Response

Okay we’ve made our REST call, now we just log the response to the status field, and to help with troubleshooting in the case where “responseCode” is not equal to “OK”, I actually log the full response to the history list.

(Warning! Logging to the history list like this has a max length of 255 characters, so if the error message exceeds that you will get another error and the workflow will fail! Use the Extract Substring activity to avoid this.)

You should now have something looking like this:

completeWK

Finally save and publish the workflow and you’re ready to go.


Time to test

Associate the workflow to an EPT, then create a project. As we’re not doing anything special in the first stage submit and you should see the workflow status info as “Building project schedule…” (looking good so far!).

Give it a minute and then refresh the page:

wftest2


Better yet, open the Schedule PDP and you will see our new task:

scheduleEg1


Neat.

Further Thoughts, Experiences and Limitations

This method opens up quite a few options when it comes to SharePoint Designer workflows, the ability to interact with all levels of the Project Server API via a workflow opens the possibility of working with any aspect of project data (tasks, assignments, resources, etc?).

However my experience of pushing this to the limit does raise some significant limitations:

  • SPD Workflows can contain a maximum of 50 local variables.

This sounds like a lot but it doesn’t take long before you’re needing to re-use variables, especially if you’re like me and you like nice verbose and unmistakable variable names. (Fifty max is killing me! ;))

  • Dictionaries are great but you can’t dynamically update them.

This is where we see the true limitations of SPD vs Visual Studio, doing a simple loop in code then adding the results to the end of a collection (array / dictionary etc) is pretty basic stuff, but with SPD can’t be done. You can loop yes sure, but you can only build a dictionary either statically (like I did above), or from the results of a query such as a http OData request.

  • Finally as a developer I’m going to call out this as a major limitation; single concern / no source control. (Ahhh!)

While creating some large workflows you don’t know how many times I have panic’ed thinking that an overly-long and unresponsive save or publish of my work has just crashed SPD and corrupted the whole workflow (it actually happened at least once), give me source control and a proper separation of concerns and let me sleep at night, please. :)


Recommended Reading

Here’s a great article on working with SPD dictionaries that I’d recommend: How to work with dictionaries in SharePoint 2013 and Office 365 workflow)

Complete basic operations using SharePoint 2013 REST endpoints

PS namespace MSDN reference (want to know what REST endpoints are available for Project Server?)


Download the solution

Create-Project-Tasks-Workflow.zip


Enjoy!

Share and Enjoy !

Shares

Exploring REST Endpoints couldn’t be easier!

One of the best takeaways from ProjConf 2014 in my opinion was this gem by Chris Givens from Architecting Connected Systems:

http://sprest.architectingconnectedsystems.com/ 

Basically if you are working with the CSOM, JSOM or REST client side APIs for Project Server and SharePoint (and if you were at ProjConf after all the great sessions you have no excuse NOT to be! ;]), then you’ve probably found yourself browsing the REST endpoints to find what you need. I do all the time, in fact I will be writing about doing so for my Holiday Sync write up to be posted soon.

Using SPREST though this is made super easy, you can browse UP or DOWN the hierarchy of objects to find what you need (e.g. BaseCalendarExceptions) and it generate the code you need to use it via REST, CSOM or JSOM!

Not only that it has a voting feature where you can submit to MS (via Chris) suggestions of what unexposed methods you want to see in the client side that are exposed in the server side! Sweet.


It’s currently in Alpha, so check the site and support it by clicking on ad’s or buying the app when it’s out!

Share and Enjoy !

Shares