One of the nice new features recently released on Project Online that will also be available for on-prem sometime in the future (PS 2016 or maybe if we’re lucky 2013 sp2?) is the ability to create custom fields via workflow using the new API CreateProjectSite. While on its own this may be a rather small change what it opens up is the possibility to completely control the Project Site creation which previously had only the out-of-the-box options i.e.; on or off!
So using this new feature I have created a walk-through here to resolve an often asked customer requirement:
How can we create the Project Site using a name other than the Project Name, e.g. a Project Number?
Solution Overview
Note: This solution can be used today on Project Online, but as of yet will not work on Project Server 2013 on-premises.
In order to fulfill this requirement we will need to create a simple two stage workflow and associated Enterprise Project Type to be the default project type.
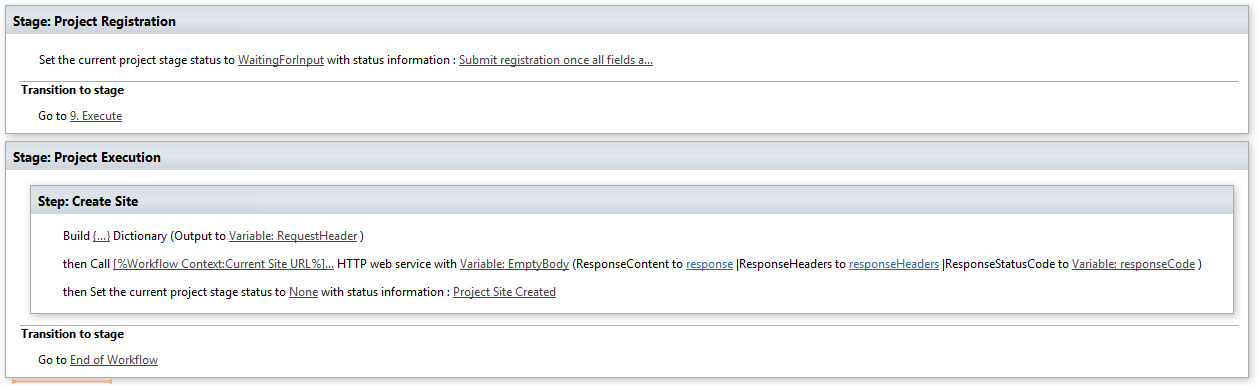
Stage 1: Project Registration
Used to collect project details including “Project Number” which will be a required field. Other PDP’s such as the project schedule will not be available.
In this stage no project site is available.
Stage 2: Project Execution
First thing upon entering this stage the project site is created using the details from the previous stage (site URL = “Project Number”), then other PDP’s, etc are shown to allow for the project to continue.
Project Online Configuration
I will go through the configuration of PWA for the workflow in brief, if you are not familiar with creating workflows or need further information then I’d recommend the following MSDN How to: How to: Create a Project Server workflow for Demand Management.
Firstly you will need a custom field called “Project Number” that is configured as a Project entity, type Text and Workflow-controlled enabled, as so:

Next create / edit the “New Project” PDP, and add the Project Number field to the PDP.
Optionally leave the field out of the PDP and go and install the Nearbaseline ID App which will set the project number in the background once the project is created (ahem shameless plug).
Now create the required Stages and Phases as follows:
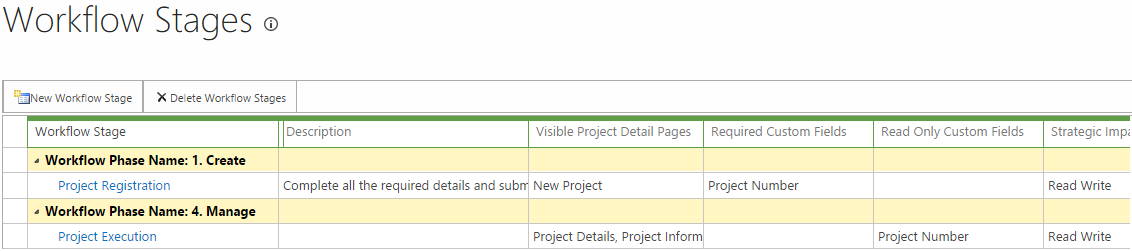
Note that in the Project Registration stage the “Project Number” field must be marked required.
Now create an Enterprise Project Type using the New Project Page created above and for now leaving everything else default / blank as you’ll have to come back and associate the EPT with your workflow after the next steps.
Finally configure the default settings to NOT create project sites automatically from PWA Settings > Connected SharePoint Sites > Settings, as follows:

With that all setup we’re ready to create our workflow in SharePoint Designer.
Workflow Creation in SharePoint Designer
The workflow creation is based on the steps documented in the MSDN guide: Project Online: Bulk update custom fields and create project sites from a workflow, as such I will skip some of the details and suggest you review that article if you have any problems.
Open SharePoint Designer, create a new SharePoint 2013 Workflow – Project Server workflow and add the following:
- Insert two stages Project Registration & Project Execution
- Optionally set the stage status in the Project Registration stage to WaitingForInput.
- Set the transition to go to the Project Execution stage.
No additional wait for submit event is really required here as the workflow will automatically wait for all required custom fields to be entered before allowing submit. - Now in the Project Execution stage add a step in which you can add the Create Project Site call as documented in the MSDN article.
- Finally terminate the workflow as the final transition.
Your workflow should look something like this:
The only change from the steps outlined in the MSDN article is in the forth step where the URL is constructed for the CreateSite call, in our case we want that to reference our “Project Number” custom field in the parameter in CreateProjectSite(parameter), so your URL should look like:
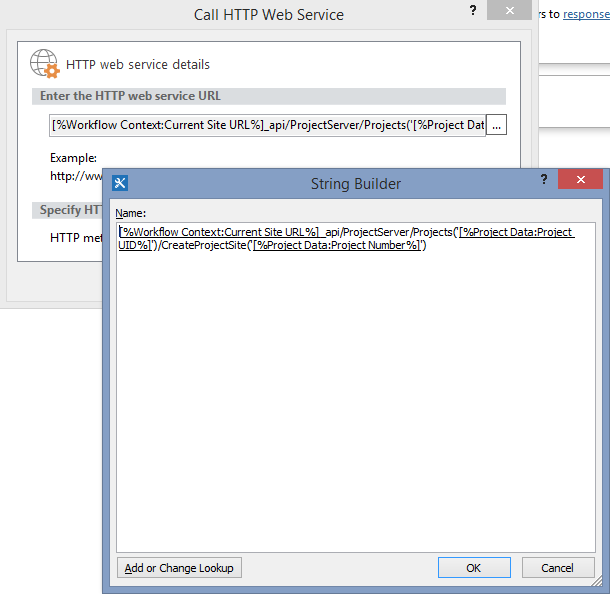
Note: Don’t try to cut and paste those URLs if you do so you will lose the special [%tags%], use the Add or Change Lookup button to insert the tags.
Once your workflow is done, save, publish and return to PWA and associate it with your EPT that you created then test!
Solution Download
Find attached below the SharePoint Designer Workflow solution created above exported as a Visio diagram, note that I cannot provide any guarantees or support for this downloaded Visio file.
Download: Demo Create Project Site from ECF
Screen shot of the workflow in Visio:

Hope this is useful to someone out there!
thanks for sharing. I will use this as an source to create separate site based on the project complexity
Jerom, can you give an example of receiving task options from the tasks collection of the project. Using such a request, such as GET http:////_api/ProjectServer/Projects('projectid‘)/Draft/Tasks
I would be very grateful)