by Martin Laukkanen | Mar 1, 2014 | Project 2013, Project Online
Alex posted this morning with the news that the Project Conference 2014 session videos are now online: Project Conference Session videos now available on Channel 9
Of course including my session on Extending Project Online and on-premises with JavaScript Apps, see it here now if you missed it:
http://channel9.msdn.com/Events/Project/2014/PC403
UPDATE 19/03: Just got the confirmation from Microsoft that my session PC403 was the highest rated of the conference! Awesome, thanks everyone for your evals and I’m very glad you enjoyed it!
by Martin Laukkanen | Feb 8, 2014 | Apps, Development, How to
In this final part of the series we’re going to complete the holiday sync app by importing the selected calendar exceptions into Project Server.
We’ll start from where we finished up in Part 2 with our app loading data from both existing project server calendars and our external web service, so to follow this article make sure you start with the solution from the end of Part 2.
Part 3: Importing data into Enterprise Calendars from our App
Now that we have a list of calendar exceptions that we want to import we need to use some JSOM to actually import those exceptions.
To break-down what we need to do here I’m going to review this JSOM in three steps;
Step 1 Prepare context and get objects to update
// Get the Project Server context
var projContext = PS.ProjectContext.get_current();
// Get our Calendar Collection
var eCalColl = projContext.get_calendars();
var eCalendar = eCalColl.getByGuid(calUid);
var eCalBaseExcep = eCalendar.get_baseCalendarExceptions();
In step 1 we instantiate our object variables using the PS.js JSOM library to first get our calendar collection, then get our calendar by GUID from that collection and finally we get our base calendar exceptions from our calendar.
Next we’ll update those collections.
Step 2 Create the exception(s)
// Step 2 Loop through and add each exception
for (var i = 0; i < exceptions.length; i++) {
  var excepInfo = new PS.CalendarExceptionCreationInformation();
  // Set the exception properties
  excepInfo.set_name(exceptions[i].Descriptor);
  excepInfo.set_start(exceptions[i].Date);
  excepInfo.set_finish(exceptions[i].Date);

  // Finally add the exception info to the base calendar object
  eCalBaseExcep.add(excepInfo);
}
// Update the collection
eCalColl.update();
Now we’re going to create each calendar exception using the PS.CalendarExceptionCreationInformation constructor, you’ll find one of those constructors for most of the objects in JSOM, if you want more on this see MSDN; http://msdn.microsoft.com/en-us/library/office/jj669390.aspx.
Once we have our excepInfo object we set the required properties; Name, Start and Finish, then finish by adding that item to our exception collection before moving to the next exception to be added. Finally we update the calendar collection object with all the exceptions created.
Now as we’re working asynchronously the last step is to execute the above update(s);
Step 3 Update the calendar asynchronously
// Finally asynchronously execute the update
projContext.executeQueryAsync(Function.createDelegate(this, function () {
	// Success update our grid and finish up
	this.grid.setSelectedRows([]);
	// Display the results and remove the progress msg
	SP.UI.Notify.addNotification("Exceptions added successfully", false);
   }), Function.createDelegate(this, function (call, error) {
	// Handle Error
	alert(error.get_message());
}));
So using the JSOM executeQueryAsync function we execute the change and handle the result, here we simply want to notify the user of the result.
Full code block follows, paste this into the bottom of the App.js:
// Function to add calendar exceptions via JSOM
HolidaySync.prototype.addCalendarException = function (calUid, exceptions) {
    // Show a progress message
    this.notifyMsg = SP.UI.Notify.addNotification('<img src="/_layouts/images/loadingcirclests16.gif" style="vertical-align: top;"/> Importing...', true);

    // Step 1 Get the Project Server context and objects
    var projContext = PS.ProjectContext.get_current();

    // Get our Calendar Collection
    var eCalColl = projContext.get_calendars();
    var eCalendar = eCalColl.getByGuid(calUid);
    var eCalBaseExcep = eCalendar.get_baseCalendarExceptions();
    //CSOM Ref (no JSOM): http://msdn.microsoft.com/en-us/library/office/microsoft.projectserver.client.calendarexceptioncollection_di_pj14mref_members.aspx

    // Step 2 Loop through and add each exception
    for (var i = 0; i < exceptions.length; i++) {
        // Create our Calendar Exception Info
        //http://msdn.microsoft.com/en-us/library/office/jj669390.aspx
        var excepInfo = new PS.CalendarExceptionCreationInformation();

        // Append the year to the name to prevent future duplicates
        var exName = exceptions[i].Descriptor + " " + new Date(exceptions[i].Date).getFullYear();

        // Set the exception properties
        excepInfo.set_name(exName);
        excepInfo.set_start(exceptions[i].Date);
        excepInfo.set_finish(exceptions[i].Date);

        // Finally add the exception to the collection
        eCalBaseExcep.add(excepInfo);
    }

    // Update the collection
    eCalColl.update();

    // Step 3 Asynchronously execute the update
    projContext.executeQueryAsync(Function.createDelegate(this, function () {
        // Success update our grid and finish up
        this.grid.setSelectedRows([]);

        // Display the results and remove the progress msg
        SP.UI.Notify.addNotification("Exceptions added successfully", false);
        SP.UI.Notify.removeNotification(this.notifyMsg);

    }), Function.createDelegate(this, function (call, error) {
        // Handle Error
        SP.UI.Notify.removeNotification(this.notifyMsg);
        alert(error.get_message());
    }));
};
Final bit: Import Button
Okay we’re almost done, just one last thing to do and that is to handle the click of the import button. A bit of jQuery will handle that for us, and in which we need to do just one more thing which is to check for any duplicates being imported to prevent import errors.
Paste the following in the main code block of App.js (should be right after the ‘$(“#importBtn”).click(…’ function:
// Button to import selected exceptions
$("#importBtn").click(Function.createDelegate(this, function () {
	var selectedRows = holidaySync.grid.getSelectedRows();

	// Use helper function to check for any duplicates before importing
	var exceptionsToImport = Helpers.removeDuplicates(selectedRows, holidaySync.data);

	// Import the exceptions
	if (exceptionsToImport.length > 0) {
		holidaySync.addCalendarException(holidaySync.data.calendarId, exceptionsToImport);
	}
	else {
		// Mark all existing
		holidaySync.grid.setSelectedRows([]);
		alert("All selected exceptions already exist.");
	}
}));
What we need to do in that function is call our removeDuplicates helper function which was created back in part 1 of this series. The function will return a filtered array of exceptions that we can then pass as a parameter to our addCalendarException function.
Now we should be able to test it and see the following:
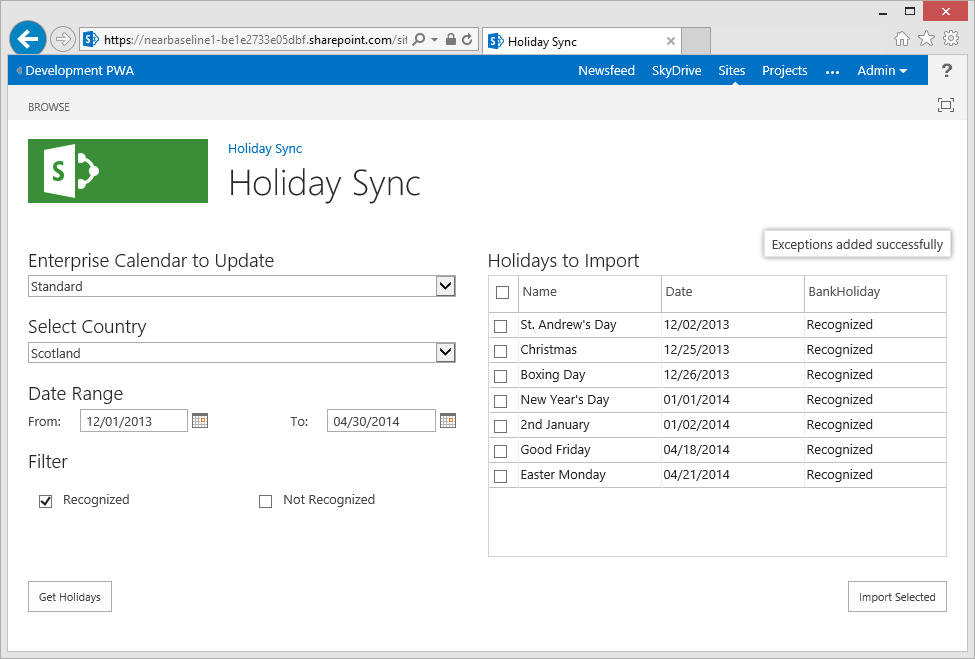
All Done
This app documented here is now available on the SharePoint App store, so please rate it if you use it!
Source Download / Repository
You can browse or download the full source code for the completed app on the following GitHub repository:
https://github.com/martinlaukkanen/holidaysync
by Martin Laukkanen | Feb 8, 2014 | Apps, HolidaySync
Holiday Sync is an App which allows the importing of public holidays from an online source, this app was developed for Project Conference 2014 to showcase JavaScript, read more about it here: Extending Project Online and on-premises with JavaScript Apps
Version 1.0.0.0 is available now on the SharePoint App Store.
See the Holiday Sync App page for support and more info on the App.
by Martin Laukkanen | Feb 8, 2014 | Apps, Development, How to
Following on from Part 1 of this series in which we setup our Holiday Sync app solution in Visual Studio including all pre-requisites, we now have a basic app web page looking the part and containing all controls functioning but without any actual data. In this next part we are going to look into getting that data into our app.
Part 2: Getting data into our Holiday Sync App
The Holiday Sync App is designed to update existing Project Server enterprise calendars with data retrieved from an external web service, so specifically our app will require the following data:
- From our Project tenant / instance we need enterprise calendar data
- From an external web service we require holiday data
Let’s look at each in turn to see what’s needed to retrieve and utilise the data.
Retrieving Enterprise Calendar Data
In order to update our Enterprise Calendars we firstly need to know some details about them including the names, GUIDs, etc. But secondly as mentioned in part 1 of this series when we looked at our helper script, we need to first remove any duplicates else our import will fail, so to do that we need to get a list of existing base calendar exceptions to compare against.
Getting enterprise data via REST endpoint
Now when working with Project Server data be it online or on-premises an extremely useful resource in 2013 is the REST endpoint, similar to the ODATA endpoints they enable you to quickly view the back-end data in Project Server or SharePoint.
To demonstrate this open your PWA tenant and browse to the following URL (note the _api/ProjectServer/ part which differs from the OData URL):
https://[mytenantname]/sites/devpwa/_api/ProjectServer/Calendars
And what you should see is something like this:
<?xml version="1.0" encoding="utf-8" ?>
<feed xml:base="https://*****.sharepoint.com/sites/devpwa/_api/" xmlns="http://www.w3.org/2005/Atom" xmlns:d="http://schemas.microsoft.com/ado/2007/08/dataservices" xmlns:m="http://schemas.microsoft.com/ado/2007/08/dataservices/metadata" xmlns:georss="http://www.georss.org/georss" xmlns:gml="http://www.opengis.net/gml">
<id>194a1d9e-fae6-4db7-8ef3-330508bd7ee2</id>
<title />
<updated>2014-02-02T21:48:33Z</updated>
<entry>
<id>https://****.sharepoint.com/sites/devpwa/_api/ProjectServer/Calendars('fb512eeb-027f-e311-be84-c48508b296a1')</id>
<category term="PS.Calendar" scheme="http://schemas.microsoft.com/ado/2007/08/dataservices/scheme" />
<link rel="edit" href="ProjectServer/Calendars('fb512eeb-027f-e311-be84-c48508b296a1')" />
<link rel="http://schemas.microsoft.com/ado/2007/08/dataservices/related/BaseCalendarExceptions" type="application/atom+xml;type=feed" title="BaseCalendarExceptions" href="ProjectServer/Calendars('fb512eeb-027f-e311-be84-c48508b296a1')/BaseCalendarExceptions" />
<title />
<updated>2014-02-02T21:48:33Z</updated>
<author>
<name />
</author>
<content type="application/xml">
<m:properties>
	<d:Created m:type="Edm.DateTime">2014-01-16T15:07:18.94</d:Created>
	<d:Id m:type="Edm.Guid">fb512eeb-027f-e311-be84-c48508b296a1</d:Id>
	<d:IsStandardCalendar m:type="Edm.Boolean">false</d:IsStandardCalendar>
	<d:Modified m:type="Edm.DateTime">2014-02-02T10:30:18.743</d:Modified>
	<d:Name>Night Shift</d:Name>
</m:properties>
</content>
</entry>
<entry>
<id>https://****.sharepoint.com/sites/devpwa/_api/ProjectServer/Calendars('b6635b2e-e747-4771-a78b-24f7509629d0')</id>
<category term="PS.Calendar" scheme="http://schemas.microsoft.com/ado/2007/08/dataservices/scheme" />
<link rel="edit" href="ProjectServer/Calendars('b6635b2e-e747-4771-a78b-24f7509629d0')" />
<link rel="http://schemas.microsoft.com/ado/2007/08/dataservices/related/BaseCalendarExceptions" type="application/atom+xml;type=feed" title="BaseCalendarExceptions" href="ProjectServer/Calendars('b6635b2e-e747-4771-a78b-24f7509629d0')/BaseCalendarExceptions" />
<title />
<updated>2014-02-02T21:48:33Z</updated>
<author>
<name />
</author>
<content type="application/xml">
<m:properties>
	<d:Created m:type="Edm.DateTime">2007-04-26T19:15:13</d:Created>
	<d:Id m:type="Edm.Guid">b6635b2e-e747-4771-a78b-24f7509629d0</d:Id>
	<d:IsStandardCalendar m:type="Edm.Boolean">true</d:IsStandardCalendar>
	<d:Modified m:type="Edm.DateTime">2014-02-02T09:57:25.097</d:Modified>
	<d:Name>Standard</d:Name>
</m:properties>
</content>
</entry>
</feed>
This shows the calendars in this particular instance of PWA, in short this is what you have in the published database in Project Server (TIP: A neat troubleshooting tool for any Admin as a matter of fact!). However one thing that’s missing above is the “BaseCalendarExceptions” data which is referenced as a link in the XML, for example “ProjectServer/Calendars(‘b6635b2e-e747-4771-a78b-24f7509629d0’)/BaseCalendarExceptions”.
Fortunately it’s easy enough to also get that in one query using the $expand REST option:
https://[mytenantname]/sites/devpwa/_api/ProjectServer/Calendars?$expand=BaseCalendarExceptions
Below is a snippet of an exception that is returned in addition to the above XML:
[snip]
<entry>
<id>https://****.sharepoint.com/sites/devpwa/_api/ProjectServer/Calendars('fb512eeb-027f-e311-be84-c48508b296a1')/BaseCalendarExceptions(0)</id>
<category term="PS.BaseCalendarException" scheme="http://schemas.microsoft.com/ado/2007/08/dataservices/scheme" />
<link rel="edit" href="ProjectServer/Calendars('fb512eeb-027f-e311-be84-c48508b296a1')/BaseCalendarExceptions(0)" />
<link rel="http://schemas.microsoft.com/ado/2007/08/dataservices/related/Calendar" type="application/atom+xml;type=entry" title="Calendar" href="ProjectServer/Calendars('fb512eeb-027f-e311-be84-c48508b296a1')/BaseCalendarExceptions(0)/Calendar" />
<title />
<updated>2014-02-02T22:44:25Z</updated>
<author>
<name />
</author>
<content type="application/xml">
<m:properties>
	<d:Finish m:type="Edm.DateTime">2013-12-25T00:00:00</d:Finish>
	<d:Id m:type="Edm.Int32">0</d:Id>
	<d:Name>Christmas 2013</d:Name>
	<d:RecurrenceDays m:type="Edm.Int32">0</d:RecurrenceDays>
	<d:RecurrenceFrequency m:type="Edm.Int32">1</d:RecurrenceFrequency>
	<d:RecurrenceMonth m:type="Edm.Int32">0</d:RecurrenceMonth>
	<d:RecurrenceMonthDay m:type="Edm.Int32">0</d:RecurrenceMonthDay>
	<d:RecurrenceType m:type="Edm.Int32">0</d:RecurrenceType>
	<d:RecurrenceWeek m:type="Edm.Int32">0</d:RecurrenceWeek>
	<d:Shift1Finish m:type="Edm.Int32">0</d:Shift1Finish>
	<d:Shift1Start m:type="Edm.Int32">0</d:Shift1Start>
	<d:Shift2Finish m:type="Edm.Int32">0</d:Shift2Finish>
	<d:Shift2Start m:type="Edm.Int32">0</d:Shift2Start>
	<d:Shift3Finish m:type="Edm.Int32">0</d:Shift3Finish>
	<d:Shift3Start m:type="Edm.Int32">0</d:Shift3Start>
	<d:Shift4Finish m:type="Edm.Int32">0</d:Shift4Finish>
	<d:Shift4Start m:type="Edm.Int32">0</d:Shift4Start>
	<d:Shift5Finish m:type="Edm.Int32">0</d:Shift5Finish>
	<d:Shift5Start m:type="Edm.Int32">0</d:Shift5Start>
	<d:Start m:type="Edm.DateTime">2013-12-25T00:00:00</d:Start>
</m:properties>
</content>
</entry>
[snip]
Once again that’s basically the raw data that we need in one simple URL request, simple isn’t it? Okay so how do you use that in the app?
Using a jQuery AJAX request to retrieve data
Now we need to use a bit of jQuery where-by we can create an AJAX request to simply download that data directly.
// Function to retrieve a list of Enterprise calendars and exceptions
HolidaySync.prototype.getEntCalData = function () {
    //Example: http://server/PWA/_api/ProjectServer/Calendars?$expand=BaseCalendarExceptions

    var url = _spPageContextInfo.webServerRelativeUrl + "/_api/ProjectServer/Calendars?$expand=BaseCalendarExceptions";

    $.ajax({
        url: url,
        type: "GET",
        context: this,
        contentType: "application/json",
        headers: { "ACCEPT": "application/json;odata=verbose" },
        success: function (data, status, xhr) {
            // Save our data
            this.data.entCalendars = data.d.results;

            // Populate our html dropdown list of calendars when data is ready
            for (var i = 0; i < this.data.entCalendars.length; i++) {
                $("#eCalendarSelect").append($('<option>', {
                    value: this.data.entCalendars[i].Id,
                    text: this.data.entCalendars[i].Name
                }));
            }
            // Also set the default value
            $("#eCalendarSelect").trigger("change");
        },
        error: function (error) {
            // Handle error
            alert("Error: " + error.statusText + " loading Enterprise Calendars");
        }
    });
};
The ajax function takes a few parameters, importantly:
- The URL – Which is identical to what we used above, ONLY that we have replaced our server name with the global property _spPageContextInfo.webServerRelativeUrl which equates to our App Domain (Not the tenant domain!)
- The content type which we set to JSON (more on this in a sec)
- And critically the success / failure handler functions to deal with the result
If we drill into the success function, we can see the following happening:
- Firstly we save our data back to the datamodel, notice here that because we can request JSON data we don’t need to do anything to the result but save it to our array previously instantiated (in part 1).
- Next we populate our html drop-down list with the data using a for loop and some basic jQuery.
- Finally we trigger the change event on the control to ensure that the view and model update.
Finally before we can preview we just have to start the above function in the appropriate place in our app, for that add the below line into the existing main code block (before the closing “});”) in the App.js file.
holidaySync.getEntCalData();
Now hit F5 to preview:
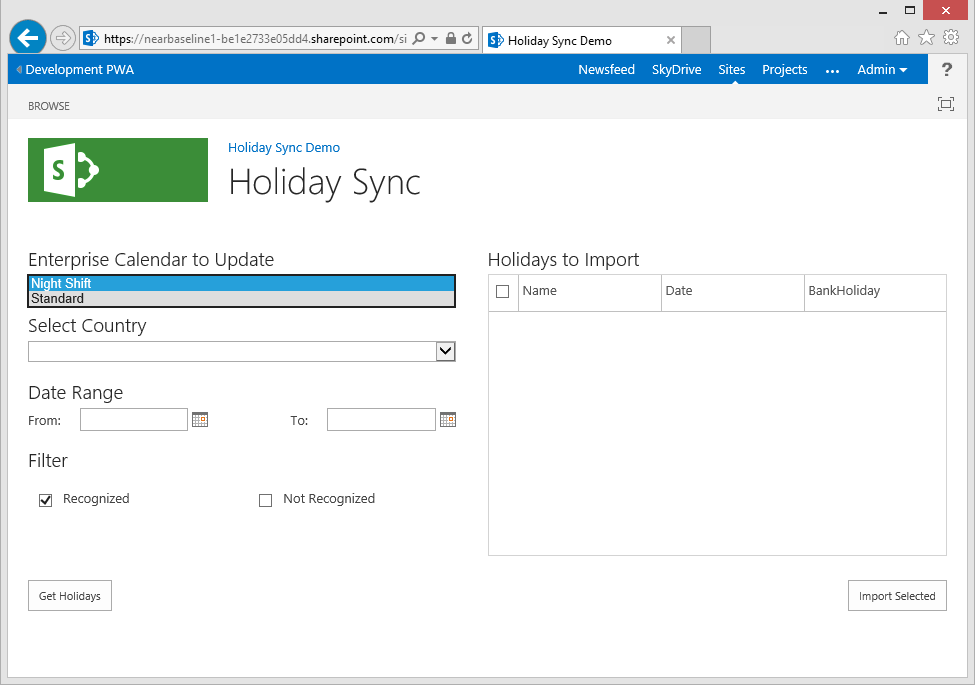
Our first drop-down is populated!
Retrieving External Web Service Data
Next we need to work with our external data provider, in this case I am using www.holidaywebservice.com for our holiday data, the service is free and provided as-is and suits our needs here (assuming you’re in one of the supported countries!). However in order to utilise a 3rd party web service we have to consider cross-domain scripting restrictions inherent to JavaScript.
SharePoint cross-domain scripting library
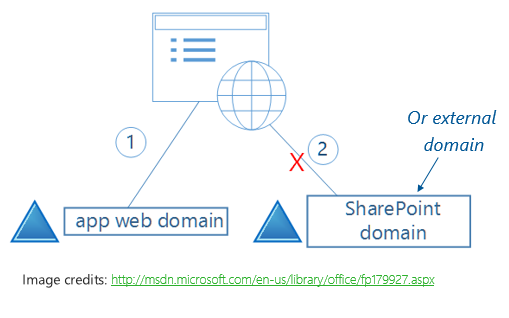
By design JavaScript which is running in a site in for example http://myapp.domain.com cannot communicate with data in something like http://someservice.com. This is to protect against a common vulnerability known as Cross-site scripting (XSS), so in order to use an external service we need to take extra steps.
Fortunately SharePoint provides us with a JSOM library that we can use to securely work with this restriction, it’s known as the Cross-domain scripting library, essentially it allows for our connection to be proxied via an endpoint in our app domain (in a SharePoint REST endpoint), therefore our request never leaves the current domain.
So the next piece of code we need to add to our App.js file is the following function;
// SharePoint Cross domain library helper function
HolidaySync.prototype.crossDomainCall = function (SPHostUrl, callUrl, successCallback, failureCallback) {
    // Use the Cross Domain library
    // Source: http://blogs.msdn.com/b/officeapps/archive/2012/11/29/solving-cross-domain-problems-in-apps-for-sharepoint.aspx
    $.getScript(SPHostUrl + "/_layouts/15/" + "SP.RequestExecutor.js", Function.createDelegate(this, function () {

        // First construct our JSOM request
        var clientContext = new SP.ClientContext.get_current();

        var crossDomainRequest = new SP.WebRequestInfo();

        crossDomainRequest.set_url(callUrl);
        crossDomainRequest.set_method("GET");

        var response = SP.WebProxy.invoke(clientContext, crossDomainRequest);

        // Execute our request with a callback function
        clientContext.executeQueryAsync(Function.createDelegate(this, function () {
            var statusCode = response.get_statusCode();

            // HTTP status success / failure determines which callback function to send our results to
            if (statusCode === 200) {
                // JavaScript functions are first-class objects (how cool!)
                successCallback(response.get_body());
            }
            else {
                failureCallback(statusCode, response.get_body());
            }
        }));
    }));
};
This helper function is one I sourced / adapted from Humberto Lezama’s blog Solving cross-domain problems in apps for SharePoint, essentially I have just parametized Humbertos’ work into a single function so that we can re-use it in the following functions in our solution.
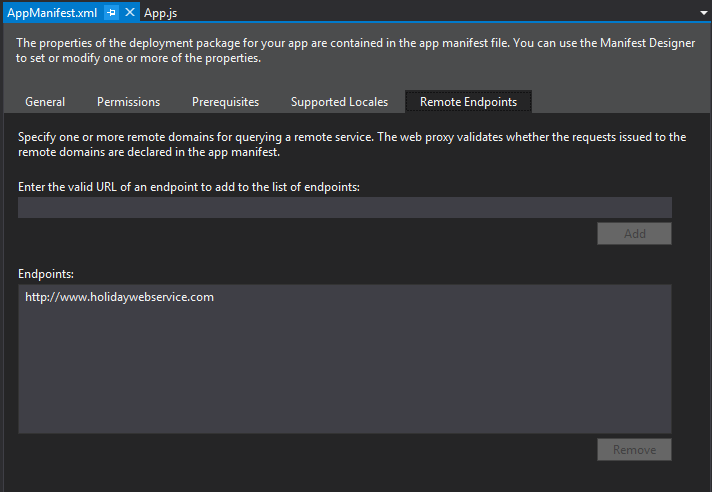
Enable the Remote Endpoint in App Manifest
Before we can use the above function there is one thing we need to do, which is to add our external URL (http://www.holidaywebservice.com) into the app manifest under Remote Endpoints, as follows;
Retrieve a list of Countries from the external service
Next we need to populate our Select Country drop-down with a list of countries available from our service, to do this paste in the following function which uses our cross domain helper;
// Get available countries from the web service
// Source: http://www.holidaywebservice.com/
HolidaySync.prototype.getCountries = function () {
    // Requires http://www.holidaywebservice.com in AppManifest Remote Endpoints

    var url = "http://www.holidaywebservice.com/HolidayService_v2/HolidayService2.asmx/GetCountriesAvailable";

    // Use the Cross Domain Helper
    this.crossDomainCall(this.urlTokens.SPHostUrl, url, Function.createDelegate(this, function (response) {
        // Save our data
        var xmlData = $.parseXML(response);

        //Using plugin: http://www.fyneworks.com/jquery/xml-to-json/
        var jsonData = $.xml2json(xmlData);
        this.data.countryCodes = jsonData.CountryCode;

        // Populate our dropdown list of Countries when data is ready
        for (var i = 0; i < this.data.countryCodes.length; i++) {
            $("#countrySelect").append($('<option>', {
                value: this.data.countryCodes[i].Code,
                text: this.data.countryCodes[i].Description
            }));
        }
        // Also set the default value
        $("#countrySelect").trigger("change");

    }), Function.createDelegate(this, function (status, error) {
        // Handle failures
        alert(error);
    }));
};
So the above function looks very similar to the jQuery AJAX function used previously, in short we are passing the function some parameters including;
- Our SharePoint host URL – not the App web, this time we need the actual tenant URL
- Our full external URL including the SOAP call (see www.holidaywebservice.com for more info on that)
- Then finally we have our success and failure handlers.
Now in this case our web service is returning XML data, so we need to do some conversion, for which I’ve used a simple jQuery plugin (http://www.fyneworks.com/jquery/xml-to-json/) once converted we populate our drop-down and trigger change to set our default value.
Again as with our getEntCalData function we add the following to the end of our main code block to trigger the function on start:
holidaySync.getCountries();
Retrieve the Holiday Data from external service
Now we’re ready to get the holiday data itself, paste in the following function;
// Get Holidays from Web Service
HolidaySync.prototype.getHolidaysForDates = function (fromDate, toDate, country) {
    var startDate = new Date(fromDate);
    var endDate = new Date(toDate);

    var url = "http://www.holidaywebservice.com/HolidayService_v2/HolidayService2.asmx/GetHolidaysForDateRange" +
        "?countryCode=" + country + "&startDate=" + startDate.toISOString() + "&endDate=" + endDate.toISOString();

    // Show a loading message
    this.notifyMsg = SP.UI.Notify.addNotification('<img src="/_layouts/images/loadingcirclests16.gif" style="vertical-align: top;"/> Loading...', true);

    this.crossDomainCall(this.urlTokens.SPHostUrl, url, Function.createDelegate(this, function (response) {
        // Save our data
        var xmlData = $.parseXML(response);

        //Using plugin: http://www.fyneworks.com/jquery/xml-to-json/
        var jsonData = $.xml2json(xmlData);

        // Update the grid contents
        Helpers.updateGridContents(jsonData.Holiday, this.data.holidayData, this.grid);

        // Remove the notification msg
        SP.UI.Notify.removeNotification(this.notifyMsg);

    }), Function.createDelegate(this, function (status, error) {
        // Handle failures
        SP.UI.Notify.removeNotification(this.notifyMsg);
        alert(error);
    }));
};
You can see a few things happening there, firstly we are taking some parameters which will be populated with our to and from dates as well as our selected country, then once again we call the cross domain helper function with our constructed SOAP request.
Just one extra thing I have added to this function is the notification handlers, that’s using the SharePoint JSOM to display and remove a neat notification message during retrieval, so we don’t have any uncomfortable pauses in our UI.
Lastly handle our button click and preview!
Almost done now, only one thing left and that is to call the above function when we click the Get Holidays button! Paste the following event handler into our Main function;
// Button to get calendar exceptions
$("#getDataBtn").click(Function.createDelegate(this, function () {
	if (!!holidaySync.data.fromDate && !!holidaySync.data.toDate && !!holidaySync.data.country)
		holidaySync.getHolidaysForDates(holidaySync.data.fromDate, holidaySync.data.toDate, holidaySync.data.country);
	else
		alert("Please select dates.");
}));
Other than handling the click event we’re just doing some error checking to ensure all parameters are selected.
Done! Hit F5 to preview.
First select the country (cool!), then pick the to and from dates, then click Get Holidays:
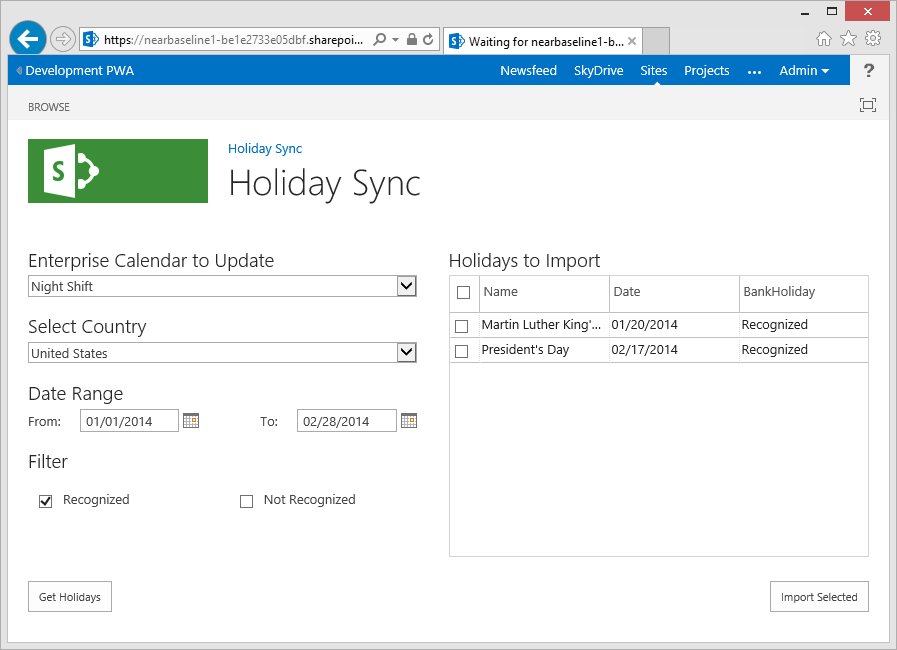
Nice.
Next up, part 3: Importing data into Enterprise Calendars from our App
Now that we have our holiday data we can finally update our enterprise calendars, check back really soon to see the final part of this series!
Source Download / Repository
Download the complete source to the above code here:

HolidaySyncDemo2.zip
Additionally for those of you who like to skip to the end of this series, you can browse or download the full source code for the completed app on the following GitHub repository:
https://github.com/martinlaukkanen/holidaysync
by Martin Laukkanen | Feb 7, 2014 | Apps, Development, How to
This is the first part of a three part series on extending project online / on-prem using JSOM, see this post for an index of all three parts to this as I write them.
Part 1: Getting started creating the Holiday Sync App
Let’s begin with a user story:
I want to import holiday exceptions into my enterprise calendars
Our solution:
We’re going to create a SharePoint hosted App for Project Server to do the following:
- List enterprise calendars in PWA
- Get holiday data from an external web service
- Allow us to select holidays to we want to import
- Provide an import button to perform the import
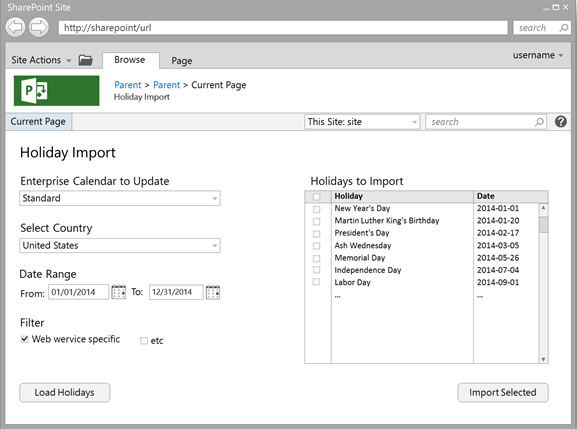
Here’s a quick wireframe created in PowerPoint to demonstrate what we’re trying to achieve (picture worth a dozen design docs?):
Software Requirements
To get started you’ll need a few things:
- Visual Studio 2012 (or higher)
I’m going to use VS2013 so you will need Visual Studio to work with the attached source files, but it would be possible to use the “Napa” Office 365 development tools or other tools for this.
- Web Essentials for Visual Studio
Highly recommended but not required.
- Development environment (either of these):
- Project Online subscription
- Local Project Server 2013 development server
Wherever you’re debugging, make sure to enable “sideloading” of apps on PWA via PowerShell.
And finally note that Project Online is not currently included in the Office365 developer subscription so you’ll need a Project Online tenant in that case, and I’d recommend creating a separate PWA instance for development as enabling side-loading changes the homepage and enables features which should not be enabled on Production sites.
Getting Started with our App in Visual Studio
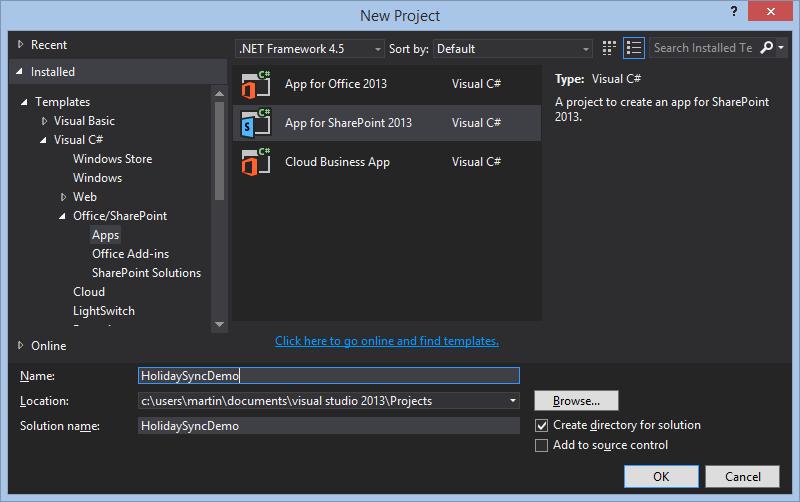
The first step is to create our blank SharePoint app in Visual Studio:
Second, I’m using a Project Online instance for debugging, but wherever you use make sure to set SharePoint-hosted for the hosting type:
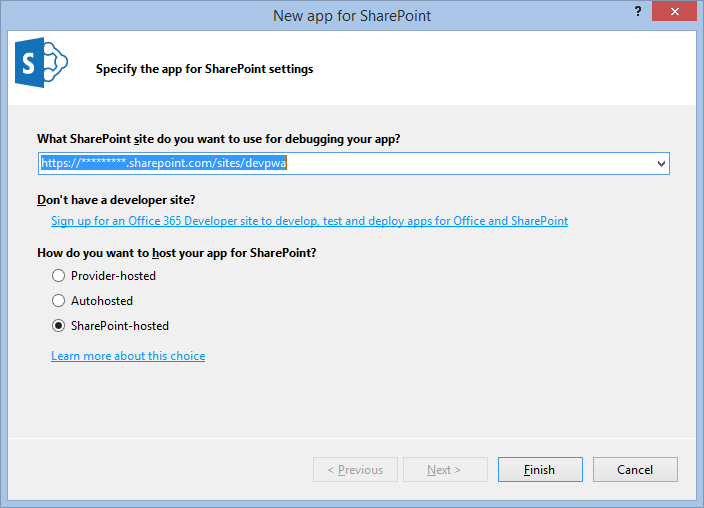
This will give you the vanilla SharePoint App template, setup for our SharePoint-hosted JavaScript app, great now let’s start adding what we need, first up libraries and add-ins.
Libraries and Add-in’s
For our app we will be adding the following:
- Project Server JSOM library (ps.js)
- jQuery – Used extensively throughout solution.
- jQuery UI – Used for the date picker UI controls.
- Slick Grid – Used for our results grid.
Plus a few miscellaneous plugins:
The main extra library used is the grid control (Slick Grid) where actually any grid would do here as our requirements are really simple (JS Grid maybe?), but I like Slick Grid as it’s free (MIT license) and it’s fast and super easy to setup and use.
So with that list in mind let’s update our Default.aspx file, insert the following below the sp.js script line:
<script type="text/javascript" src="/_layouts/15/ps.js"></script>
<script type="text/javascript" src="../Scripts/libs/jquery-ui-1.10.3.custom.min.js"></script>
<script type="text/javascript" src="../Scripts/libs/jquery.xml2json.js"></script>

<link type="text/css" href="../Content/jquery-ui-1.10.3.custom.css" rel="stylesheet" />
<link type="text/css" href="../Content/slick.grid.css" rel="stylesheet" />

<script type="text/javascript" src="../Scripts/libs/jquery.event.drag-2.2.js"></script>
<script type="text/javascript" src="../Scripts/libs/slick.core.js"></script>
<script type="text/javascript" src="../Scripts/libs/slick.grid.js"></script>
<script type="text/javascript" src="../Scripts/libs/slick.checkboxselectcolumn.js"></script>
<script type="text/javascript" src="../Scripts/libs/slick.rowselectionmodel.js"></script>
<script type="text/javascript" src="../Scripts/libs/slick.dataview.js"></script>
To download the files in the libs folder see the bottom of this article, or you could even download them directly from the links above.
HTML and Stylesheets
I’m not a front end developer so I’ll freely admit that the following two parts took me longer than the rest of this App to write! But looks are important so it’s time well spent I’d say.
HTML for our Single Page App
Add this to the ContentPlaceHolderID=”PlaceHolderMain” section of the Default.aspx file;
<div class="HalfPage">
	<div class="ContentPane">
		<h2>Enterprise Calendar to Update</h2>
		<select id="eCalendarSelect">
		</select>

		<h2>Select Country</h2>
		<select id="countrySelect">
		</select>

		<h2>Date Range</h2>
		<div class="DatePickers">
			<div class="HalfPage">
				<label>From:</label>
				<input type="text" id="fromDatePicker" />
			</div>

			<div class="HalfPage">
				<span class="RightHalf">
					<label>To:</label>
					<input type="text" id="toDatePicker" />
				</span>
			</div>
		</div>

		<h2>Filter</h2>
		<div id="filterInputs" class="FilterOpts">
			<ul class='listColumns'>
				<li><input id='Recognized' type='checkbox' value='Recognized' checked='checked' />Recognized</li>
				<li><input id='NotRecognized' type='checkbox' value='NotRecognized' />Not Recognized</li>
			</ul>
		</div>
	</div>
</div>

<div class="HalfPage">
	<h2>Holidays to Import</h2>
	<div id="grid" class="grid"></div>
</div>

<div>
	<input type="button" id="importBtn" class="ImportButton" value="Import Selected" />
	<input type="button" id="getDataBtn" class="RetrieveButton" value="Get Holidays" />
</div>
So in our HTML, we need a two column page with our required select and input elements with labels to identify them and also I’ve included the required filter options based on our holiday web service which will come back to later. That should be dynamic like the other controls which will be created in the JavaScript but that suits our purposes for now. Finally we have Div place holder for our grid control and some action buttons.
Most of the base styling including headers, fonts and labels are borrowing the SharePoint default styles available so the intention is to have our app look like native SharePoint / Project functionality. For the grid and other classes used I have a bit of CSS to add to the SlickGrid Excel style css theme that is available for that library, but I have modified it a bit as you can see in the CSS.
CSS Style Sheet
Place the following in the App.css:
.HalfPage {
    width:50%;
    float:left;
}
.HalfPage h2 {
    clear: left;
    padding: 16px 0 4px;
}

.ContentPane {
    margin: 0 32px 16px 0;
}
.ContentPane select {
    width:100%;
}

.DatePickers label {
    margin-right: 16px;
}
.DatePickers input {
    width: 45%;
}
.RightHalf {
    float:right;
    text-align: right;
}

.ui-datepicker-trigger {
    vertical-align: middle;
    padding-left: 4px;
}

.FilterOpts input {
    margin: 0 8px;
}

.ImportButton {
    margin-top: 24px;
    float:right;
}

.RetrieveButton {
    margin-top: 24px;
    float:left;
    margin-left: 0px !important;
}

.listColumns {
    -moz-columns:  2;
    -webkit-columns:  2;
    columns:  2;
    list-style: none;
    padding-left:0px;
}

#grid {
  outline: 0;
  border: 1px solid lightgrey;
  height: 280px;
}

.slick-viewport {
    overflow-x: hidden !important;
}

.slick-header-column.ui-state-default {
    padding-top: 6px;
    height: 26px;
}

.slick-header-columns {
    border-bottom: 1px solid silver;
}

.ui-state-default {
    border: none;
    background: none;
    font-family: "Segoe UI","Segoe",Tahoma,Helvetica,Arial,sans-serif;
    font-size: 13px;
}

.ui-widget {
    font-family: "Segoe UI","Segoe",Tahoma,Helvetica,Arial,sans-serif;
    font-size: 13px;
}
Before you comment on my ugly CSS, lets just move along! :)
Helper.js JavaScript helper script
I’ve separated out our App code into just two files to keep this simple, the Helper.js file includes a number of functions that do as the name suggests, things like browser compatibility shims are ideal here as we will load this file before our main JS file.
Summary of helper functions:
- Date.prototype.toISOString() – Used to support IE8 as it doesn’t support the ISO date string format.
- Helpers.urlToArray() – Used to convert our URL query strings into an array of key / values.
- Helpers.setupGrid() – The first part of our Slick Grid code used to setup the grid and required plug-ins.
- Helpers.bankHolidayFilter() – Our Slick Grid filter function.
- Helpers.dateTimeFormatter() – Our grid date formatter, for this I have hard coded to US format, but I would suggest using a library like Moment.js to help do this properly for all regions.
- Helpers.updateGridContents() – Used to update our grid once we have transformed our holiday data as required.
Create a new file in your solution called Helpers.js and add the following;
'use strict';

///
/// Helpers
///
// Shim for IE8 to support date formatter
if (!Date.prototype.toISOString) {
    (function () {

        function pad(number) {
            if (number < 10) {
                return '0' + number;
            }
            return number;
        }

        Date.prototype.toISOString = function () {
            return this.getUTCFullYear() +
              '-' + pad(this.getUTCMonth() + 1) +
              '-' + pad(this.getUTCDate()) +
              'T' + pad(this.getUTCHours()) +
              ':' + pad(this.getUTCMinutes()) +
              ':' + pad(this.getUTCSeconds()) +
              '.' + (this.getUTCMilliseconds() / 1000).toFixed(3).slice(2, 5) +
              'Z';
        };

    }());
}

// Static helper class
var Helpers = function () { };
Helpers.urlToArray = function (url) {
    var request = {};
    var pairs = url.substring(url.indexOf('?') + 1).split('&');
    for (var i = 0; i < pairs.length; i++) {
        var pair = pairs[i].split('=');
        request[decodeURIComponent(pair[0])] = decodeURIComponent(pair[1]);
    }
    return request;
};

/// Grid helpers
// Setup our Grid
// Using https://github.com/mleibman/SlickGrid
Helpers.setupGrid = function (grid, options, columns, data) {
    var checkboxSelector = new Slick.CheckboxSelectColumn({
        cssClass: "slick-cell-checkboxsel"
    });
    columns.unshift(checkboxSelector.getColumnDefinition());

    grid = new Slick.Grid("#grid", data, columns, options);
    grid.setSelectionModel(new Slick.RowSelectionModel({ selectActiveRow: false }));
    grid.registerPlugin(checkboxSelector);
    data.setFilter(Helpers.bankHolidayFilter);

    return grid;
}

// Grid filter function
Helpers.bankHolidayFilter = function (item, args) {
    var inArray = $.grep(args.BankHoliday, function (value) { return value === item.BankHoliday; });

    if (inArray.length > 0) {
        return true;
    }
    return false;
};
Helpers.dateTimeFormatter = function (row, cell, value, columnDef, dataContext) {
    // Basic US date formatter with fallback to ISO
    var dt = new Date(value);
    if (isNaN(dt))
        return value.split("T")[0];
    else
        return dt.format("MM/dd/yyyy");
};

// Update the grid contents
Helpers.updateGridContents = function (holidays, gridData, grid) {
    // Setup grid filters
    gridData.setFilterArgs({
        BankHoliday: $("#filterInputs input:checked").map(function () { return this.value; }).get()
    });

    // First need to add a uniquie identifier to the data set (to support SlickGrid filtering)
    for (var i = 0; i < holidays.length; i++) {
        holidays[i].id = i;
    }

    // Now use the data
    gridData.setItems(holidays);

    // Redraw the grid
    gridData.refresh();
    grid.invalidateAllRows();
    grid.render();
    grid.resizeCanvas();
}
Finally we have a remove duplicates function that I will go into a little more detail on as it relates to our JSOM import that we’ll be adding later, so add the following function to the end of the Helper.js file.
// Remove duplicate calendar exceptions
Helpers.removeDuplicates = function (selectedRows, data) {
    var exceptionsToImport = [];

    // Use jQuery grep function to get our selected enterprise calendar
    var entCalendar = $.grep(data.entCalendars, function (cal) {
        return cal.Id === data.calendarId;
    })[0];

    // Prepare the array of exceptions excluding duplicates
    for (var i = 0; i < selectedRows.length; i++) {
        // Get this selected row from the Grid
        var selectedHoliday = data.holidayData.getItem(selectedRows[i]);

        // Ensure that our exception date does not overlap with any existing exceptions
        var alreadyExist = $.grep(entCalendar.BaseCalendarExceptions.results, function (excep) {
            return excep.Finish <= selectedHoliday.Date && excep.Start >= selectedHoliday.Date;
        });

        if (alreadyExist.length === 0) {
            // Last check to make sure we don't add the same date twice
            var newException = $.grep(exceptionsToImport, function (item) {
                return item.Date === selectedHoliday.Date;
            });

            if (newException.length === 0)
                exceptionsToImport.push(selectedHoliday);
        }
    }

    return exceptionsToImport;
}
From testing it was clear that the following preconditions in Project Server exist which affect our app;
- No exceptions can overlap in a single base calendar.
- All exceptions must have a unique name in a single base calendar.
So our remove duplicates function ensures the above by doing the following;
- First looping through our selected rows array.
- Getting the item in each row and getting a reference to our enterprise calendar.
- Comparing the Start and Finish dates of our exception to ensure they do not overlap with any existing BaseCalendarExceptions (note that we’ll be populating this data in Part 2 of this series) – I’m using the jQuery Grep function for this as it’s quite flexible for this kind of thing.
- Then finally add this exception to our output array, after a quick check to ensure that we haven’t already added it with another name.
Now that we have all of our helpers in add a reference to the Helper.js file in the Default.aspx pointing to wherever you created your file, for example:
<script type="text/javascript" src="../Scripts/Helpers.js"></script>
Note: Ensure that the above line is placed ABOVE the App.js script reference!
App.js Main JavaScript file outline
For now we only have our basic structure and functionality in here, specifically I’m using the constructor prototype pattern in JavaScript here to clearly define our namespace and structure our code accordingly, trust me it might look more complex compared with many examples out there, but once you start working with asynchronous event based functions you really need to know where your this is! (Not to mention keeping the global context clean)
///
/// Namespace & constructor
///
var HolidaySync = function () {
    // Instance data
    this.urlTokens = Helpers.urlToArray(location.href);
    this.data = new HolidaySync.DataModel();

    // Grid configuration
    this.grid = undefined;
    this.columns = [
        { id: "Name", name: "Name", field: "Descriptor" },
        { id: "Date", name: "Date", field: "Date", formatter: Helpers.dateTimeFormatter },
        { id: "BankHoliday", name: "BankHoliday", field: "BankHoliday" }
        ];
    this.options = {
        enableCellNavigation: true,
        syncColumnCellResize: true,
        forceFitColumns: true
    };
};
So our first few lines to add to App.js declare our namespace and some instance properties, most of which relates to our Slick Grid (options and columns etc). We also have an instance of our DataModel instantiated which is done using the following function;
///
/// Data Model
///
HolidaySync.DataModel = function () {
    this.entCalendars = {};
    this.countryCodes = {};

    this.calendarId = '';
    this.country = '';
    this.fromDate = '';
    this.toDate = '';

    // Grid data
    this.holidayData = new Slick.Data.DataView();
};
Now that we have our “Public properties” I have a main function at the top with just a few lines for the moment:
///
/// Main code block, begin once the DOM is loaded
///
$(document).ready(function () {
    // Instantiate our object
    var holidaySync = new HolidaySync();

    // Setup our Grid
    // Using https://github.com/mleibman/SlickGrid
    holidaySync.grid = Helpers.setupGrid(holidaySync.grid, holidaySync.options, holidaySync.columns, holidaySync.data.holidayData);

    // Setup our page controls and events
    holidaySync.setupPageControls();

});
In there we instantiate our namespace defined above, then start calling some helper functions to setup our grid (defined in Helpers.setupGrid()) and then to setup our page using the following function:
// Function to wire-up our UI
HolidaySync.prototype.setupPageControls = function () {

    // Create our jQuery UI Date picker controls
    $("#fromDatePicker").datepicker({
        showOn: "button",
        buttonImage: "/_layouts/15/images/calendar.gif",
        buttonImageOnly: true,
        onSelect: Function.createDelegate(this, function (dateText) {
            this.data.fromDate = dateText;
        })
    });

    $("#toDatePicker").datepicker({
        showOn: "button",
        buttonImage: "/_layouts/15/images/calendar.gif",
        buttonImageOnly: true,
        onSelect: Function.createDelegate(this, function (dateText) {
            this.data.toDate = dateText;
        })
    });

    // Setup our page event handlers
    $("#countrySelect").change(Function.createDelegate(this, function (event, data) {
        this.data.country = $("#countrySelect option:selected")[0].value;
    }));
    $("#eCalendarSelect").change(Function.createDelegate(this, function (event, data) {
        this.data.calendarId = $("#eCalendarSelect option:selected")[0].value;
    }));
};
This function is all jQuery and creates our date pickers and change events on our drop-down select boxes. Note the context here, ie this.data.*** as we are on our prototype these controls asynchronously update our DataModel in this instance (hence why this is not in the static helper class).
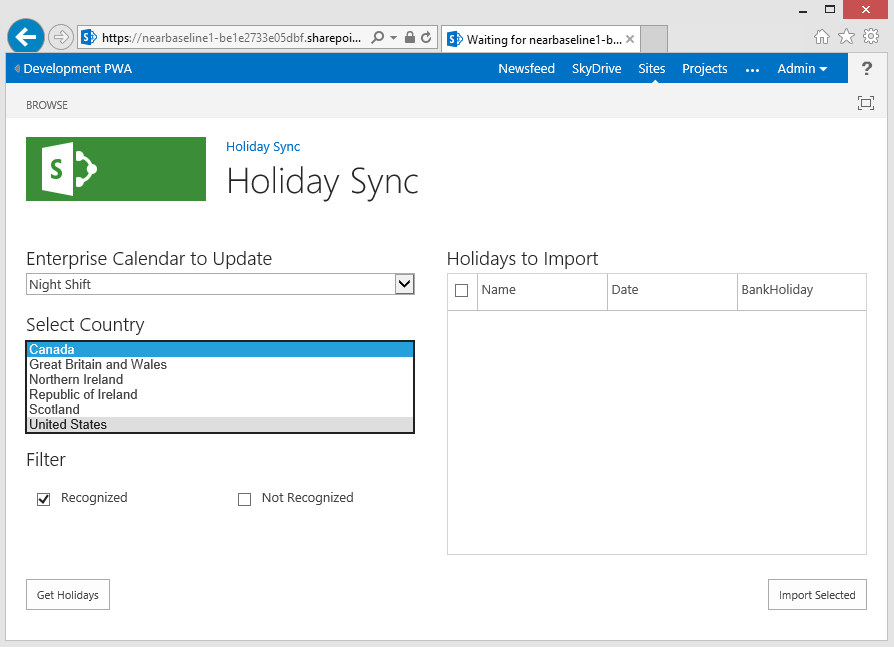
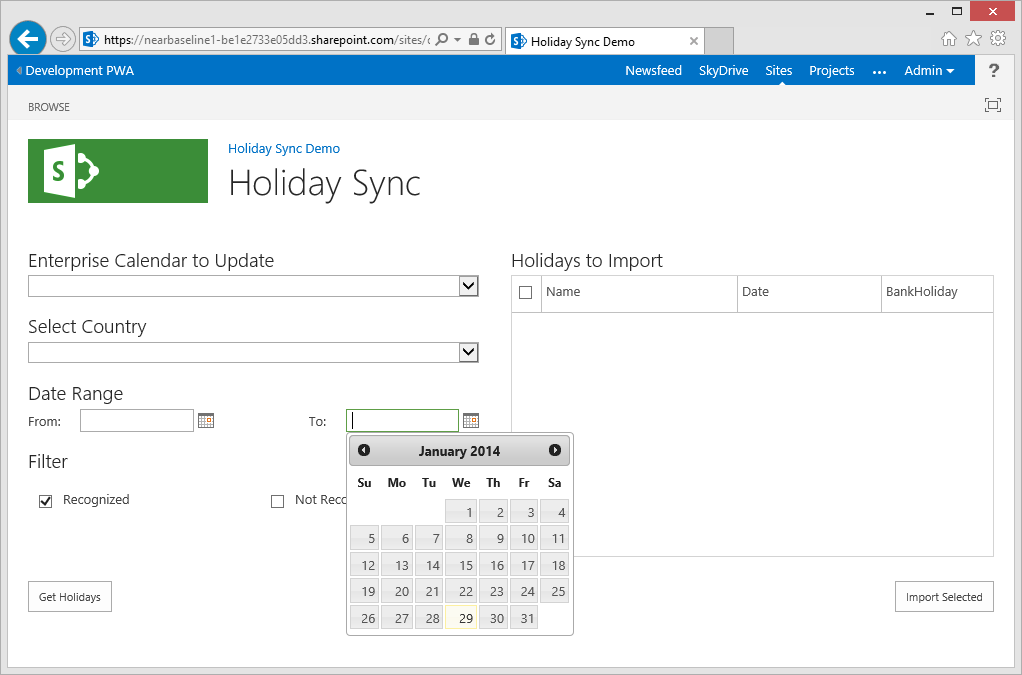
With the above added you should now be able to preview the app! Nothing much will happen yet, but it should look pretty complete visually and all of our controls should function:
Next up, part 2: Getting data into our Holiday Sync App
Now that we have our App structure, next we need to work with some data, so check back in the next day or so for Part 2 of this series.
Source Download / Repository
Download the complete source to the above code here:
HolidaySyncDemo1.zip
Additionally for those of you who like to skip to the end of this series, you can browse or download the full source code for the completed app on the following GitHub repository:
https://github.com/martinlaukkanen/holidaysync