by Martin Laukkanen | Dec 9, 2013 | Development, How to, SharePoint 2013
This is one of the new features of SharePoint 2013 that I have been looking forward to trying out since I first read about it; as someone who has often uses JavaScript to enhance the usability of Project Server JSLink is a perfect feature to make these customisation’s simply and in a supportable way.
JSLink in Action
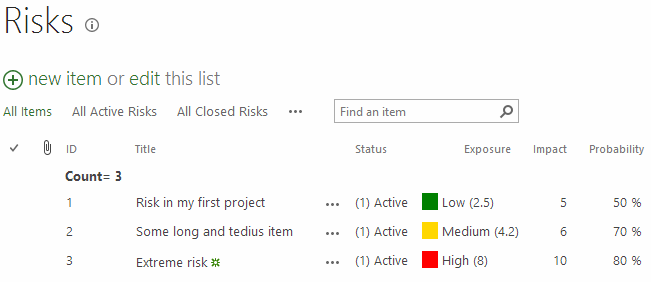
Check out my Exposure column on an otherwise default Project Site risk list! :)
JSLink enables the client-side rendering to be customised with just about any JavaScript or html changes that you think of, and better yet not only does it apply to views, but also New and Edit forms. For me that means I will probably never suggest InfoPath forms to a customer again!
Example Updating the Project Site Template
The screenshot above shows a simple example of a JSLink script configured on the project site out-of-the-box Risks list, to demonstrate how to do that quickly and easily against an existing list (or your Project Workspace Site template), first you need a bit of JavaScript:
JSLink script riskColor.js
Type.registerNamespace('CustomFormat');
CustomFormat.riskColor = function () {
var riskFieldsContext = {};
riskFieldsContext.Templates = {};
riskFieldsContext.Templates.Fields = {
"Exposure": { "View": CustomFormat.exposureColourTemplate }
};
SPClientTemplates.TemplateManager.RegisterTemplateOverrides(riskFieldsContext);
}
// This function provides the rendering logic for list view
CustomFormat.exposureColourTemplate = function(ctx) {
var fieldValue = ctx.CurrentItem[ctx.CurrentFieldSchema.Name];
if (parseFloat(fieldValue) > 7) {
return "<span style='background-color : red'> </span> High (" + fieldValue + ")";
}
else if (parseFloat(fieldValue) > 4) {
return "<span style='background-color : gold'> </span> Medium (" + fieldValue + ")";
}
else {
return "<span style='background-color : green'> </span> Low (" + fieldValue + ")";
}
}
//CSR-override for MDS disabled site
CustomFormat.riskColor();
if (typeof _spPageContextInfo != "undefined" && _spPageContextInfo != null) {
// CSR-override for MDS enabled site
RegisterModuleInit(_spPageContextInfo.siteServerRelativeUrl + "/SiteCollectionDocuments/riskColor.js", CustomFormat.riskColor);
}
In summary what is happening is the following:
On line 8 inside the CustomFormat.riskColor() function I define the field names which we want to customise and specify the formatting callback function for the type of customisation, in this case we are customising the “View” but we could use “DisplayForm”, “NewForm” or “EditForm” here also.
Two things to note here, firstly make sure you use the Internal Name of your field, so for instance if you created a custom column called “Risk Rating” then that would be “Risk_x0020_Rating”, secondly you can specify as many fields / columns by name here as you want each with a separate formatting function.
For more details on JSLink and all the other options available I’d recommend the following reading:
Next from line 19 to 26 in the CustomFormat.exposureColorTemplate() function I simply return our modified HTML based on the value of the field in question, in this example I’m comparing the number against three arbitrary values for High, Medium and Low, then returning a html string including a colour and some text to emphasize the value.
Finally and thanks to Wictor Wilen for his article on fixing the issues caused by MDS (SharePoint’s Minimal Download Strategy feature) I’m registering and then executing the script properly when called.
Registering the JSLink Script
Now that we have our script, we just need to register it in our site template, so to do so first save your script somewhere central in your site collection, I personally like Site Collection Documents under PWA, but wherever it is make sure everyone has access.
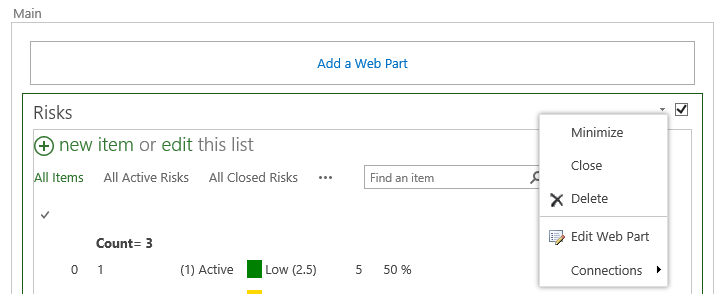
Secondly open your Risks list view and Edit Page from the SharePoint menu. With the page in Edit mode click the dropdown arrow for the Risks list web part and select Edit Web Part:
Now in the Web Part Properties expand Miscellaneous and locate the JS Link field:
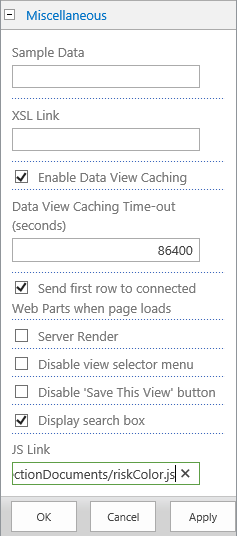
The full path I’m using is:
~sitecollection/SiteCollectionDocuments/riskColor.js
This path also is referenced at the bottom of the script as _spPageContextInfo.siteServerRelativeUrl + “/SiteCollectionDocuments/riskColor.js” so make sure to set both correctly.
NOTE: I’ve found this step is critical, the “~sitecollection” token is REQUIRED in the web part misc properties! At least in my case I was able to consistently cause IE to throw script errors if I tried to use a relative path like /PWA/SiteCollectionDocuments/riskColor.js! It did work in Chrome so maybe it is something in IE? Either way you can replace that with ~site ,or ~layouts as required.
Finally save your webpart configuration and it should immediately work.
Final Words
A few things; firstly double check the URL using in the Web Part properties and make certain to specify the path correctly in both the script and the web part properties. If you noticed the views fail (I did many times) then double check the note above about the ~sitecollection token.
Secondly because we are using the out-of-the-box Risks list we must add this JS Link script reference to every view and web part display of our Risks list.
Thirdly clear your browser cache! This one had me stumped as it seemed like none of my changes were working when in fact the script changes were not being refreshed, I found disabling the cache (easy in F12 mode in Chrome) made testing this super easy.
Finally for a bunch of cool examples of JSLink in action don’t forget to have a look at:
http://code.msdn.microsoft.com/office/Client-side-rendering-JS-2ed3538a
I hope you find this useful.
by Martin Laukkanen | Oct 21, 2013 | How to, Project 2013
If you’ve worked with large lookup tables in Project Server before you know how unwieldy they can get very quickly, in 2013 the page control you use now includes a nice search feature to help but the default four lines displayed really doesn’t show much! See this example where you can see the scroll bar on the right is already very cramped:
Modifying the List Size with JavaScript
To give some more flexibility with the size I have written the following JavaScript (jQuery actually) to increase the size of a list of specific lookup tables when opened on the PDP:
<script src="//ajax.googleapis.com/ajax/libs/jquery/1.10.2/jquery.min.js">
</script>
<script>
function resizeLKTables() {
	setTimeout(function () {
		var incHeight = 150;
		var ltId = ['Blueprint Deliverables', 'Definition Deliverables'];

		for (var i = 0; i < ltId.length; i++) {
			var ltDiv = $("input[title='" + ltId[i] + "']").parent().children("div");

			ltDiv.height(175 + incHeight);
			ltDiv.find('div.outer-container').height(168 + incHeight);
			ltDiv.find('div.outer-container').find('div.results-padder').height(88 + incHeight);
			ltDiv.find('div.outer-container').find('div.general-results').height(86 + incHeight);
		}
	},50);
}

$('button').on("click", resizeLKTables);
</script>
The result

Much better.
Script Usage
To use this script copy the script source above and save into notepad as something like “resizetables.js“, now on lines 6 and 7 you need to update the two variables used:
- incHeight is the number of pixels to add to all of the specified lookup tables.
- ltId is a comma separated list of Custom Field names to increase the size of.
Once updated, upload the script somewhere in PWA (Site Assets maybe) then edit your PDPs and add a content editor webpart to the bottom of the page which links to your uploaded resizetables.js file.
Enjoy!
by Martin Laukkanen | May 1, 2013 | How to, PowerShell, Project 2013
A few people have written about PowerShell provisioning of PWA in 2013, see here and here, both reference this TechNet source. However if you’re anything like me you might find these confusing! Coming from 2010 it seems that everything has changed, so after struggling a bit using the above three references trying to update my old automated PWA deployment scripts I figured that it can’t hurt to have one more guide online covering the process.
Look No Site Collection
Firstly though, one of the great things about 2013 is that PWA is now uncoupled from its Site Collection, basically /PWA no longer needs to be a Site Collection but can be any regular site.
Esoteric as that may sound it means that we no longer have this odd divide where Project data such as Project Sites live in various “SharePoint Intranet” site collections and PWA has to be in it’s own isolated space with different users, permissions, features, etc. Clearly this is geared towards supporting SharePoint permissions mode and generally making Project more SharePoint friendly, but combined with those nifty new license management features things become very much easier for many of us dealing with real world deployment scenarios.
This also has the added bonus of making it easier to provision PWA at the root site collection (in a more standard way – ick Site Collection host headers!).
Get to the setup
The challenge I had with the scripted setup links above was that they seemed to be missing something, for instance the TechNet article misses the whole site collection creation part and so then confuses things by splitting off into a separate article on creating PWA in an existing site collection? Is it just me or was that really confusing?
Anyway here’s my PowerShell script for provisioning a new PWA instance in a new Site Collection where the root site collection contains a Team Site and PWA is in the familiar location /PWA.
$SiteUrl = "https://"+$HostHeader
$PWASiteUrl = "https://"+$HostHeader+$PWAPath
$SiteCollectionOwner="i:0#.w|domain$($AdminUser)"
$SecondaryOwnerAlias=""
$PWADatabase="ProjectWebAppDB"
$DatabaseServer = "sqlservername"
$PWAAbbreviation = "PWAInstance1"

$svcApp = Get-SPServiceApplication | ? {$_.TypeName -eq 'Project Application Services'}
$webapp = Get-SPWebApplication -Identity $SiteUrl


Write-Host "Creating Project Server database:" $PWADatabase
New-SPProjectDatabase -Name $PWADatabase -ServiceApplication $svcApp `
    -DatabaseServer $DatabaseServer -Tag $PWAAbbreviation `
    -ErrorVariable err
if ( $err ) {
    write-host "An Error Occured: " $err -ForegroundColor Red
    break
}


Write-Host "Creating Team Site root for PWA" $SiteUrl " Owner:" $SiteCollectionOwner
$site = New-SpSite -url $SiteUrl `
    -owneralias $SiteCollectionOwner `
    -SecondaryOwnerAlias $SecondaryOwnerAlias `
    -ErrorVariable err
if ( $err ) {
    write-host "An Error Occured: " $err -ForegroundColor Red
    break
}

Write-Host "Creating PWA Web: " $PWASiteUrl " Owner:" $SiteCollectionOwner
$web = New-SPweb -URL $PWASiteUrl -Template pwa#0

$web=Get-SPWeb $SiteUrl
$web.Properties["PWA_TAG"] = $PWAAbbreviation
$web.Properties.Update()

Write-host "Enabling PWASite features..."
Enable-SPFeature pwasite -URL $SiteUrl
I lifted that from my mass deployment script (woo 2,600 lines and counting) so after my little rant above please excuse me if I forgot to declare one of the variables or something.
Hope this helps someone!
This article is republished with permission here: EPMonDemand Blog
by Martin Laukkanen | Apr 1, 2010 | Project 2010
Been reviewing the MS documentation on 2010 in preparation for my first production 2010 deployment, and found this little titbit in this TechNet Article under ‘Enable the common language runtime’.
Use the following SQL script to improve Project Server performance, quote: “Enabling the common language runtime provides a significant improvement in performance for custom field operations.”
sp_configure ‘clr enabled’, 1
go
reconfigure
go
Simple enough, just open SQL Management Studio, connect to your SQL server and select New Query then paste and run that.
by Martin Laukkanen | Feb 23, 2010 | Development, SharePoint 2010
While diving deeper into the SharePoint 2010 PowerShell command-lets I realised that my last blog using a borrowed script based on 2007 was in need of a major update for 2010, so see here a version doing the same thing but with no use of STSADM (and thus no need to run as admin in 2008).
Warmup2.ps1
############################################################################

#WarmUp2.ps1 - Enumerates all web sites in web applications in a 2010

#              SharePoint farm and opens each in a browser.

#Notes:

#-"get-webpage" function borrowed from:

# http://kirkhofer.wordpress.com/2008/10/18/sharepoint-warm-up-script/

#

#Assumptions:

#-Running on machine with WSS/MOSS 2010 installed

############################################################################


Add-PsSnapin Microsoft.SharePoint.PowerShell

$extrasitelistfile = 'c:ToolsWarmupwarmup-extrasites.txt'


function get-webpage([string]$url,[System.Net.NetworkCredential]$cred=$null)

{

  $wc = new-object net.webclient

  if($cred -eq $null)

  {

    $cred = [System.Net.CredentialCache]::DefaultCredentials;

  }

  $wc.credentials = $cred;

  return $wc.DownloadString($url);

}


#This passes in the default credentials needed. If you need specific

#stuff you can use something else to elevate basically the permissions.

#Or run this task as a user that has a Policy above all the Web

#Applications with the correct permissions


$cred = [System.Net.CredentialCache]::DefaultCredentials;

#$cred = new-object System.Net.NetworkCredential("username","password","machinename")


$apps = get-spwebapplication -includecentraladministration

foreach ($app in $apps) {

  $sites = get-spsite -webapplication $app.url

  foreach ($site in $sites) {

    write-host $site.Url;

    $html=get-webpage -url $site.Url -cred $cred;

  }

}

# Warm up other sites specified in warmup-extrasites.txt file (such as SSRS)


if (test-path $extrasitelistfile) {

  $extrasites = get-content $extrasitelistfile

  foreach ($site in $extrasites) {

    write-host $site;

    $html=get-webpage -url $site -cred $cred;

  }

}
The script still retrieves a list of all sites in all web applications in the farm (including Central Admin) and additionally retrives a list of sites in a text file by default located in “C:ToolsWarmupwarmup-extrasites.txt”
Warmup-extrasites.txt
http://servername/ReportServer
Enjoy!