by Martin Laukkanen | Apr 16, 2011 | Development, How to, Project 2010
A very frequent request I get is how to change the default permissions assigned by Project Server to Project Workspace Sites for all projects, unfortunately this is not something that is configurable in Project Server so the only option out of the box is to disable the permissions sync and manage those permissions manually. Of course if you don’t want Administrators to manage every user manually this is not an option.
This is made more annoying if you want PM’s to be able to manage the site, as by default they only have Contribute like access.
There are a few options that exist out there, notably this one; Adjust the Default Project Web Access Permission Levels, which uses a SharePoint timer job to manage the default Permission Levels. However I have had need for something simpler, and so recently for a customer I implemented the following:
Modifying Basic Site Permissions using Project Events:
My solution is by intent extremely simple, so simple that I will include the main piece of code below (as well as having the full solution attached), in short what this code does is the following:
On Publish of any project does the following;
- Retrieves the OWNER of the Project
- Retrieves the Workspace Site of the Project
- Adds the Owner to the default SharePoint role SPRoleType.Administrator
So as you can see it only updates one user’s permissions, however it would be trivial to update the code to do more based on the Project Team and other requirements.
Here is the bulk of the code:
if (wssData.ProjWssInfo.Count == 0)
{
  LogEventEntry(String.Format("No workspace site found for project: {0}",
    projectData.Project.First().PROJ_NAME), EventLogEntryType.Warning);
}
else {
  // Open the SPSite and web
  using (SPSite pwsSite = new SPSite(wssData.ProjWssInfo[0].PROJECT_WORKSPACE_URL))
  {
    using (SPWeb pwsWeb = pwsSite.OpenWeb())
    {
      // Handle Null Email Address
      String ownerEmail;
      if (resourceData.Resources.First().IsWRES_EMAILNull()) ownerEmail = "";
      else ownerEmail = resourceData.Resources.First().WRES_EMAIL;

      // Add the new role assignment to the Owner
      SPRoleAssignment roleAssn =
        new SPRoleAssignment(resourceData.Resources.First().WRES_ACCOUNT,
          ownerEmail,
          resourceData.Resources.First().RES_NAME,
          "Project Owner");
      SPRoleDefinition roleDefn =
        pwsWeb.RoleDefinitions.GetByType(SPRoleType.Administrator);
      roleAssn.RoleDefinitionBindings.Add(roleDefn);

      pwsWeb.RoleAssignments.Add(roleAssn);
    }
  }
}
The code is bound to both OnPublished and OnSummaryPublished (to get the Save from PWA also), and ensures that the Owner will always have Admin rights, and if not all the PM has to do is republish.
Download only the WSP package here with – basic – instructions.
Download the full source package here.
Notes:
- As an Event the solution runs under the security context of the Project Server Event Service account, and so this user must be a user in PWA with appropriate access, I use administrator however it could get by with less.
- This completely ignores the WssSync jobs created by Project Server, as such some actions such as AD sync and group membership changes can apply permissions outside of typical Publish events. However in my experience with 2010 this will not remove existing SharePoint permissions (see one of my previous blogs on this).
- The solution is built with Visual Studio 2010 and packaged as a WSP allowing for simple installation using typical SharePoint means.
- The solution uses Project Server 2010 WCF methods to access the PSI, and so without modification it will not work on Project Server 2007.
- The solution logs error information to the Event Log and not the ULS, this is because I’m lazy. However it means that on Windows Server 2008 if the user (Event Service Account) is not a local admin it will fail and log nothing.
Post comments with any questions or additions even, but please note that I can’t provide support for the standalone WSP package.
by Martin Laukkanen | Aug 6, 2010 | Development, Project 2010
This is a useful solution; with it you can update on a PDP an Excel spreadsheet saved in project’s workspace document library and then potentially update custom fields from the results.
However it is far from a complete solution to download and deploy.
First issue – Admin rights required to use Web-Part:
Installed as per instructions (build / package / run script), then when adding the web part this familiar error occurred:
“An unexpected error has occurred.”
A quick look at the ULS shows more details:
The source was not found, but some or all event logs could not be searched. Inaccessible logs: Security.
Now that’s interesting as I had this exact same issue a few months back working with a 2007 PSI project, it turns out the answer is rather simple; the web service is attempting to write to the event log using “EventLog.WriteEntry” method calls, however in Windows 2008 and above this is restricted to Administrators only. So as the PWA users are not local admins the error was guaranteed.
A quick solution is to comment out each line in the code beginning with “EventLog.” of course that will disable the logging, so you would be better off doing that after you get everything else working. The file in the solution that you are after is CostAndBenefiXlsWebPart.cs in the WebPart.CostBenefit project and you’ll find about half a dozen envent log entries to comment out.
Second issue – The default site template location:
While your in that file commenting out lines, you’ll most likely notice this;
private string pdpSitePath = @”http://project.contoso.com/PWA/MajorPWSTemplateSite;”
Although the solution will work without changing this, as that is only used when no workspace site exists (like when in server settings – project detail pages), updating that to point to your http://server/pwa/template workspace site template will fix any file not found issues when setting up your PDPs.
Third issue – Location of the Excel document used:
If you’ve gotten this far then like me you might be seeing something like this:
No item exists at http://servername/_layouts/xlviewer.aspx?list=b73da3b8-b48e-400c-8fe0-9b6a48442518&id=1&DefaultItemOpen=1&Edit=1. It may have been deleted or renamed by another user.
A little digging turned up the cause of this one to be the embedded ID in that URL “&id=1”, which means that it is trying to open the document with ID 1 in that particular list. This again is hard coded in the same .cs file as above (line 191), so you can either make certain that in your template above the first file saved to the Project Documents folder is your xls sheet, or modify the code again.
All done.
So now we should have a working webpart referencing our Excel sheet saved in the project workspace site, there are some obvious limitations, not least of all the inability to use any other spreadsheet in the webpart. But I guess that’s why they call it a “solution starter”.
Update 23/10/2010: Most of the points above have been fixed in the more recent updates to the solution starter package, make sure you update your code from Codeplex: http://code.msdn.microsoft.com/P2010SolutionStarter
by Martin Laukkanen | Apr 11, 2010 | Development, Project 2010, Troubleshooting, Workflow
I’ve been working on a full end-to-end demand management workflow over the past couple of weeks and unfortunately as RTM is due any day now, much of the final documentation is still not public, meaning that some things just need to be figured out.
One problem that I found is the custom workflow task form, which has a very useful "Review project details" link on it. However if you have used Microsoft’s demo2010a image, then you’d see that for all of the workflow’s the link initially does not work. (See image)

Fortunately this one was relatively easy to guess, thanks MS for making it quite obvious!
Firstly a custom workflow task content type called PSWApprovalTask is created by default in the PWA site "Project Server Workflow Tasks" list, here’s what it looks like out-of-the-box:

Interestingly though, it is not by default added to the list content types, BUT if you run through the Sample Proposal Workflow once then you will see it appear in the list automatically. For the purpose of this just use the ‘Add from existing site content types’ option in List Settings to add it:

Now another interesting thing is apparent on the list settings page:

Specifically Microsoft has pre-defined three Columns named: Project Name, Project Owner and ProjectUid (and some others..), however they are not added to the content type by default either, but they are used in the views including the default My Tasks.
To the point:
Now getting to the point of this post, if you use the content type and populate all of those fields then the task approval page will work as expected! Specifically the ProjectUID Column needs to be populated with guess what: the Project’s GUID, once that is done then the link works as expected!
Too easy!
Well unfortunately not. The Visual Studio Workflow Activities included with Project Server 2010 gives you the very handy ReadProjectProperty action, however while having a choice of either reading a Custom Field based on GUID or a pre-defined built in field based on name, it does not include Project GUID. This is where it gets complicated.
The “simple” solution is to use PSI, then using something like this nice little method created by Chris Boyd you can retrieve the GUID by providing the Project Name using PSI method ReadProjectStatus.
Unfortunately having to use PSI in what otherwise could be a very simple SharePoint workflow in my opinion is clunky, it would be very nice if MS could add the Proj_UID property to the ReadProjectProperty action!
If you’re interested, based on Chris’s blog post linked above, here is an extract of my code to get all of those fields working (Note that this plugs in nicely to my last code post: Extending the Branching Workflow):
// Declare your PSI Stuff
private static WebSvcProject.Project project = new WebSvcProject.Project();
private void createTask_InitApproval(object sender, EventArgs e)
{
[… insert your other required task attributes …]
taskProps.ExtendedProperties["Project Name"] = Proj_Name[0];
taskProps.ExtendedProperties["Project Owner"] = Proj_Owner_Name[0];
taskProps.ExtendedProperties["ProjectUid"] = GetProjectUidFromProjectName(Proj_Name[0]);
}
public static Guid GetProjectUidFromProjectName(string projectName)
{
Guid projectGUID;
project.Credentials = CredentialCache.DefaultCredentials;
WebSvcProject.ProjectDataSet readProjDs = new WebSvcProject.ProjectDataSet();
readProjDs = project.ReadProjectStatus(
Guid.Empty,
WebSvcProject.DataStoreEnum.WorkingStore,
projectName,
0
);
if (readProjDs.Project.Rows.Count == 1)
{
projectGUID = new Guid(readProjDs.Project[0].PROJ_UID.ToString());
}
else
{
throw new Exception("No Project by the name: " + projectName + " Found");
}
return projectGUID;
}
Enjoy!
Update 4/08/2010:Check the comments below for a much easier way to correct this issue, without the use of PSI.
by Martin Laukkanen | Apr 11, 2010 | Development, How to, Project 2010, Workflow
With Project Server 2010 you get an out of the box workflow named ‘Sample Proposal Workflow’, this is quite a good demonstration as it includes all of the usual things you might see in such a process; Validation, Approval, Selection, etc. However unfortunately as of this time (days before RTM) the source for this sample is still not available, at the moment the only SDK example is a simple Branching Workflow which only includes a single validation step.
I had an opportunity at the Sydney Ignite to ask Jan Kalis about this one, and he assured me that the full source for the sample will be released sometime around RTM, but we’ll have to wait a little bit more for that one.
In the meantime the world moves on and I have been busily writing my first full blow demand management workflow for a customer deployment, and so I thought I would share some of what I have done here. To that end I have taken the SDK Branching Workflow and extended it to include an Approval stage similar to that in the Sample Proposal Workflow.
Read below for what I have done and what you need to test it for yourself, then download my Visual Studio 2010 project below.
Branching Workflow with Approval:
The steps below are a summary of the changes made to the Branching Workflow, for a more complete how-to guide I very strongly suggest that you read the SDK Branching Workflow article and if you complete the examples there you will end where my steps below begin. Furthermore all the general requirements for getting this running (Visual Studio 2010 etc) are in the SDK article.
Before you start (or download):
This example is built on a default PWA instance, I have renamed the out of the box Sample Proposal Workflow to ‘Branching Workflow with Approvals’ then after deploying the code changed the workflow selected to the new one. All other PDPs and Stages are used as is, and the only other change required is an optional one below in step 5 below (see image).
Changes Made:
- Starting with the SDK Branching Workflow (note that if you download it in the p14betasdk then the code is incomplete and a few steps from the MSDN article must be completed). I also renamed the Feature and the Workflow in the deployment package to avoid confusion.
- Then I added a pre-build event command to automatically regenerate the Strong Name. (Can be removed, but just makes testing easier)
- Added a step after the Proposal Details Stage where the workflow goes to Proposal Selection Stage in Select Phase (updateProjectStageStatus20 – Waiting for Approval) – Note I have used the Select phase as my ‘Approval’ phase, I am not doing anything with Portfolio Selection here just approval.
- Next I read the Project Properties of "Project Name" and "Owner" for the Workflow Task (These are optional and just for completeness).
- Read "Portfolio Managers" Project Server Group membership to create approval request for first person returned in group.
- Create Workflow Task using CreateTaskWithContentType and assign to approver and populate task properties with Project Name and Owner.
Important: In order for these task properties to work you must ad the built in Columns to the PSWApprovalTask content type by editing the Default Workflow Approvals, then updating the content type to include the existing list columns.
(See Screenshot from List Settings PSWApprovalTask Content Type Properties)

- Then we add a while activity onTaskChanged to wait for the Approval task to be actioned. In this step the ExtendedProperties are checked for a value "Approved" anything else results in Rejection.
- And finally an IfElseActivity is used to branch on the Approved / Rejected result.
- If true then continue to end and UpdateProjectStageStatus to Execution stage.
- Else UpdateProjectStageStatus to Not Selected state and Terminate.
Here is the result in Visual Studio:

What’s left?
- Email notification? You can simply use the SharePoint list notifications on the Workflow Task list as a simple and consistent email notification method.
- Portfolio Selection? I’ll leave that one to you.
Technical Details:
This example was created on the following beta software, meaning that things might change by RTM:
- SharePoint Server 2010 RC Build
- Project Server 2010 RC Build
- Visual Studio 2010 RC Build
Download the full project files in a zip here. (*see update below)
MSDN References:
How to: Create a Branching Workflow <http://msdn.microsoft.com/en-us/library/ee767701(v=office.14).aspx>
Step 3: Create the Workflow <http://msdn.microsoft.com/en-us/library/ms580283.aspx>
UPDATE 3/09/2010:
I thought that I’d revisit this one as clearly from the comments there was something wrong after RTM, basically the problem everyone seems to be having relates to the ‘WorkflowTaskCTypeID’ defined. Somehow what I had in the BranchingWorkflow.cs file is actually incorrect, the solution has the following on line 46:
public String WorkflowTaskCTypeID = “0x0108010038A52C27344148C9B9214F82C7C0298500544602C73FFD1245BCC090442C85426B”;
When it should be:
public String WorkflowTaskCTypeID = “0x0108010038A52C27344148C9B9214F82C7C02985?;
Not quite sure where the first one came from (and why it worked?!) but that fixed it for me. If you update that line then recompile / rebuild you should be good.
PS. I don’t use the CreateTaskWithContentType anymore, have a look at the 2010 workflow activity (OfficeTask class) used in the Sample Proposal found in the SDK: http://msdn.microsoft.com/en-us/library/microsoft.office.workflow.actions.officetask.aspx
by Martin Laukkanen | Feb 8, 2010 | How to, Project 2007, Reporting
Update 31/03/2011: See the following blog about how much simpler this is with SQL Server 2008 R2.
This is one of the most common gripes that I hear about Project Server’s reporting database, the fact that only the default fields in your Project workspace lists, ie Project Risks, Project Issues, etc are available to report on.
Unfortunately I have yet to come across a client who uses (for example) a percentage probability of risk, I’m guessing it’s all that PRINCE2 influence. So as a result you are usually left with two options;
- Update the default fields to match your requirements, which actually is possible in 90% of the cases with some careful modifications to the workspace template and possibly some custom MDX measures for your cube. The biggest drawback with this one is if you want to report on new lists, such as for example a Change Register it is simply not possible without extending the RDB and cube!
-
Secondly you could find and purchase a third-party product that will allow you to report directly on all of the list contents of your workpace, some of these link directly into the sites, others use a staging database.
There is of course a third option though, do it yourself, and that is what this blog post is about.
How to access the SharePoint data?
The first question is how, and of course I should be clear as a one-time minion of the capital MS, the question must be how to do it in a supported manner. So that completely rules out direct SQL access to the databases!
Fortunately there is another way: XML.
Let me start by saying that there is a lot of information is out there on this method, so here are some links to some of the most helpful pages; at codeproject, and other blogs here and here. (That last Blog one I probably found most useful!)
Before I get into it it’s worth mentioning that my example involves using Visual Studio 2008 with the SQL Business Intelligence Design Studio (BIDS) installed. Don’t let the VS2008 bit scare you it would be possible to do much of this using Report Builder, at least once you have your data connections created, perhaps I’ll leave that for a future blog?
In summary this is what you need to do:
- Create a SRS data source pointing to your PWA Reporting database.
- Use the above data source to identify the field named "ProjectWorkspaceInternalHRef" from the "MSP_EpmProject_UserView" table for each project you want to report on.
- Then use the URL indentified to dynamically construct your XML data source query by basically appending "/vti_bin/lists.asmx" to the end of the string.
- Finally using XML pull down the information that you want.
Too easy!
Okay show me the details!
Okay so first thing you need to do after firing up Visual Studio is start a new blank Report Server Project, then:
Step 1: Create your Shared Data Source
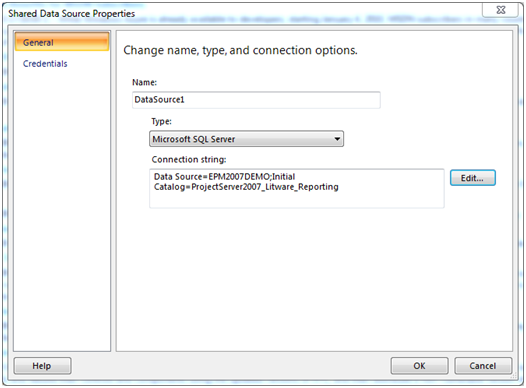
Create a standard SQL data source pointing to your Project Server Reporting database, such as:
| Data Source=EPM2007DEMO;Initial Catalog=ProjectServer2007_Litware_Reporting |
Step 2: Enumerate Workspace URLs and Select your Project
Firstly create a blank report with a simple SQL query to enumerate a list of all projects and their associated workspace URL:
Example query:
SELECT ProjectName, ProjectWorkspaceInternalHRef
FROM MSP_EpmProject_UserView
|
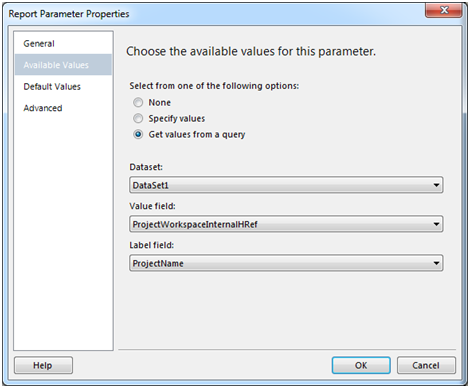
Then create a Parameter to prompt the user for a selection:
Name: SelectedProject
Prompt: Select Project
Select Get values from a query for Available Values:
Value field: ProjectWorkspaceInternalHRef
Label field: ProjectName
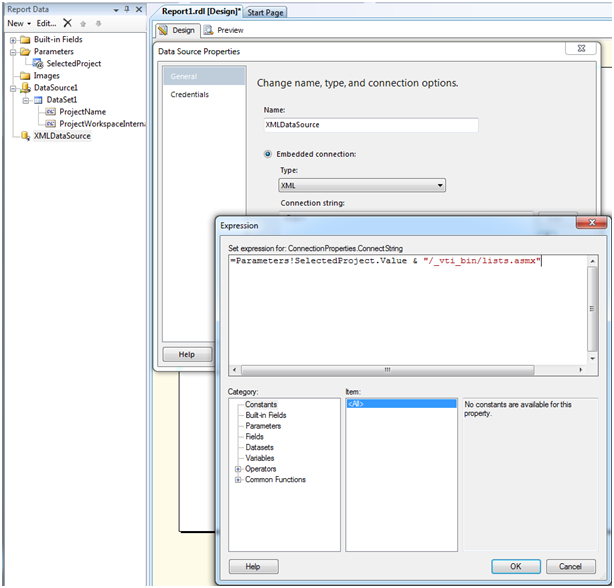
Step 3: Create your XML Data Source
Now the interesting bit, create a new non-shared datasource (Embedded connection).
Type: XML
Connection String: Expression
Credentials: Do not use credentials
Expression should be as follows:
| =Parameters!SelectedProject.Value & "/_vti_bin/lists.asmx" |
Step 4: Now create your Dataset using XML
Now you need to create your first Dataset in this XML data source, this is where we reference the actual list item, in this example Project Risks.
Create a new dataset using the following query:
<Query>
<Method Namespace="http://schemas.microsoft.com/sharepoint/soap/" Name="GetListItems"/>
<SoapAction>http://schemas.microsoft.com/sharepoint/soap/GetListItems</SoapAction>
</Query>
|
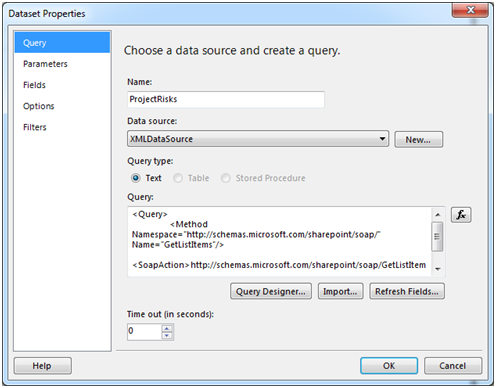
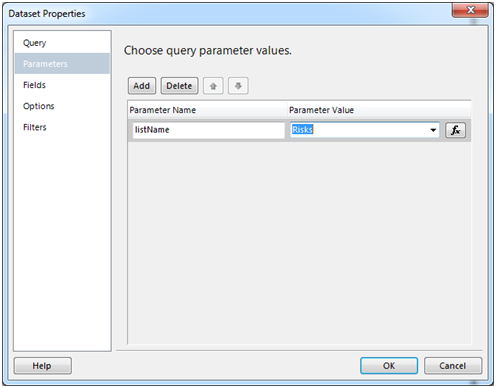
Populate the Parameters with the "listName" (note: this is case sensitive) parameter with the value "Risks":
Step 5: Select your Fields to include in the report
Now the annoying bit, under Fields you must include each field that you want to include in your report, however because we are dynamically generating the data source we cannot automatically populate this.
Note: To automatically populate this list hard code the data source to an actual workspace site then when you create the query for this dataset select Refresh Fields.
Otherwise you can manually populate these, just open the list in question in a workspace and open list settings:
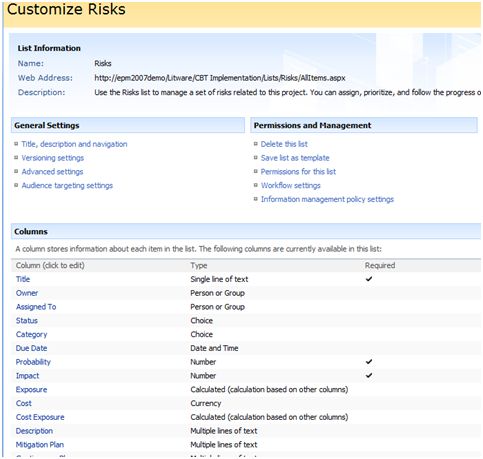
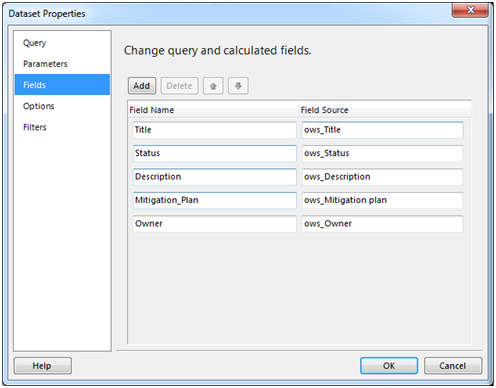
Then use the Column name in the Fields list source by simply prefixing each name with ows_, for example: ows_Title
Resulting in something like this:
Step 6: Finally Create a Test Report to see the Results!
Now add a table to your report and add those columns to preview the data, you should see something like this:
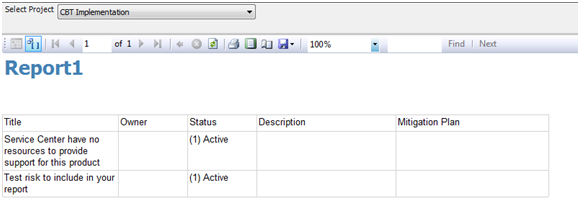
Unfortunately you might notice some fields being blank, there’s actually something we forgot! One of the possible parameters in the dataset above is "viewName", that does exactly what you would think select’s the desired view, so as my example above (using the EPM2007DEMO databases with default column names) Owner, Description and Mitigation Plan are all blank, this is because the Default view configured for that list does not include them.
So you can fix this by changing the default view to include the required fields or by creating your own view and using the viewName parameter. Note though; that parameter requires the GUID of the view not it’s name, so you need to use something like http://meyerweb.com/eric/tools/dencoder/ to decode the GUID from the URL of the view. (See the above linked blog by David Wise for additional details on the parameters available)
One that is done, you should now see something more like this:
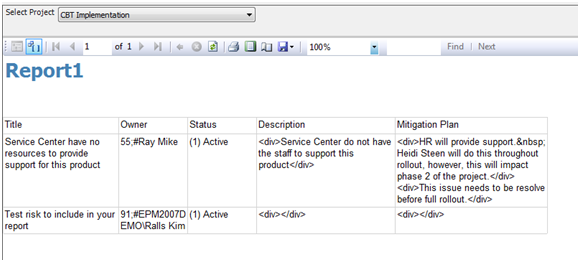
Looking good! (Almost!)
Just one last thing there, you can see the special characters in the data, for the Description and Mitigation Plan it is an easy matter of changing the ‘Placeholder Properties’ to Markup Type: HTML. However for the Owner and as you’ll find various other fields they contain internal codes used by SharePoint, these have to be removed with code, again David’s blog above has some code to do just that, or if you’re like me and didn’t quite bother to read down that far you can create your own and add it to the Report Properties – Code section:
Public Function CleanSPSInput(strIn As String) As String
Dim RegEx as System.Text.RegularExpressions.Regex
‘ Replace invalid characters with empty strings
if strIn = "" OR IsDBNull(strIn)
Return ""
Else
Return Regex.Replace(strIn, ".+;#", "")
End If
End Function
|
Then just replace your Owner field name with the following expression:
| =code.CleanSPSInput(Fields!Owner.Value) |
Now your report should look something like this:
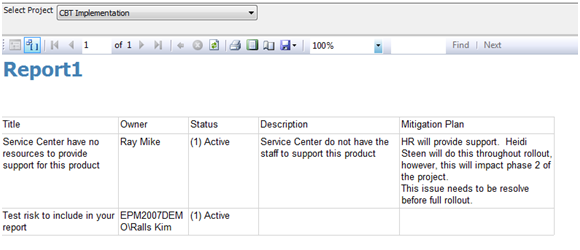
All Done!(Well for me at least)
What’s the catch?
There is actually a big one which you might have guessed: performance.
The above report is effectively generating the report by browsing to each page and pulling down each list item every time the report is generated. For one single project like in the example above, that’s not such an issue, but if you wanted to create a portfolio summary report for example or batch process a single project report for all active projects then performance would quickly become a problem.
Much of that can be addressed through Reporting Services itself, using caching and pre-generation, etc or better yet using SQL Integration Services (SSIS). With that and some much more interesting scripting a DTS job could be created to setup your very own staging database using the same XML methods as above! Definitely something to blog about another time…
But what about??
Yes there are lots of questions left unanswered;
- What if someone renames the list used above?
- What if someone changes / deletes the view I selected?
- What if …
I think you can see some of the limitations here and possible also how they can be overcome (workspace template standards, etc) but I’ll leave that to you.


