by Martin Laukkanen | Jun 12, 2014 | Development, How to
Recently I spoke at a Microsoft Project Server event here in Switzerland on the topic of Extending Project Server and using small pieces of JavaScript with jQuery to make little changes for big effects. One of my demos was to correct the following annoyance that many of us have probably come across but have no out of the box way to fix.
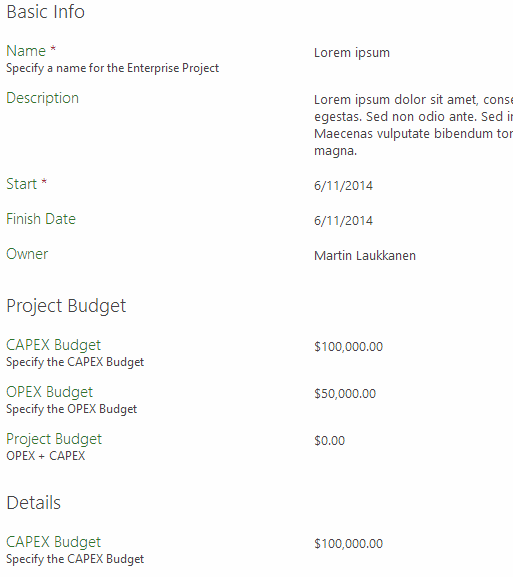
Project Detail Pages column alignment issues
Example
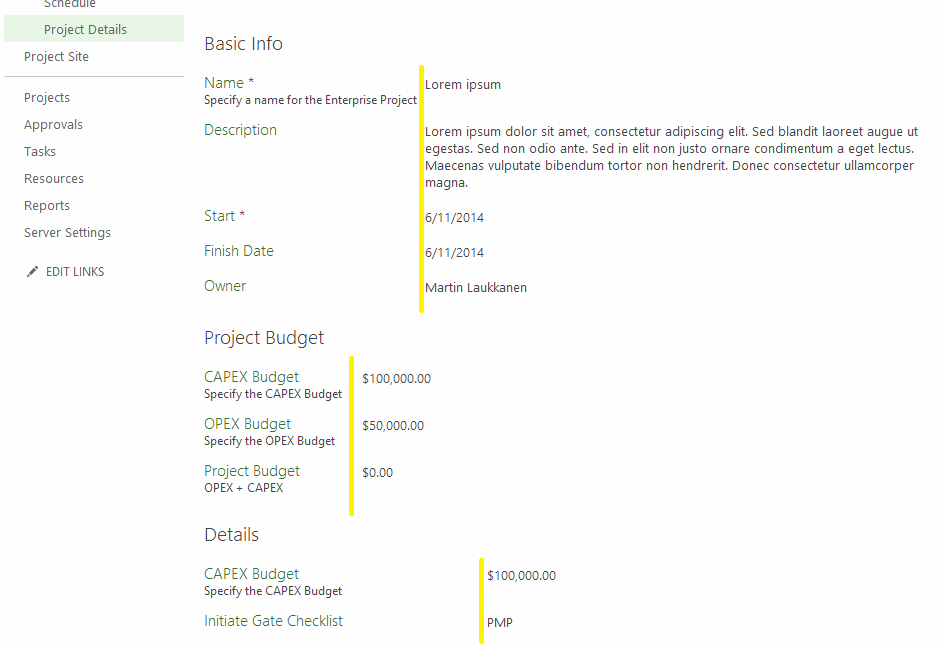
In yellow I have highlighted the issue that I’m talking about in case it is not obvious in the screenshot. As you see the alignment is actually based on the length of the longest custom field displayed in the web part, so as in the above example where we have used separate webparts to break up the webpage with headings the width of each column is unpredictable.
jQuery to the rescue
This is a great example of using jQuery as it shows how ridiculously simple some things can be to change! So let’s walk through the solution here if you’ve not done this before, as you will see the possible usage of this kind of “fix” is vast.
“Debugging” in Chrome or IE
The first thing you need to do to here is to identify the html element(s) in question, so the easiest way to do that is to use the “Inspect Element” feature available in both IE and Chrome browsers (and probably all others too), you’ll find it on the right click menu

When selected the inspect element will open up the developer console of your browser and focus on the specific element under the mouse, in this case the “Description” field text label.
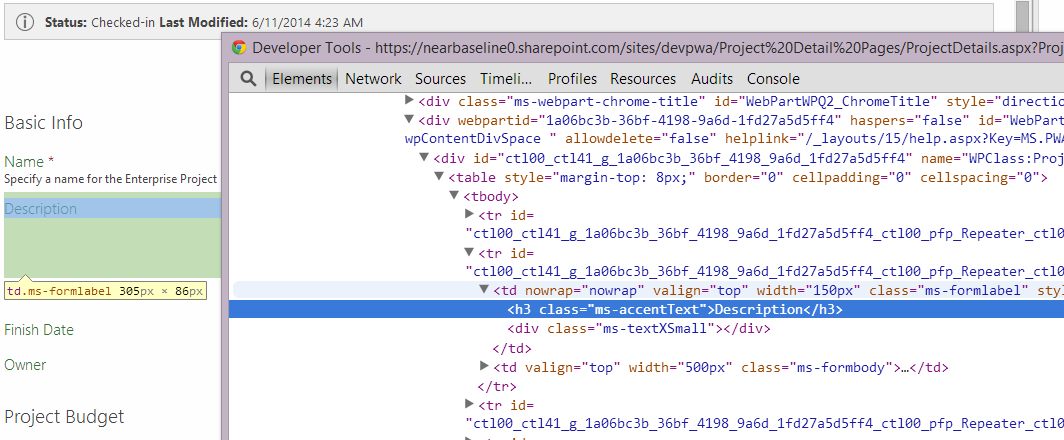
Now you can browse the page source and as you see each element is highlighted, neat!
Now we can start using jQuery to select our columns to modify, start by dynamically loading the jQuery library using the following script:
var jq = document.createElement('script');
jq.src = "//ajax.googleapis.com/ajax/libs/jquery/1/jquery.min.js";
document.getElementsByTagName('head')[0].appendChild(jq);
Now that we have jQuery available you can again look at the source and think about what we need to ‘select’, in this case we can see that our Description label is in a h3 inside of a table (tbody > tr > td) and specifically it has a class of “ms-formlabel”. Cool so in jQuery we can now select all such elements like this:
$("tr td.ms-formlabel")
Best thing is that being JavaScript all elements are selected and can be used in an array, but even better we can directly update all items like this:
$("tr td.ms-formlabel").width("300px");
Neat hey? If you run that command in the console immediately all the columns will update to be 300px wide!
Permanently applying fix to the page
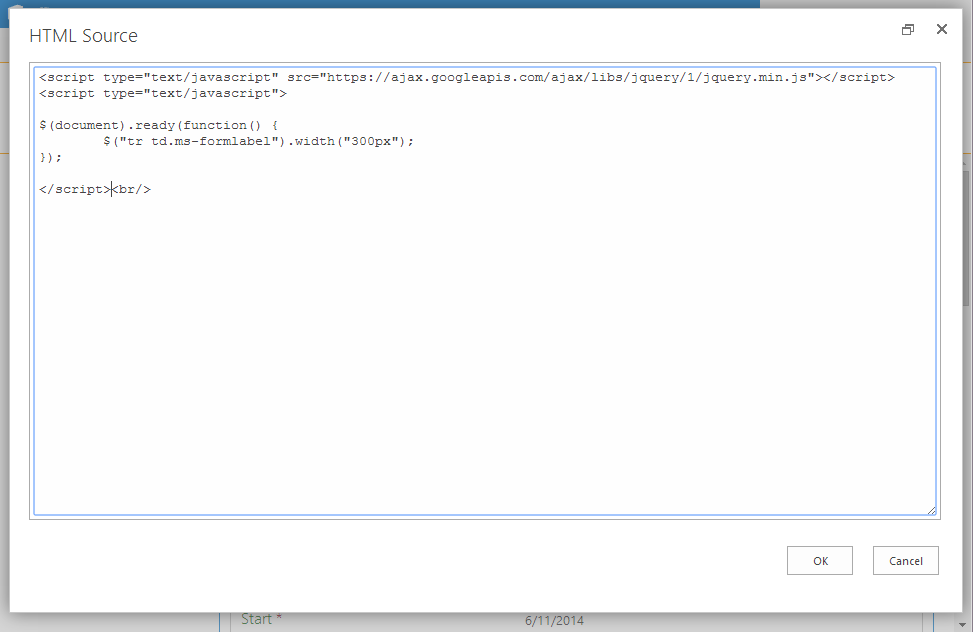
So now we have our script let’s add it to a Content Editor Web Part (CEWP) on the page itself, to do that we need to wrap our line in some html which loads the jQuery library and runs the script when the page is ready, like this:
<script type="text/javascript" src="//ajax.googleapis.com/ajax/libs/jquery/1/jquery.min.js"></script>
<script type="text/javascript">

$( document ).ready(function() {
	$("tr td.ms-formlabel").width("300px");
})

</script>
Now edit the PDP web part page, and add a Content Editor web part to it, then simply add the above HTML content to the web part HTML source like so:
First add the Content Editor web part and use the Edit Source ribbon option
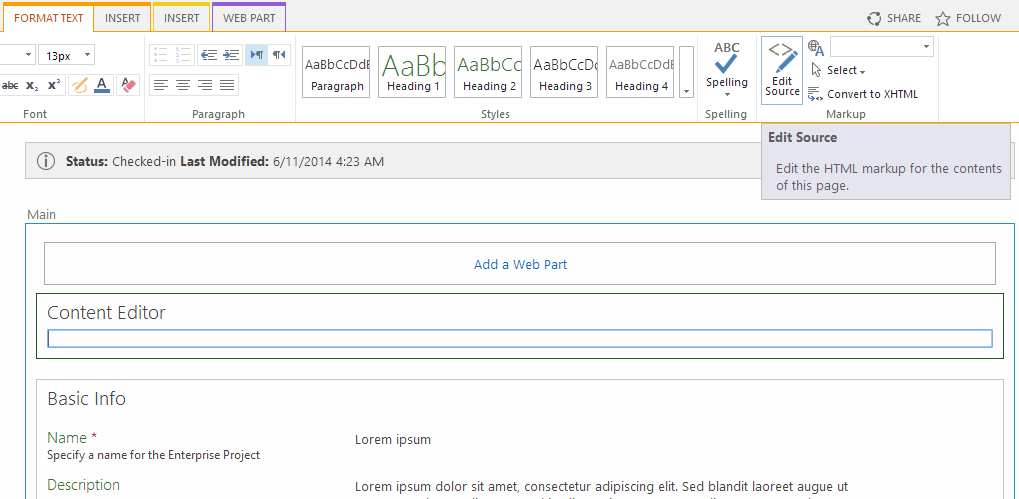
Then paste in our html script
Now each time the page is loaded the script is run and all columns are aligned to 300px looking something like this:
Enjoy!
by Martin Laukkanen | May 1, 2013 | How to, PowerShell, Project 2013
A few people have written about PowerShell provisioning of PWA in 2013, see here and here, both reference this TechNet source. However if you’re anything like me you might find these confusing! Coming from 2010 it seems that everything has changed, so after struggling a bit using the above three references trying to update my old automated PWA deployment scripts I figured that it can’t hurt to have one more guide online covering the process.
Look No Site Collection
Firstly though, one of the great things about 2013 is that PWA is now uncoupled from its Site Collection, basically /PWA no longer needs to be a Site Collection but can be any regular site.
Esoteric as that may sound it means that we no longer have this odd divide where Project data such as Project Sites live in various “SharePoint Intranet” site collections and PWA has to be in it’s own isolated space with different users, permissions, features, etc. Clearly this is geared towards supporting SharePoint permissions mode and generally making Project more SharePoint friendly, but combined with those nifty new license management features things become very much easier for many of us dealing with real world deployment scenarios.
This also has the added bonus of making it easier to provision PWA at the root site collection (in a more standard way – ick Site Collection host headers!).
Get to the setup
The challenge I had with the scripted setup links above was that they seemed to be missing something, for instance the TechNet article misses the whole site collection creation part and so then confuses things by splitting off into a separate article on creating PWA in an existing site collection? Is it just me or was that really confusing?
Anyway here’s my PowerShell script for provisioning a new PWA instance in a new Site Collection where the root site collection contains a Team Site and PWA is in the familiar location /PWA.
$SiteUrl = "https://"+$HostHeader
$PWASiteUrl = "https://"+$HostHeader+$PWAPath
$SiteCollectionOwner="i:0#.w|domain$($AdminUser)"
$SecondaryOwnerAlias=""
$PWADatabase="ProjectWebAppDB"
$DatabaseServer = "sqlservername"
$PWAAbbreviation = "PWAInstance1"

$svcApp = Get-SPServiceApplication | ? {$_.TypeName -eq 'Project Application Services'}
$webapp = Get-SPWebApplication -Identity $SiteUrl


Write-Host "Creating Project Server database:" $PWADatabase
New-SPProjectDatabase -Name $PWADatabase -ServiceApplication $svcApp `
    -DatabaseServer $DatabaseServer -Tag $PWAAbbreviation `
    -ErrorVariable err
if ( $err ) {
    write-host "An Error Occured: " $err -ForegroundColor Red
    break
}


Write-Host "Creating Team Site root for PWA" $SiteUrl " Owner:" $SiteCollectionOwner
$site = New-SpSite -url $SiteUrl `
    -owneralias $SiteCollectionOwner `
    -SecondaryOwnerAlias $SecondaryOwnerAlias `
    -ErrorVariable err
if ( $err ) {
    write-host "An Error Occured: " $err -ForegroundColor Red
    break
}

Write-Host "Creating PWA Web: " $PWASiteUrl " Owner:" $SiteCollectionOwner
$web = New-SPweb -URL $PWASiteUrl -Template pwa#0

$web=Get-SPWeb $SiteUrl
$web.Properties["PWA_TAG"] = $PWAAbbreviation
$web.Properties.Update()

Write-host "Enabling PWASite features..."
Enable-SPFeature pwasite -URL $SiteUrl
I lifted that from my mass deployment script (woo 2,600 lines and counting) so after my little rant above please excuse me if I forgot to declare one of the variables or something.
Hope this helps someone!
This article is republished with permission here: EPMonDemand Blog
by Martin Laukkanen | Mar 13, 2013 | Development, How to
One of the great features of Claims authentication in SharePoint (2010 or 2013) is the ability to use external authentication providers such as ADFS, Microsoft LiveID (Hotmail, Outlook.com etc) or even Google among others. Better yet, using Microsoft Azure ACS makes setting up and managing this for extranet sites or Cloud applications simple!
The Catch!
However there’s one catch (isn’t there always?) Microsoft Live ID doesn’t give the email address in the claim. This sounds obscure but in effect what it means is that once you configure all of this this is what you get:

What a nice and friendly username!
(If you want instructions on configuring all this, I highly recommend Wictor Wilén’s indispensible series of articles on the topic: http://www.wictorwilen.se/Post/Visual-guide-to-Azure-Access-Controls-Services-authentication-with-SharePoint-2010-part-1.aspx)
Solutions?
Most people suggest using something like Google to authenticate instead to avoid this, however with SharePoint Online, Project Online, EPMonDemand (ahem – excuse the blatant plug!) and Office365 all tied to my LiveID, I personally don’t think that’s an option!
So basically we need to populate that information, sure we could ask users to do it manually, but better yet let’s find out how to do this the Microsoft way.
Live Connect API
In order to support Windows 8 apps, Web apps and all manner of mobile devices MS have this great resource available, head over to the Live Connect Developer Center to see more information. Once you’ve registered then you can follow my steps below to get you setup to auto-populate SharePoint user information via Javascript!
Getting this going
Note: Getting to the business end here; you’ll Visual Studio, some JavaScript, SharePoint Object Model and WebPart development experience to continue. (Or just skip to the end and download my example, like everyone else!)
Firstly you’ll need to create yourself an ‘application’ on Live Connect, something like the following:

The important thing is to note your Client ID, and then enter the correct URL under Redirect domain.
All done, easy!
If you want to see how all this works, the Interactive Live SDK is one of the best SDK implementations I’ve seen from MS, have a look at what kind of options are available to you.
For example, the following JavaScript will return the basic user information for the currently logged in user including name, email addresses and more;
 WL.init({
    client_id: “***********”,
    redirect_uri: “callback.aspx”,
    response_type: “token”
 });
 WL.login({ “scope”: “wl.emails” }).then(
    function (response) {
        updateUserData();
    },
    function (response) {}
 );
 function updateUserData() {
    WL.api({ path: “/me”, method: “GET” }).then(
        function (response) {
            // Do something here!
        },
        function (response) {}
    );
 }
Neat hey?
Bring it all together
Okay not quite done yet, lets put this into a nice simple SharePoint webpart and then using the good old Object Model update the current users’ details.
What you need to do:
- Open Visual Studio and create a new SharePoint – Visual Web Part Project

- Create some ASP controls for your webpart, I won’t bore you with all the details here, get the full solution below in which I created the following:
- AccountTextBox
- NameTextBox
- EmailTextBox1
- UpdateButton
- Plus a bunch of labels to make things neat.
- We need a link to the Live Connect http://js.live.net/v5.0/wl.jsfile, to make this easier I have saved a copy in a Layouts folder in my solution, so my ScriptLink looks like this:
<SharePoint:ScriptLink ID="LiveIdscript" runat="server" Name="UpdateUserWebPart/wl.js"></SharePoint:ScriptLink>
- Also for the Live ID bit to work we need a callback.aspx file in our solution, which is referenced in the “redirect_uri” parameter passed to to WL.init in the JavaScript, this file should look something like the following;
 <!DOCTYPE html>
 <html xmlns="http://www.w3.org/1999/xhtml">
 <head>
 <title>Authentication Complete</title>
 </head>
 <body>
 <!--
 The script will handle passing oauth/authorize response back to the calling page.
 -->
 <script src="/_layouts/15/UpdateFromLiveID/js/wl.js" type="text/javascript">
 </script>
 <p>This window can be closed.</p>
 </body>
 </html>
- Now for the JavaScript, first we need to initialise and try to login to Windows Live.
<SharePoint:ScriptBlock ID="ScriptBlock1" runat="server">
    WL.init({
        client_id: "*************",
        redirect_uri: "<%=SPContext.Current.Web.Url %>/_layouts/15/UpdateUserWebPart/callback.aspx",
        response_type: "token"
    });
    if (document.getElementById("<%=EmailTextBox1.ClientID %>").value == '') {
        WL.login({ "scope": "wl.emails" }).then(
        function (response) {
             updateUserData();
         },
         function (response) {}
         );
    }
Above I’ve included an IF that checks for an existing Email address, if none is found then it automatically tries to login. (Pop-up blockers hate this, so you’ll need to do something nicer)
- Next here’s my updateUserData() function which is called on successful login;
function updateUserData() {
    WL.api({ path: "/me", method: "GET" }).then(
        function (response) {
            document.getElementById("<%=EmailTextBox1.ClientID %>").value = response.emails.preferred;

            if (!response.name) {
                document.getElementById("<%=NameTextBox.ClientID %>").value = response.emails.preferred;
            }
            else {
                 document.getElementById("<%=NameTextBox.ClientID %>").value = response.name;
            }

            document.getElementById("<%=UpdateButton.ClientID %>").click();
            },
            function (response) {}
        );
    }
</SharePoint:ScriptBlock>
So once we have the user data we update our ASP controls created previously so we can use those in the code behind.
- Lastly we need some code behind to get the details and update our SPUser object.
protected void Page_Load(object sender, EventArgs e)
{
    if (string.IsNullOrEmpty(AccountTextBox.Text))
    {
        AccountTextBox.Text = SPContext.Current.Web.CurrentUser.LoginName;
        NameTextBox.Text = SPContext.Current.Web.CurrentUser.Name;
        EmailTextBox1.Text = SPContext.Current.Web.CurrentUser.Email;
    }
    UpdateButton.Click += UpdateButton_Click;
}
- Here I’m updating the controls on Page_Load but only once, then creating an event for our Button.
- For the button I basically do the following:
void UpdateButton_Click(object sender, EventArgs e)
{
    [...]
    SPUser currentUser =
        elevatedWeb.SiteUsers.GetByID(SPContext.Current.Web.CurrentUser.ID);

    currentUser.Name = NameTextBox.Text;
    currentUser.Email = EmailTextBox1.Text;

    currentUser.Update();
    [...]
}
To keep this short(er) I have cut out the RunWithElevatedPrivileges bits and such, you actually might not need to have that depending on your user permissions, but if you leave it in then I suggest reading this.
Are we done yet?
Now lets deploy and have a look;

That’s what we see initially, but once we allow that popup:


Make sure you select Yes.

Nice.
Now if everything’s working, clicking Update should do just that!

Hurrah!
Get my full example solution here built for Visual Studio 2012 in SharePoint 2012, just make sure you update it with your Client ID from Live Connect.
Conclusion
It’s not perfect, in fact it’s a way off (think application pages, modal dialogs, mmm), but hopefully this will get you started.
Any questions, post below, but I strongly recommend you play with the Interactive SDK on Live Connect and read the Getting started documentation there if you have any problems with the JavaScript. It took me quite a bit to get all that working together the first time!
Update: See my latest post on this topic for a better approach: http://nearbaseline.azurewebsites.net/blog/2013/07/sharepoint-hosted-apps-with-saml-authentication/
by Martin Laukkanen | Sep 23, 2011 | Troubleshooting
I hate log noise, errors like the following:
Log Name: Application
Source: Microsoft-SharePoint Products-Project Server
Date: 23/09/2011 11:16:05 AM
Event ID: 2077
Task Category: General
Level: Error
Keywords:
User: NT AUTHORITYIUSR
Computer: server.domain.local
Description:
Failed to get language information for Project Server (https://server/PWA)
Apparently this is an error that can be ignored, hence my term “log noise”, however if you are managing large farms having hundreds or even thousands of these occur each night across a number of servers is clearly a big problem.
So I set out to resolve this one, and the cause turned out to be rather simple.
The errors occur nightly during the same window as the Full Search Crawl, so it’s not hard to find the culprit, a bit of searching in the ULS logs correlates the above with some or all of the following errors:
09/23/2011 11:16:05.26 w3wp.exe (0x194C) 0x2A74 Project Server General auvt Exception System.Web.Services.Protocols.SoapException: ProjectServerError(s) LastError=GeneralSecurityAccessDenied Instructions: Pass this into PSClientError constructore to access all error information at Microsoft.Office.Project.Server.WebServiceProxy.Admin.ListInstalledLanguages() at Microsoft.Office.Project.PWA.PJLanguageInfo.EnsureLanguageInfo
Cause
The cause is simply that the Search Default Content Access Account does not have permissions in PWA. Typically said accounts would be granted a Web Application “Full Read” policy in order to index content, however although this allows the account to index all the content without issue it does result in these errors still being thrown up by the PSI.
In that sense this can be safely ignored, however if like me you need to get rid of these the solution is simple; just setup the search account in PWA. In my case on a default test PWA instance granting Team Member rights resolved 14 out of 16 of these, so some level higher than that is required to fully resolve this.
by Martin Laukkanen | Jul 1, 2011 | SharePoint 2010, Troubleshooting
Had some time today to upgrade my lab to SP1, and thought it worth a quick post here about my experience.
For many people SP1 will be the first update applied to Project Server and SharePoint 2010, so with up to a year or more of production use it’s very possible that some features / solutions have been installed and removed which might cause some problems for the SP1 install.
In my case on my development lab this was most certainly the case with literally dozens of (often half developed) solutions in various states of deployment!
So in this case you may have the configuration Wizard fail after SP1 setup with a message like this:
Upgrade Timer job is exiting due to exception: Microsoft.SharePoint.Upgrade.SPUpgradeException: Upgrade completed with errors. Review the upgrade log file located in C:Program FilesCommon FilesMicrosoft SharedWeb Server Extensions14LOGSUpgrade-20110701-160359-545.log. The number of errors and warnings is listed at the end of the upgrade log file.
Digging into the log mentioned reveals something like:
[ERROR] [7/1/2011 4:17:20 PM]: The feature with Id d67567a3-4946-412f-9428-1ca6061a5189 is referenced in the database [WSS_Content], but is not installed on the current farm. The missing feature may cause upgrade to fail.
(A very helpful and surprisingly accurate message)
The problem as you can see is a missing feature, however using the standard PowerShell get-SPFeature commands don’t reveal anything. This is due to the solution already being uninstalled (or perhaps never installed in the case of a migrated database). Fortunately there is a solution:
Thanks Phil, using the provided scripts I was quickly able to identify and remove the offending feature. Once done a rerun of the PSCONFIG wizard (in my case using the command line “PSCONFIG –cmd upgrade –inplace b2b”) completes without errors.
Hope that helps someone else out there.


