by Martin Laukkanen | Jul 25, 2014 | Reporting, SQL
I saw this issue when working with an old colleague Hammad Arif earlier this year and he came up with a solution written up here that worked nicely at the time, however I’ve come across this again and this time it proved more of a challenge.
Problem
When exporting to PDF Reporting Services reports containing multi-line text from a SQL datasource the first line of text loses all spaces between words, see screenshot taken from a PDF file:

Nope that’s not one particularly long German conjugation, that is the problem I’m talking about! It only seems to affect the first line of each multi-line based custom field value in the SSRS dataset and additionally when looking at the data in SQL or in the HTML source there is nothing different visible! However oddly on the affected projects a single odd character (​) does exist before the html <span>.
Resolution
After much head scratching it took a call to Microsoft to identify that hidden away in the database tables are some characters, specifically HEX ‘0B 20’ which turns out to be the Zero Width Space or in HTML (​), the same character you can see in the HTML. Now this makes sense as despite these being invisible in the SQL tables using a SELECT statement, they still exist and cause these symptoms in the PDF but not when viewed on the Web or exported to Word or other formats.
Fortunately the resolution for the report is nice and simple;
SELECT REPLACE(Problemstellung, NCHAR(8203), '') AS Problemstellung
Simply wrap each multi-line text field affected with the SQL REPLACE command removing the character completely!
To answer the question of where they came from, that is one I leave to the Microsoft escalation engineers. :)
HTH,
by Martin Laukkanen | Apr 9, 2014 | How to, Reporting
I’ve been looking forward to using the new SSIS OData Connector for SQL 2012 since first hearing about it at Project Conf last month, Paul Mather wrote up a great step-by-step guide on getting it all up and running here so have a look at that if you haven’t yet.
However the devil is always in the details! Creating a simple report combining Project data and SharePoint site data is not as straight-forward as you might hope.
Reporting custom project site list data from ProjectOnline
Possibly the most common customer request I get when it comes to reporting is the need to report against non-standard Project site list data, something that was simple using SSRS 2008 R2 but made impossible in ProjectOnline, until now that is.
Following on from Paul’s post, in order to do this you’ll need an SSIS package that does the following:
- Retrieve Project Data from the ProjectOnline OData endpoint: /_api/ProjectData
- Get a list of Project Site URLs from the data and save it in a variable
- Loop through each Project Site and retrieve data from the SharePoint endpoint: /[ProjectURL]/_vti_bin/listdata.svc after dynamically updating the [ProjectURL]
Also you’ll notice there in step 3 I use the listdata.svc endpoint rather than the REST endpoint (e.g. /_api/Web/Lists/getbytitle(‘Risks’)/Items), if you followed Paul’s steps above and tried to retrieve the site list data then you probably are seeing the following error when building the connection:
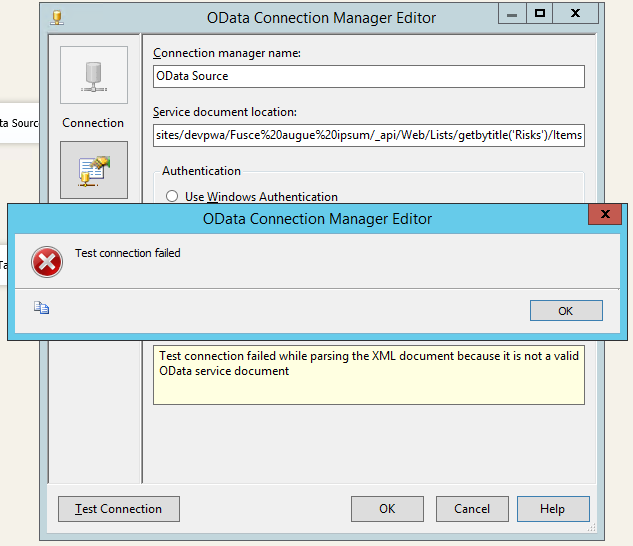
Error message:
Test connection failed while parsing the XML document because it is not a valid OData service document.
If you’re seeing that message it is because the SSIS connector is expecting a ‘service document’ and not the actual OData feed. Not sure why the SharePoint REST endpoints don’t also have a service document at the root but we can work around it by using the listdata.svc.
Finally once we have the list of all of the Project site URLs then we need to update the Data Connection URL before we retrieve the site list data. I’ll cover all of these steps below.
Requirements for building the SSIS package
Paul Mather’s blog covers the basic setup, so I won’t cover that in detail but in summary to create / use the solution below you will need:
- SQL Server Integration Services 2012
- SQL Data Tools 2012 (the BIDS replacement on the SQL DVD)
- Microsoft® OData Source for Microsoft SQL Server® 2012
- SharePoint Server 2013 Client Components SDK
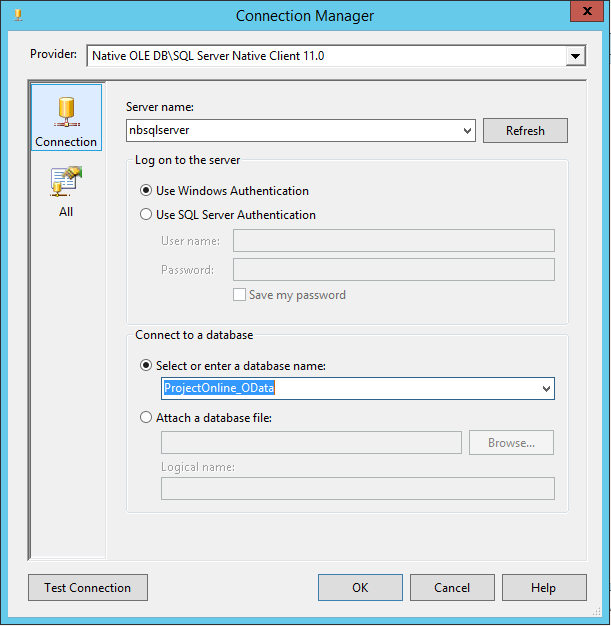
- An empty SQL database to write to, I’m going to use one called ProjectOnline_OData
You can run Data Tools on your client but the rest must be installed on the SSIS server.
Creating a SSIS package to retrieve site custom list for all projects
Create a new SSIS package and to start by adding the following Connection Managers:
- OLE DB Connection which points to your SQL database: e.g. ProjectOnline_OData
- An OData Connection pointing to the ProjectData OData service: e.g.

- An OData Connection pointing to the SharePoint ListData.svc OData service of an existing project site: e.g. Test%20Project/_vti_bin/listdata.svc
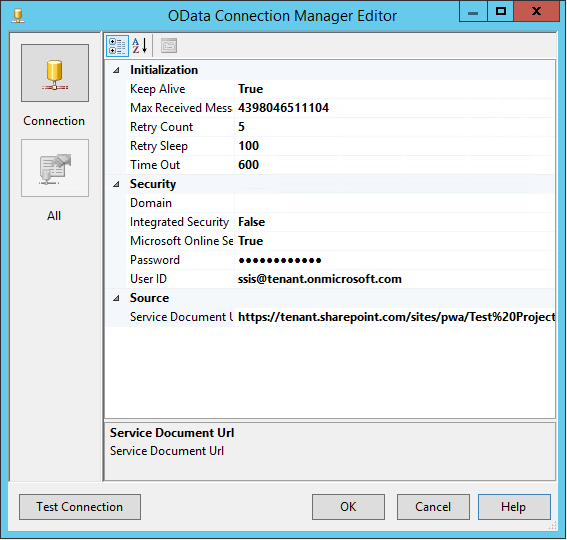
Make sure that each connection test’s successfully, and give them descriptive names which will be used later. I’m using OData_ProjectData and OData_SharePointListData for the last two and note that both names will be referenced below.
A note on security
The account used to authenticate with our OData connections must be a ProjectOnline user, and specifically it must have access to all projects and project sites. In order to do this easily I have added the users ([email protected]) to the following:
- Project Web App Administrators
- Site Collection Administrators
Adjust as you see fit.
Retrieve project data from OData
Now that we have our data connections we need to first get our Project data (and optionally any other data such as tasks), then prepare to get our project site data.
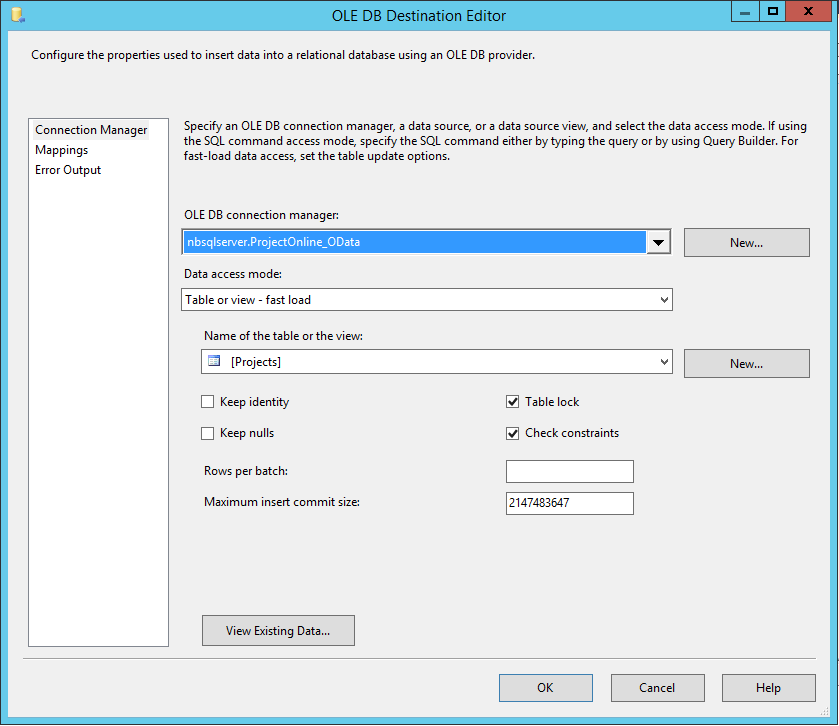
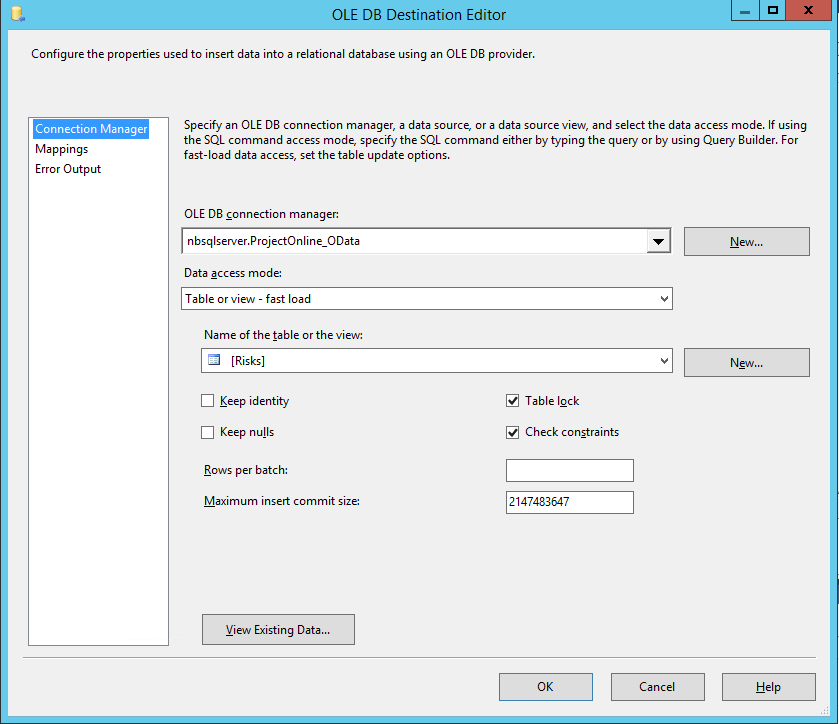
- As per Paul’s blog create a Data Flow task with an OData Source (OData_ProjectData) which points to the Projects collection.
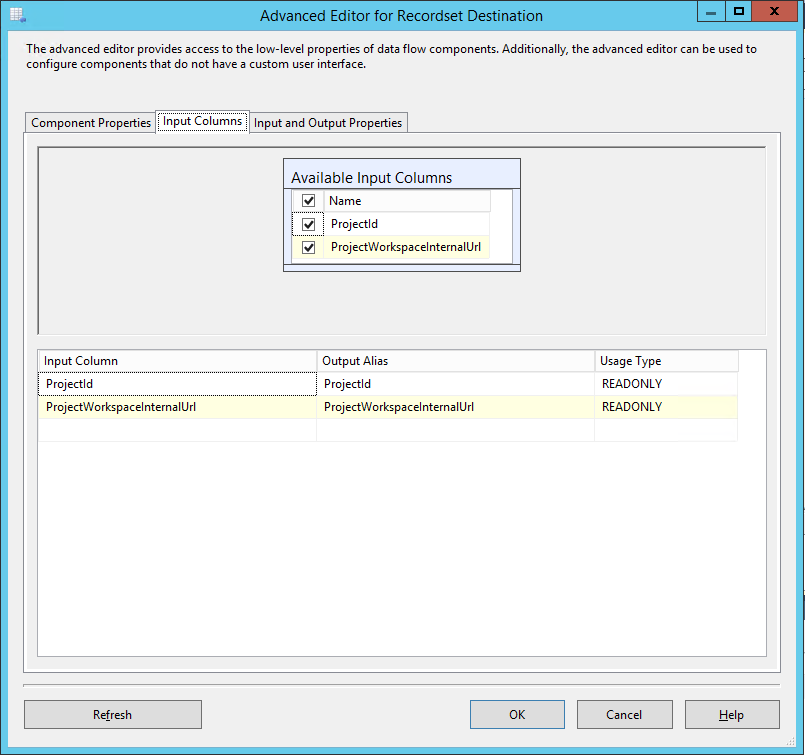
- Ensure that you select only your required Columns, however you must include the following as a minimum: ProjectId & ProjectWorkspaceInternalUrl.
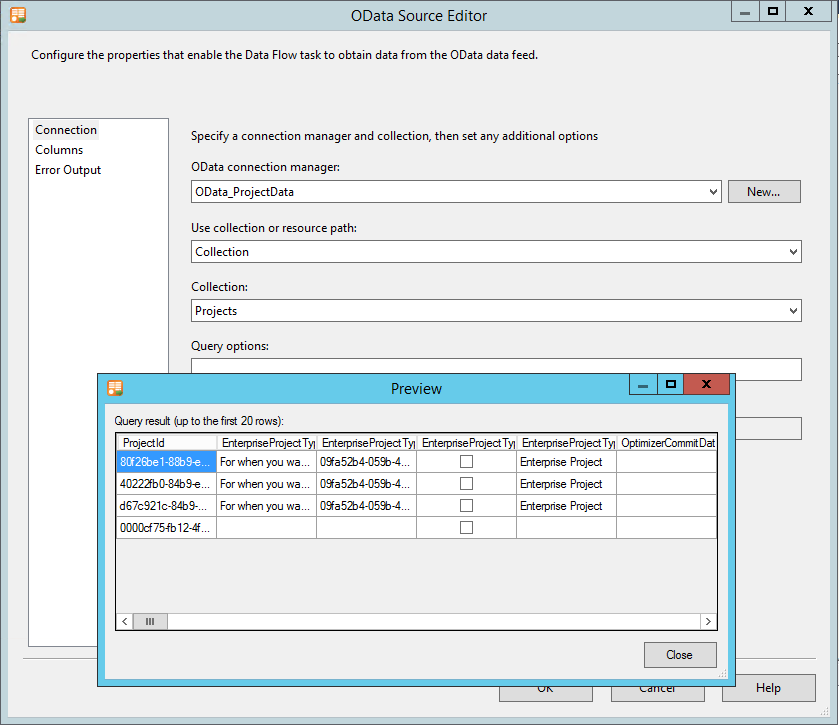
Projects collection OData source with preview
- Use the Destination Assistant to create the destination database
- Create a new table to store the data in (I’m using the name Projects) and configure your mappings
- Optionally you could add other Data Flow tasks in there to get Tasks or other data into additional database tables, but only using the OData_ProjectData connection at this point.
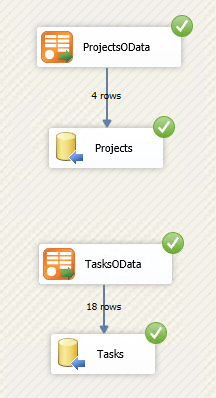
So now you should have a solution that runs and looks something like this when debugging:
Also if you started with Paul’s blog, then this is where those steps end.
Prepare to loop through all project sites
In order to get the site list data for each project in PWA we need to first save a temporary variable with a list of all ProjectWorkspaceInternalUrl‘s.
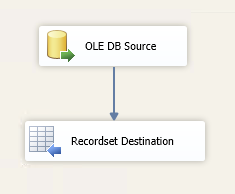
- In your solution on the Control Flow tab add another Data Flow Task. Link the green arrow from the previous task to this one (so runs 2nd)

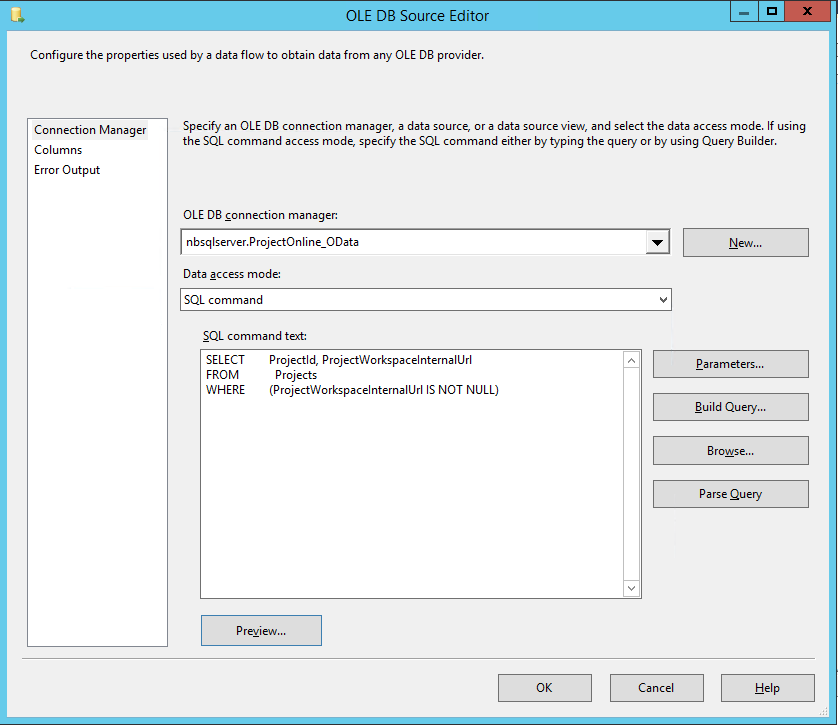
- Add an OLE DB Source to the Data Flow using the Source Assistant
- This source will be configured to get project url’s saved into our database in the last step using the following SQL command:
SELECT        ProjectId, ProjectWorkspaceInternalUrl
FROM            Projects
WHERE        (ProjectWorkspaceInternalUrl IS NOT NULL)
So it looks like;
Create a temporary variable to store URLs
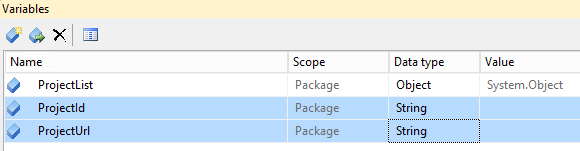
- Open the Variables window in Visual Studio (it’s one of the icons top right above the package area.
- Add a variable called ProjectList and set the Type to Object

- Now add a Recordset Destination to the data flow and link the blue arrow from our OLE Source to it
- In the advanced properties specify the VariableName just created.
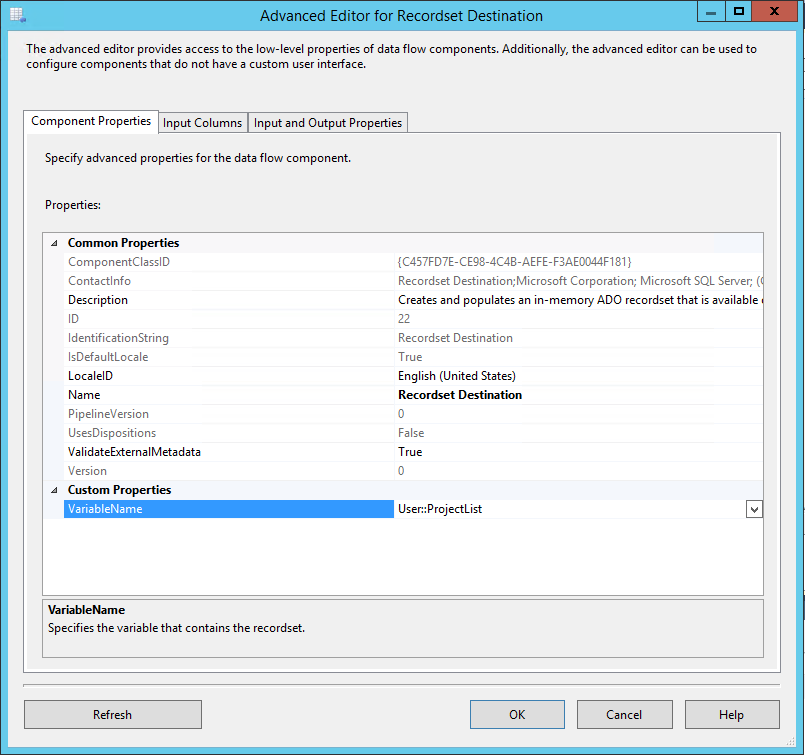
- On the Input Columns tab select all columns
All other settings can be left with defaults. The Data Flow task should now look like this;
Create a Foreach loop to iterate through sites
Now we’re getting to the tricky part, SSIS enables this kind of iteration nicely, however we need to do a couple of special things to work with our OData list data, specifically update the datasource URL to the next project and extend the returned data by adding the ProjectId field of the project (for our FK).
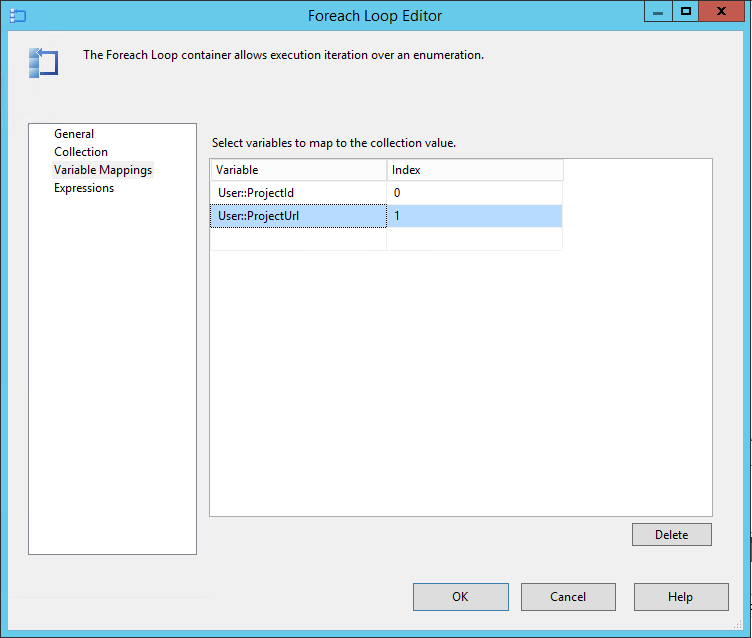
- Firstly add two new Variables to the package; ProjectId and ProjectUrl, both as type String
- Next drag in a Foreach Loop Container and connect the green arrow from the previous item to it
- In the Collection properties of the Foreach Loop select Foreach ADO Enumerator and specify the User::ProjectList variable created earlier
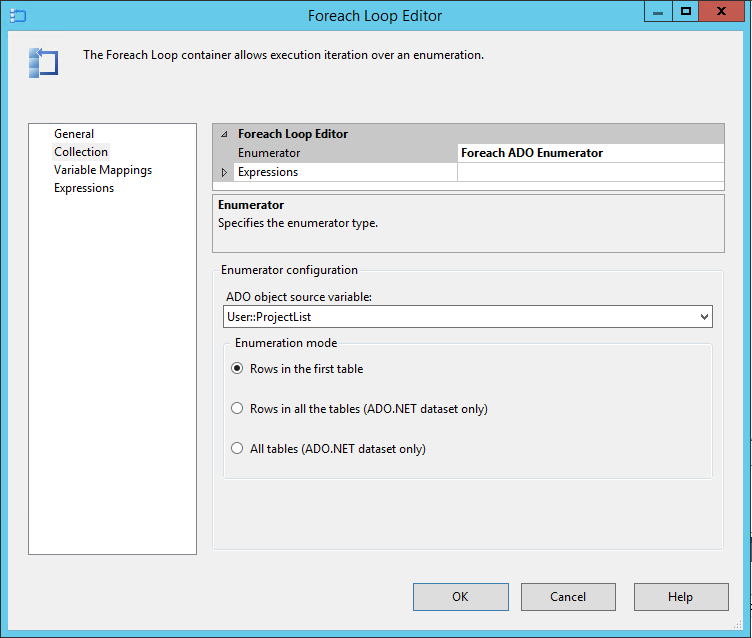
- Next under Variable Mappings specify our other variables in the following index order: Index 0 – User:ProjectId, Index 1 – User::ProjectURL, (Note this order is important and used in the Foreach below!)
Update the SharePoint Listdata datasource URL
The first action inside our Foreach loop must be to update the connection string property of our SharePoint listdata dataconnection created at the beginning. Don’t run away but we’ll do this using a Script Task and a few lines of code.
- Drop a Script Task inside the Foreach loop container
- In the properties make sure the ScriptLanguage is Visual C# 2010
- Then add a ReadOnlyVariable pointing to User::ProjectUrl

- Click Edit Script and we’ll be replacing the Main() block with the following code:
public void Main()
{
	// TODO: Add your code here
	String ProjectURL = (String)Dts.Variables[0].Value;

	Dts.Connections["OData_SharePointListData"].ConnectionString =
		System.Text.RegularExpressions.Regex.Replace(
			Dts.Connections["OData_SharePointListData"].ConnectionString,
			"https://.*(?=/_vti_bin/listdata.svc)",
			ProjectURL);

	Dts.TaskResult = (int)ScriptResults.Success;
}
IMPORTANT NOTE: In that code we reference the OData_SharePointListData connection by name which we created way back in the first step! So if you used another name make sure you update both references to that name in the code.
Save and close that script window and we can move on to the last couple of steps.
Getting project site data from each site
- Add a Data Flow Task after the script task inside the Foreach loop container, and link the green arrow from the script task to the data flow task
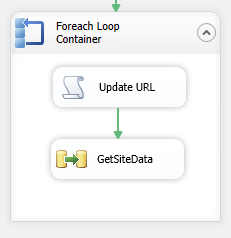
- In the Data Flow tab for this item, first add an OData Source
- Configure the source using the OData_SharePointListData source created and specify the required collection (I’m using Risks for the sake of this demo)
- Select the desired columns and preview to test
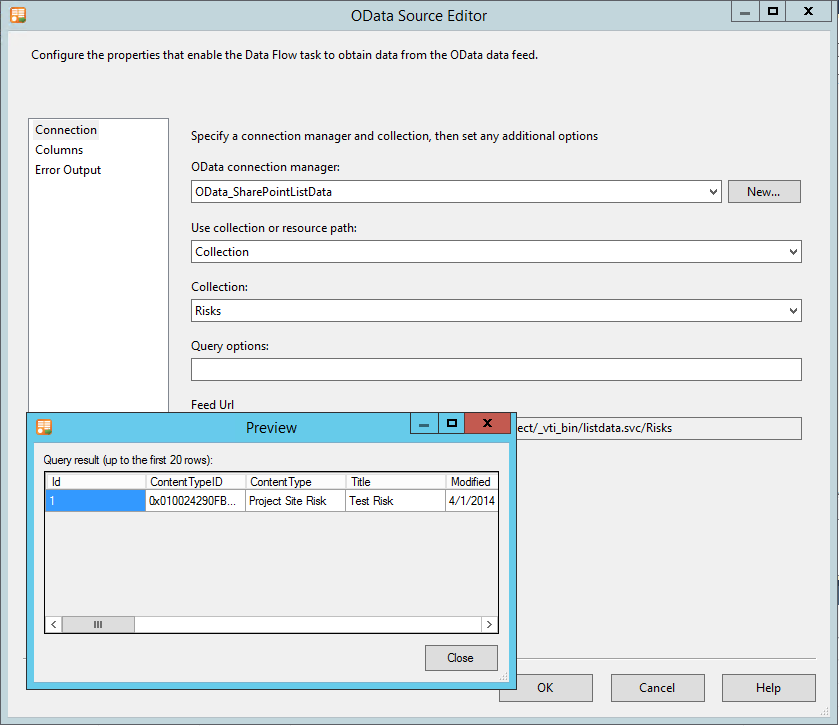
Note here that I’m able to see the values in the test project site that I specified right back at the beginning, however when the solution executes the URL will have been updated before this step. Whenever you edit this solution in the future this site must be valid and accessible else you will get errors here.
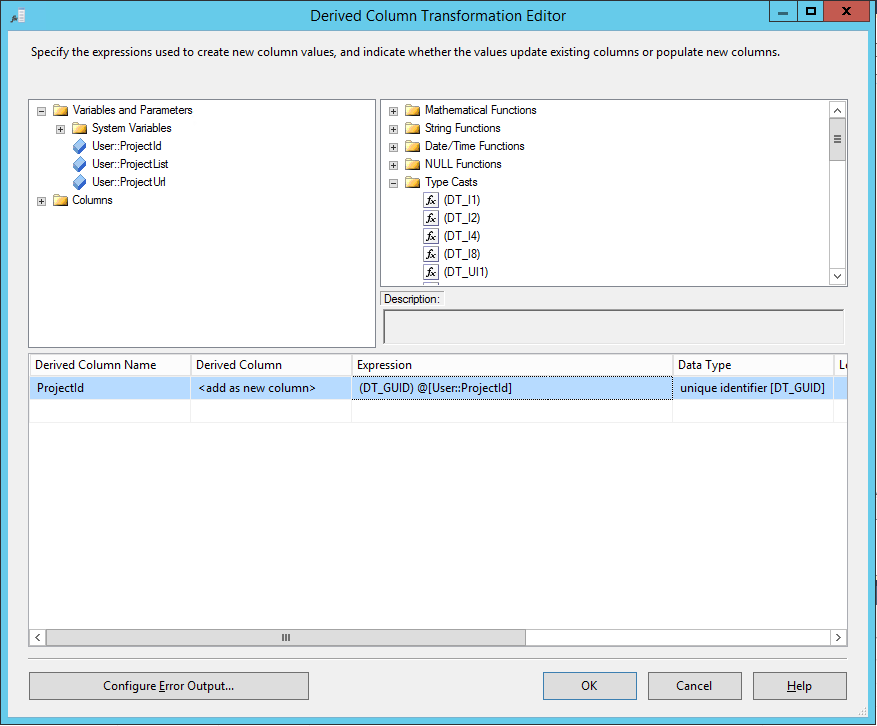
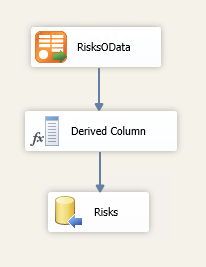
Next we need to add our project server ProjectId to the data coming from OData so we can use it is a foreign key in the destination database table.
- Drag a Derived Column to the canvas link it 2nd and edit the properties
- Add a Derived Column Name as ProjectId
- From the Variables and Parameters drag the User::ProjectId into the Expression box
- Lastly (importantly) from the Type Casts list drag the (DT_GUID) item to the start of the expression so it is exactly: (DT_GUID) @[User::ProjectId]
- Now finally use the Destination Assistant to create and configure our Risks database table where the data will be saved
- Configure the mappings as required, and double check that ProjectId has automatically been mapped
We’re just about done, that Data Flow should now look like this:
Final touches
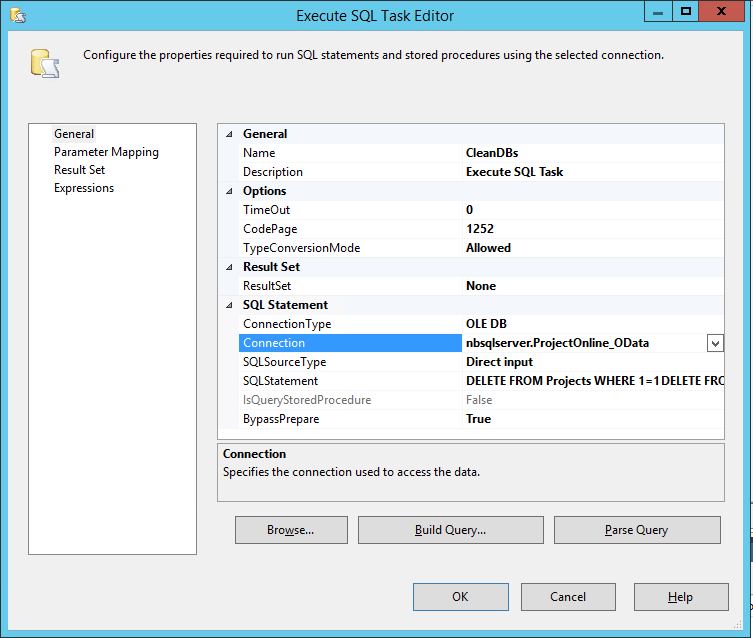
The solution should now run and work as expected, with only one catch, each time you run it it will append all of the data again, so for a quick (hackish) solution to that the final step here is to add a step to the very beginning to delete existing data in our report database.
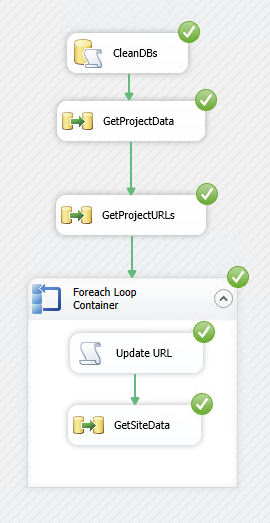
- On the Control Flow tab add one more Execute SQL Task to the top of the canvas and make our first GetProjectData follow it.
- Edit the properties and select our temp database ProjectOnline_OData as the Connection
- Then set the following as the SQL Query (Note: Don’t use Build Query as that won’t let you cut and paste, just paste it into the SQLStatement field
DELETE FROM Projects WHERE 1=1
DELETE FROM Tasks WHERE 1=1
DELETE FROM Risks WHERE 1=1
- No other options need be changed
Done, test it out and it should run and look something like this when run:
Final words
That was easy, wasn’t it? Aren’t we all glad to not need the SSRS SharePoint list datasource anymore! *ahem* [sarcasm]
Well now that you have your data-warehouse of project data and all artifacts, that should make your SSRS report writing not only simpler but actually much faster performing.
Download Source
Download this full solution here and any post any questions below.

ProjectOnline_OData.zip
To use this you will need to update all your data-connections and recreate the destination Tables (as per steps above).
by Martin Laukkanen | Mar 31, 2011 | Reporting, SQL
A long time ago (it seems) I blogged about reporting directly from the SharePoint workspace sites using SQL Reporting Services to get around the limitations with the reporting database refresh. Using XML provided a neat method for pulling data directly from all the out-of-the-box lists such as Risks and Issues, as well as other custom lists.
Unfortunately setup and maintenance was difficult requiring a little knowledge of web services as well as some XML syntax, but fortunately now with SQL Server 2008 R2 things have improved drastically!
What’s New: Now you can directly create ‘Microsoft SharePoint List’ data sources!
See the screenshot:

Better yet when you create a Data Set using the above data source the Query Designer is completely new:

Finally no more messing around with column names using XML and having to have specific views configured in your SharePoint sites.
That should make things much easier!
BTW. Lastly it’s definitely worth mentioning that the above also works with Report Builder 3.0!
by Martin Laukkanen | Nov 27, 2010 | Troubleshooting
When trying to configure the SQL Reporting Services Add-in for SharePoint 2010 from Central Admin you might see the following error:

(Error Text: Failed to establish connection with report server. Verify the server URL is correct or review ULS logs for more information. …)
Most common cause: Kerberos
There are actually a few causes for this, and usually the ULS will show the reason pretty clearly, for instance most commonly I see the following:
w3wp.exe (0x11E4) 0x1460 SQL Server Reporting Services SOAP Client Proxy 0000 High Exception encountered for SOAP method GetSystemProperties: System.Net.WebException: The request failed with HTTP status 401: Unauthorized
In that case the cause is likely to be related to Kerberos, if you’re using Windows Authentication mode and have multiple servers in the SharePoint farm then that is where you should look. A good test to prove that is if it works without error using ‘Trusted Authentication’.
Alternate cause: SSL
However recently I have found a new type of issue that causes this, here’s the ULS extract;
An operation failed because the following certificate has validation errors:nnSubject Name: CN=*.something.com, [… … snip … …]nnErrors:nn The root of the certificate chain is not a trusted root authority..
In this case the ULS log is very helpful indeed as it seems that SharePoint maintains its own certificate store which does not contain any of the usual certificates.
So the solution to this one is quite easy, you simply need to obtain and install the appropriate certificate.
With credits to this blog Calling an SSL Web Service from SharePoint 2010 (For example LinkedIn) you can download the certificates directly from Verisign:
https://www.verisign.com/support/roots.html
In my case it was the GeoTrust certificate, if you’re not sure then view the certificate by clicking the Padlock icon in IE and under Certification Path you can view the certificate hierarchy to determine who your root certificate is.
Once you have your certificate then open Central Admin, and under Security – Manage Trust add the certificate using New. It should then look something like this:

Once that’s done go back to the SSRS integration and you should now hopefully be able to complete the integration without further errors.
Final Thoughts
This SSRS integration has always had problems in my experience, all that I can suggest if you are still having issues is double check:
- SQL Reporting Services 2008 should be installed with Service Pack 2 (or SP1 with CU8)
- SQL Reporting Services 2008 R2 in my experience works without any updates, however you might like to try the latest patches: both SSRS and the SharePoint add-in are updated in SQL 2008 R2 CU4 (http://support.microsoft.com/kb/2345451)
Hope that helps someone out there!
by Martin Laukkanen | May 17, 2010 | Project 2010, SharePoint 2010, SQL
With SharePoint 2010 adding a good number of new databases to the default configuration one thing that is sorely missing is the ability to easily name those databases.
Is it just me who has to conform to strict database naming conventions in most installations of Project Server?
I’ve just been working on what I think is a pretty typical Project Server 2010 installation and found that in-order to simply prefix my databases names with something rather than let them be automatically named with a GUID I faced the following:
- Central Admin and the farm configuration is the same as 2007, the PSCONFIG command line will let you name both of those databases.
- Session State Service Application – the first hurdle, this one requires a PowerShell command to give the database a name, e.g.:
$serviceApp = New-SPStateServiceApplication -Name "State Service"
New-SPStateServiceDatabase -Name "MyPrefix_State_Service" -ServiceApplication $serviceApp
New-SPStateServiceApplicationProxy -Name "State Service" -ServiceApplication $serviceApp –DefaultProxyGroup
- Secure Store Application – Central Admin fortunately will let you name the database through the usual creation process.
- Search Service Application – Next hurdle and this one much bigger, three databases are required now for the Search service; Administration, Crawl and Property databases are created, this blog post has a nice PowerShell script to create the service with named databases but with 50 odd lines for the script I’m not going to repeat it here. Fortunately if you’re happy with not naming just one of those three databases, it is actually possible to create new Crawl and Property databases with specified names after creating the three using Central Admin.
- PerformancePoint Service – Well for this one I have not found a way to name the database?! I need to revisit this as there must be a way, but looking at the PowerShell command line options and searching TechNet I couldn’t find one!
- User Profile Service, Excel Services and WSS Usage are all well behaved and through Central Admin you can name the databases.
So it’s about time to get that installation PowerShell script done, as unless your happy with the default wizard configuration then this setup is getting quite long “just” to get Project Server 2010 installed.


