by Martin Laukkanen | Jul 26, 2018 | Flow, How to, Workflow
Flow is a great (one day) replacement for SharePoint Designer workflows, however at the moment the Project Online connectors are still in “preview” and as such as woefully inadequate. In my view the biggest omission is the inability to set custom fields, among many other failings this one is pretty much always step one or two on any workflow I have ever needed to create for Project Server.
You may have seen some MS demos where they show a quick easy way to circumvent this by using the HTTP action, unfortunately I’ve yet to find any online examples of that so I’m going to write one myself. This article focuses on Enterprise Resource custom fields but applies equally well to Task custom fields. However, the process is actually simpler for Project level custom fields and Paul Mather has blogged on the topic before here. Although he doesn’t cover Flow in that article, you can convert his JavaScript code to a JSON body and use it as as below. There’s also this StackExchange post that covers Project fields using a different method.
Updating Enterprise Resource fields via REST
It turns out this is not supported!
Please correct me if I’m wrong here, I’ve spent many hours looking for a solution for this from MS to no avail!
Well for me I figure if MS released an API 5 years ago and never got around to finishing it then supported or not I need a way to do my job. Fortunately it is possible via CSOM/JSOM to do this, and by understanding how all the client side API’s work you will see that it is possible and (arguably) fully supported to do this via REST using the internal methods used by CSOM/JSOM.
Updated Enterprise Resource default fields via REST
Before we look at custom fields lets cover how to set the default fields such as; Group, Email, etc. These can be set via the normal REST endpoint, and frankly this is how it also *should* be possible to set custom fields.
Assuming the resource exists and you want to update it by GUID, the following HTTP PATCH request will do it:
PATCH /sites/pwa/_api/ProjectServer/EnterpriseResources('[guid]') HTTP/1.1
Host: contoso.sharepoint.com
Accept: application/json; odata=verbose
Content-Type: application/json; odata=verbose

{
    "__metadata": {
      "type": "PS.EnterpriseResource"
    },
    "Group": "Test group",
    "Email": "[email protected]"
}
That’s a raw HTTP request from PostMan, the important bits are the JSON and the PATCH type of request, yes a standard POST or PUT request will not work. In that JSON body of the request you can list multiple custom fields as long as you adhere to correct JSON syntax, for the full list of field names, browse to the endpoint in your browser: /sites/pwa/_api/ProjectServer/EnterpriseResources.
However if you look at the endpoints you’ll see the custom field values referenced by internal name, e.g.: Custom_x005f_000039b78bbe4ceb82c4fa8c0c400284
Unfortunately it is not possible to add to your JSON the CF value, like: “Custom_x005f_000039b78bbe4ceb82c4fa8c0c400284″: “Text value for field” as a result we have to work a bit harder.
Enter the ProcessQuery endpoint
(If you’re not interested in the why, but just the how to do this, you may want to skip to the next section!)
If you’re familiar with Fiddler traces of any of the SharePoint client side object models then you will have seen that all of the API calls made are translated into HTTP calls to an internal endpoint: _vti_bin/client.svc/ProcessQuery while not documented anywhere I have found, you can see that basically this is where the ClientContext.ExecuteQueryAsync(…) call from either CSOM or JSOM is performing the requested operation.
The ProcessQuery endpoint accepts a HTTP POST request with a body that looks something like this:
<Request xmlns="http://schemas.microsoft.com/sharepoint/clientquery/2009" SchemaVersion="15.0.0.0" LibraryVersion="16.0.0.0" ApplicationName="Javascript Library">
    <Actions>
        <Method Name="SetCustomFieldValue" Id="9" ObjectPathId="6">
            <Parameters>
                <Parameter Type="String">Custom_f825c154928ae81180da00155df8aa23</Parameter>
                <Parameter Type="String">text field value</Parameter>
            </Parameters>
        </Method>
        <Method Name="Update" Id="10" ObjectPathId="6" />
    </Actions>
    <ObjectPaths>
        <Method Id="6" ParentId="4" Name="GetById">
            <Parameters>
                <Parameter Type="String">5e658680-838a-e811-80df-00155df8b01b</Parameter>
            </Parameters>
        </Method>
        <Property Id="4" ParentId="0" Name="EnterpriseResources" />
        <Constructor Id="0" TypeId="{3a609e5f-e2a1-497c-87a2-e5e8a781c096}" />
    </ObjectPaths>
</Request>
That happens to be the query syntax to set a single text custom field for a resource. If you read through the content you can see (in order of Id properties) what is happening, in short the above translates to the following (pseudo) CSOM code:
var res = EnterpriseResources.GetById([guid]);
res.SetCustomFieldValue("Custom_f825...", "text field value");
EnterpriseResources.Update();
Pretty cool huh? :)
It get’s better, as if you trace in fiddler some code that does multiple things, like for example setting 3 or 4 custom field values, you will see that they are all batched into a single POST query just as you’d expect when using ExecuteQueryAsync in your code. The change in the method above is simply additional <Action> elements in the XML, one for each call to SetCustomFieldValue (note: incrementing the Id property is also necessary).
The remainder of that XML deserves a short explanation, ignoring the XML schema stuff the only other variable defined in the above example is a GUID: {3a609e5f-e2a1-497c-87a2-e5e8a781c096}. This GUID refers to the ServerTypeId that is defined in the Microsoft.ProjectServer.Client.dll file specifically the PS.ProjectServer constructor, and importantly “EnterpriseResources” is a public property of that class. So with that in mind you could re-use this GUID and make calls to any other public property to construct the call you need.
I prefer to cheat, and simply write a small snippet of JSOM (or CSOM) code that makes the call I want in REST, then use fiddler to get the XML body created when I make that call.
Calling a Project Online API from Flow
Now that we know what the HTTP request needs to look like we can start building a flow. Not so long ago this was much more difficult as we had to worry about OAuth2 and AzureAD apps and such, but now thankfully MS have added a new action to the SharePoint actions list which we are going to use:

I’ve created a new flow with a Project Online trigger “When a new resource is created”, and then added the above HTTP request action.
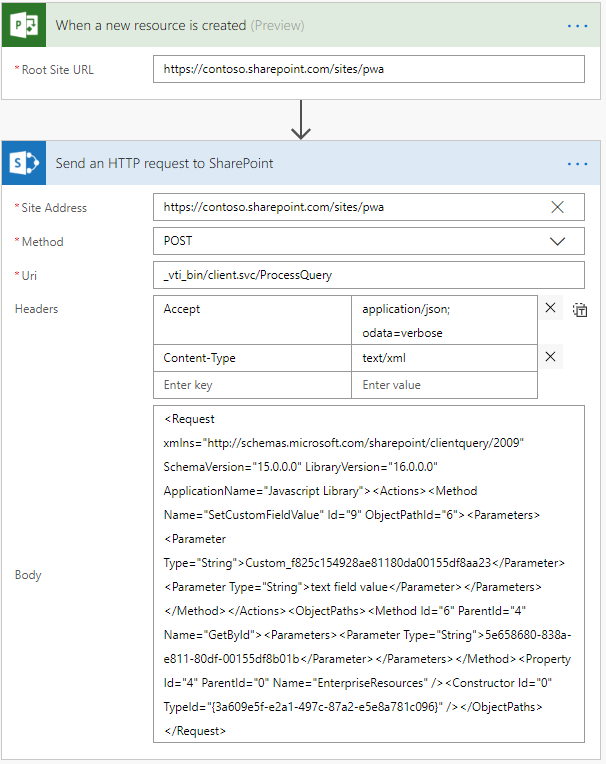
You need to populate the following values:
- Site Address: URL to your PWA
- Method: POST (for custom fields, or if out of the box fields PATCH)
- Uri: _vti_bin/client.svc/ProcessQuery
- Headers:
- Accept: application/json; odata=verbose
- Content-Type: text/xml
- Body: [Our XML body from the previous step]
Note: The header for Content-Type must be “text/xml” to match the content, if you were updating a default field using the JSON body from the beginning of this article, this would also be set to “application/json; odata=verbose”.
Thanks to the SharePoint HTTP action we don’t have to worry about authentication here, so actually that is it! Well almost.
Parameterizing the Flow action
Adding some variables to the flow allows us to parameterize the action based on whatever logic you want, once that’s done replace the values in the XML like this:
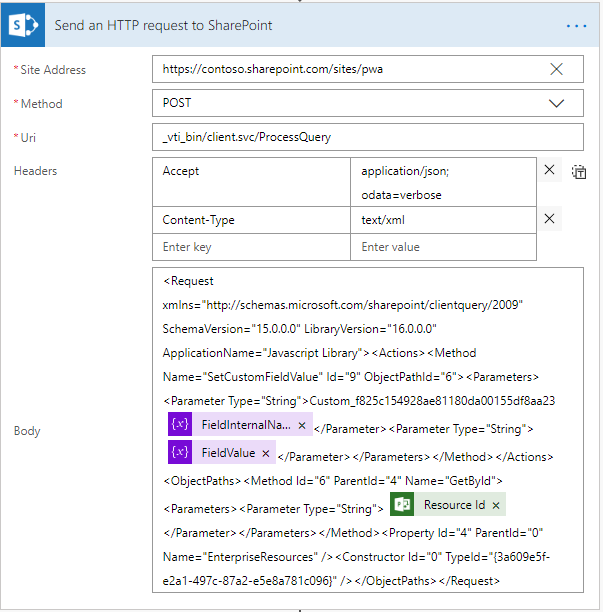
Important: Notice I have stripped the XML of tabs, spaces and line endings! This is required, if you don’t do that you will get an Unknown Error on larger query bodies.
Done.
What about default fields?
For completeness if you wanted to update the internal Group field for a resource, the http request action would look like this:
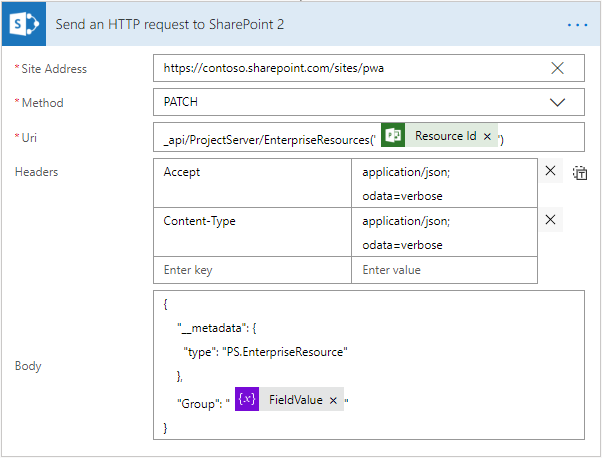
Note the resource GUID is in the URI and both the Method and Headers are different!
What about Lookup Table Values?
Lookup table value updates via REST have the same requirements as updating those values via JSOM (or CSOM), see my earlier post – Updating Lookup Table values using JSOM – for more on that.
In summary though, we need to first identify the lookup entry internal name, something like “Entry_412bb4bd5661e711a989000d3a28f1ff” then we need to pass that to the request as an array.
The request body now will look like this:
<Request xmlns="http://schemas.microsoft.com/sharepoint/clientquery/2009" SchemaVersion="15.0.0.0" LibraryVersion="16.0.0.0" ApplicationName="Javascript Library">
    <Actions>
        <Method Name="SetCustomFieldValue" Id="13" ObjectPathId="8">
            <Parameters>
                <Parameter Type="String">Custom_f825c154928ae81180da00155df8aa23</Parameter>
                <Parameter Type="String">text field value</Parameter>
            </Parameters>
        </Method>
        <Method Name="SetCustomFieldValue" Id="14" ObjectPathId="8">
            <Parameters>
                <Parameter Type="String">Custom_000039b78bbe4ceb82c4fa8c0c400284</Parameter>
                <Parameter Type="Array">
                    <Object Type="String">Entry_412bb4bd5661e711a989000d3a28f1ff</Object>
                </Parameter>
            </Parameters>
        </Method>
        <Method Name="Update" Id="15" ObjectPathId="6" />
    </Actions>
    <ObjectPaths>
        <Property Id="6" ParentId="0" Name="EnterpriseResources" />
        <Method Id="8" ParentId="6" Name="GetById">
            <Parameters>
                <Parameter Type="String">0bd67eed-538e-e811-aadb-000d3a28f1ff</Parameter>
            </Parameters>
        </Method>
        <Constructor Id="0" TypeId="{3a609e5f-e2a1-497c-87a2-e5e8a781c096}" />
    </ObjectPaths>
</Request>
I’ve left in the previous example to demonstrate how to set two custom fields at once, but the important part here is lines 9 – 16 which include the additional syntax you will need to set an array type value. Once again passing the value as an array is required for both single value lookups as well as multi-value.
Final words
This ProcessQuery endpoint is not publicly documented by Microsoft but a long time ago I discussed this with some people from the product group and their response was that while not officially supported, it is supported in the sense that it will not change until JSOM and CSOM are both disabled, as that’s how they internally work.
So use it with the usual warnings, but biggest of all: I take no responsibility or offer no support for how you use the above. Feel free to ask a question in the comments below, if I can help I will, but no guarantees.
by Martin Laukkanen | Oct 21, 2013 | How to, Project 2013
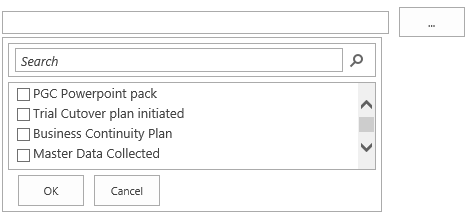
If you’ve worked with large lookup tables in Project Server before you know how unwieldy they can get very quickly, in 2013 the page control you use now includes a nice search feature to help but the default four lines displayed really doesn’t show much! See this example where you can see the scroll bar on the right is already very cramped:
Modifying the List Size with JavaScript
To give some more flexibility with the size I have written the following JavaScript (jQuery actually) to increase the size of a list of specific lookup tables when opened on the PDP:
<script src="//ajax.googleapis.com/ajax/libs/jquery/1.10.2/jquery.min.js">
</script>
<script>
function resizeLKTables() {
	setTimeout(function () {
		var incHeight = 150;
		var ltId = ['Blueprint Deliverables', 'Definition Deliverables'];

		for (var i = 0; i < ltId.length; i++) {
			var ltDiv = $("input[title='" + ltId[i] + "']").parent().children("div");

			ltDiv.height(175 + incHeight);
			ltDiv.find('div.outer-container').height(168 + incHeight);
			ltDiv.find('div.outer-container').find('div.results-padder').height(88 + incHeight);
			ltDiv.find('div.outer-container').find('div.general-results').height(86 + incHeight);
		}
	},50);
}

$('button').on("click", resizeLKTables);
</script>
The result

Much better.
Script Usage
To use this script copy the script source above and save into notepad as something like “resizetables.js“, now on lines 6 and 7 you need to update the two variables used:
- incHeight is the number of pixels to add to all of the specified lookup tables.
- ltId is a comma separated list of Custom Field names to increase the size of.
Once updated, upload the script somewhere in PWA (Site Assets maybe) then edit your PDPs and add a content editor webpart to the bottom of the page which links to your uploaded resizetables.js file.
Enjoy!
by Martin Laukkanen | Dec 4, 2010 | How to, SharePoint 2010
It seems SharePoint 2010 gives a nice new way to say exactly what versions of the binaries are installed on any given server in your farm, this is a great enhancement from 2007 which effectively required a Windows Explorer properties check at times to be absolutely sure that all the servers had been updated!
Find it in Central Admin by;
- Open Central Admin go to Upgrade and Migration

- Select Check product and path installation status
You should see something like the following:

Specifically if you scroll down you will see the project server section under each server in the farm, and in my case you can see the RTM version number plus the KB2394322 (October 2010 CU).

Nice.
FYI that SQL method still can come in handy (when migrating for instance) so if you’re not familiar with it here it is:
USE ProjectServer_Reporting
SELECT * FROM dbo.Versions
Not exactly as much detail as the above method, but it does confirm what version server your databases should belong to.
by Martin Laukkanen | Aug 7, 2010 | How to, Project 2010, Reporting
One of the biggest areas of advancement in Project Server 2010 is reporting, with Project now utilising; Excel Services, SQL Analysis Services, SQL Reporting Services and PerformancePoint the options are almost endless.
However most people I encounter look at that list and say; “What on earth is PerformancePoint?”, so lately I had another opportunity to flex my PPS skills and thought I might share my experience to give you a taste of how powerful yet simple to use this new thing can be.
Creating a Dynamic Resource Utilisation Graph using PerformancePoint
I’m going to keep this very simple, as I find PPS to be very often quite mind-boggling, so to give you a taste of it what I’ll describe here is how to create a simple equivalent to the old typical Data Analysis Resource Utilisation view.
So before you begin, make sure you have your Cube setup and built, the PerformancePoint service application setup and running in your SharePoint installation and some data to play with.
First step you need to get to the PerformancePoint Dashboard Designer, this is a nifty little web application (independent from the Office Web Apps) that is automatically installed and made available when you provision a PWA site.
To find it, open up the Business Intelligence site, and from there the quickest way to get to it is by hovering over any of the landing page images (Create Dashboards, etc) and selecting the ‘Start using PerformancePoint Services’ link.

You then have the icon to run Dashboard Designer:

This should download and install the designer for you, and assuming that you have all the correct permissions (and that PWA is in your Internet Explorer trusted sites), you will end up with a mostly empty designer window looking something like the image below.
Now you’re ready to start creating those reports, first step setup your Data Connections by selecting the Create tab on the ribbon and selecting Data Source:

Select Analysis Services as the connection type, and populate the connection details and properties as required:

For Analysis Services datasources you should populate the Time tab to ensure that your Time dimensions are correct, something like this;

Finally when you are done, select save from above the ribbon to continue.
Note: This is something you will get used to with the Dashboard Designer, everything is automatically saved to the PWA BI site in their respective locations (dataconnections, reports or dashboards), with just one exception being the ‘Workspace’ which is effectively your configuration of Dashboard Designer (something I don’t usually bother saving).
Now lets move on and create our report, select PerformancePoint Content and then from the Create ribbon lets select ‘Analytic Chart’;

Then select your datasource just created and hit finish, then your report will open in the designer;

Give it a name and then lets start adding content:
- First add some measures to the Series; Work and Actual Work.
- Now add your Resource List dimension to the Bottom Axis.
It should look something like this;

If you want to expand members of a dimension select the chevron (Down arrow next to the X), and select the members in the dialog.

Here for dynamic dimensions like the Resource list you are better off right-clicking and selecting one of the Autoselect Members, such as All Children, like so;

Which now looks like:

Finally we need our Time dimension, add it to the Bottom Axis from the right list and use the chevron to select the desired time periods (I’m selecting months by name here, however you can use something called Named Set’s to do this dynamically for you – another blog article maybe). Finally I think it’s best to move the Resource List to the top of the series Series list and apply some filters to filter out the blanks, to give us something like:

Don’t forget the Edit tab on the Ribbon which has a number of settings that you’ll find handy getting your report right.
Almost there now..
Okay so now we’re ready to save and see this thing for real, so hit the save button, and lets minimise the designer and go back to our BI site in Internet Explorer.
If you open the default ‘PerformancePoint Content’ link, you should see your new report listed, select the drop-down to Display the report:

Final product:

Now this report is ready to add to any where in SharePoint using the PerformancePoint viewer web part, and the best thing is that all of the dynamic functions will be available to all users, so if someone wants to view this report in terms of Cost / Actual Cost, it’s just a few clicks away:

Or maybe you want to see the breakdown of a particular person’s activities using the Decomposition Tree?

I’d say this beats those old Data Analysis views!
That’s it for this how-to, hopefully this scratching of the surface has shown you some of the potential of PPS, keep experimenting and you’ll see very quickly how easy it is to replace those old Data Analysis views that are so 1990!
In the future I might come back and write a Part II to this one on creating your first KPI Scorecard in PPS, stay tuned..
by Martin Laukkanen | Apr 22, 2010 | How to, Project 2010, Reporting
As you’ll quickly find in Project Server 2010, if you want to use the default Business Intelligence Center data connections then in order to include your own custom fields, then you’ll need to update the connectors. Here’s a quick guide on doing that to get to that data for your first Project Status Report.
Before I get into it don’t forget that the OLAP connections are automatically created, so in many cases you can use those, but if you’re like me and prefer direct reporting from the Reporting Database then you’ll have to create your own connections.
Step 1: Start from an existing connection file
For this I am going to use "Project Server – Project and Task Data" from the default location "BC CenterData Connections – English (…)", find the existing file and save it somewhere locally using the Send to – Download a Copy option.

Now open that ODC file in Notepad and you’ll see the XML contents and hopefully the important part the section labelled <odc:CommandText> where the SQL "SELECT …" statement is, that’s what we need to change to include our custom fields.
Step 2: Add your Custom Field details using SQL Management Studio
Using SQL Management Studio is the easiest way to confirm that you have the right field names to add to the query, to do that find your ProjectServer_Reporting database and in particular what you will want is the View named dbo.MSP_EpmProject_UserView (or one of the others if you want task or resource fields). Select the view and using the ‘Select Top 1000 Rows’ option to generate a SELECT query returning all data.

You’ll end up with something like this:
/****** Script for SelectTopNRows command from SSMS ******/
SELECT TOP 1000 [ProjectUID]
,[ProjectName]
[ …. Snip lots of built in fields….]
,[ProjectBaseline10Duration]
,[Project Departments]
,[Sample Business Need]
,[Sample Areas Impacted]
,[Sample Proposal Cost]
,[Sample Compliance Proposal]
,[Sample Assumptions]
,[Sample Goals]
,[Sample Post Implementation Review Date]
,[Sample Post Implementation Review Notes]
,[Sample Proposed Start Date]
,[Sample Proposed Finish Date]
,[Sample Approved Start Date]
,[Sample Approved Finish Date]
FROM [PWA_ProjectServer_Reporting].[dbo].[MSP_EpmProject_UserView]
The nice thing is in the views all the custom fields are listed last, as you can see from above the out of the box ‘Sample’ fields are all there to see. So next you just have to copy those field names into the ODC file opened earlier and save your changes.
Step 3: Update the ODC file
The only catch with updating the ODC file as you probably noticed is the format includes the view or table name prefix, such as:
MSP_EpmProject_UserView.ProjectBaseline10FinishDate as [ProjectBaseline10FinishDate], MSP_EpmProject_UserView.ProjectBaseline10Duration as [ProjectBaseline10Duration],
So all you need to know is that unless your changing the name you don’t need the bit after ‘as’, so if you search and replace to prefix each of your custom fields to add the "MSP_EpmProject_UserView." before the "," so you end up with something like:
,MSP_EpmProject_UserView.[Sample Business Need] ,MSP_EpmProject_UserView.[Sample Areas Impacted] ,MSP_EpmProject_UserView.[Sample Proposal Cost]
Now the last step is to paste those lines into the ODC file in Notepad, but note that the commas are at the start not the end, so you just need to make sure that when you paste the new lines that you have just one comma between each line except for the last line before the "FROM". You should end up with something like this:
MSP_EpmTask_UserView.TaskBaseline10Duration as [TaskBaseline10Duration], MSP_EpmTask_UserView.TaskBaseline10DurationString as [TaskBaseline10DurationString], MSP_EpmTask_UserView.[Health] as [Health] ,MSP_EpmProject_UserView.[Sample Business Need] ,MSP_EpmProject_UserView.[Sample Areas Impacted] ,MSP_EpmProject_UserView.[Sample Proposal Cost] FROM dbo.MSP_EpmProject_UserView INNER JOIN dbo.MSP_EpmTask_UserView ON MSP_EpmProject_UserView.ProjectUID = MSP_EpmTask_UserView.ProjectUID ORDER BY MSP_EpmProject_UserView.ProjectName, MSP_EpmTask_UserView.TaskIndex, MSP_EpmTask_UserView.TaskName </odc:CommandText>
Step 4: Upload the new ODC file to your Data Connection library
Now your just about done, save the file and back in your BI Center upload the file to a new location, make sure that you don’t try to overwrite the default file as those may be replaced by future service packs, I upload them directly into the Data Connections library.
Once uploaded you can now use them in Excel as normal. You might want to update or copy the existing templates and edit the data connection properties to point to this new ODC file, or otherwise just add them in as you normally would and carry on..


