by Martin Laukkanen | Dec 9, 2013 | Development, How to, SharePoint 2013
This is one of the new features of SharePoint 2013 that I have been looking forward to trying out since I first read about it; as someone who has often uses JavaScript to enhance the usability of Project Server JSLink is a perfect feature to make these customisation’s simply and in a supportable way.
JSLink in Action
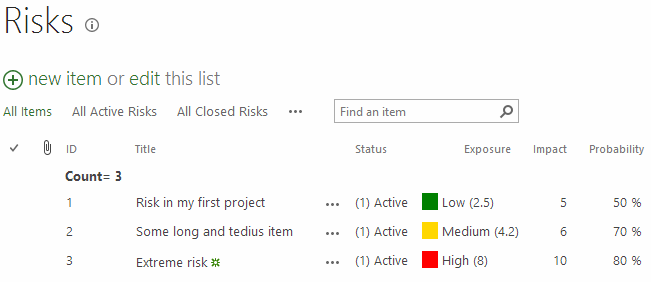
Check out my Exposure column on an otherwise default Project Site risk list! :)
JSLink enables the client-side rendering to be customised with just about any JavaScript or html changes that you think of, and better yet not only does it apply to views, but also New and Edit forms. For me that means I will probably never suggest InfoPath forms to a customer again!
Example Updating the Project Site Template
The screenshot above shows a simple example of a JSLink script configured on the project site out-of-the-box Risks list, to demonstrate how to do that quickly and easily against an existing list (or your Project Workspace Site template), first you need a bit of JavaScript:
JSLink script riskColor.js
Type.registerNamespace('CustomFormat');
CustomFormat.riskColor = function () {
var riskFieldsContext = {};
riskFieldsContext.Templates = {};
riskFieldsContext.Templates.Fields = {
"Exposure": { "View": CustomFormat.exposureColourTemplate }
};
SPClientTemplates.TemplateManager.RegisterTemplateOverrides(riskFieldsContext);
}
// This function provides the rendering logic for list view
CustomFormat.exposureColourTemplate = function(ctx) {
var fieldValue = ctx.CurrentItem[ctx.CurrentFieldSchema.Name];
if (parseFloat(fieldValue) > 7) {
return "<span style='background-color : red'> </span> High (" + fieldValue + ")";
}
else if (parseFloat(fieldValue) > 4) {
return "<span style='background-color : gold'> </span> Medium (" + fieldValue + ")";
}
else {
return "<span style='background-color : green'> </span> Low (" + fieldValue + ")";
}
}
//CSR-override for MDS disabled site
CustomFormat.riskColor();
if (typeof _spPageContextInfo != "undefined" && _spPageContextInfo != null) {
// CSR-override for MDS enabled site
RegisterModuleInit(_spPageContextInfo.siteServerRelativeUrl + "/SiteCollectionDocuments/riskColor.js", CustomFormat.riskColor);
}
In summary what is happening is the following:
On line 8 inside the CustomFormat.riskColor() function I define the field names which we want to customise and specify the formatting callback function for the type of customisation, in this case we are customising the “View” but we could use “DisplayForm”, “NewForm” or “EditForm” here also.
Two things to note here, firstly make sure you use the Internal Name of your field, so for instance if you created a custom column called “Risk Rating” then that would be “Risk_x0020_Rating”, secondly you can specify as many fields / columns by name here as you want each with a separate formatting function.
For more details on JSLink and all the other options available I’d recommend the following reading:
Next from line 19 to 26 in the CustomFormat.exposureColorTemplate() function I simply return our modified HTML based on the value of the field in question, in this example I’m comparing the number against three arbitrary values for High, Medium and Low, then returning a html string including a colour and some text to emphasize the value.
Finally and thanks to Wictor Wilen for his article on fixing the issues caused by MDS (SharePoint’s Minimal Download Strategy feature) I’m registering and then executing the script properly when called.
Registering the JSLink Script
Now that we have our script, we just need to register it in our site template, so to do so first save your script somewhere central in your site collection, I personally like Site Collection Documents under PWA, but wherever it is make sure everyone has access.
Secondly open your Risks list view and Edit Page from the SharePoint menu. With the page in Edit mode click the dropdown arrow for the Risks list web part and select Edit Web Part:
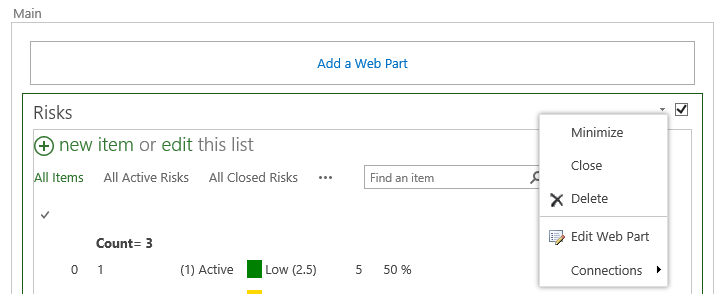
Now in the Web Part Properties expand Miscellaneous and locate the JS Link field:
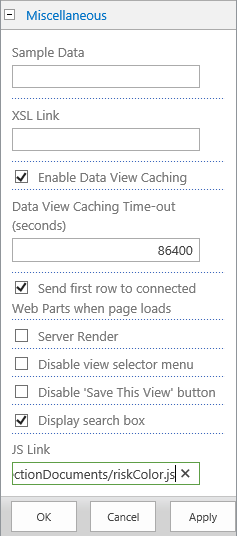
The full path I’m using is:
~sitecollection/SiteCollectionDocuments/riskColor.js
This path also is referenced at the bottom of the script as _spPageContextInfo.siteServerRelativeUrl + “/SiteCollectionDocuments/riskColor.js” so make sure to set both correctly.
NOTE: I’ve found this step is critical, the “~sitecollection” token is REQUIRED in the web part misc properties! At least in my case I was able to consistently cause IE to throw script errors if I tried to use a relative path like /PWA/SiteCollectionDocuments/riskColor.js! It did work in Chrome so maybe it is something in IE? Either way you can replace that with ~site ,or ~layouts as required.
Finally save your webpart configuration and it should immediately work.
Final Words
A few things; firstly double check the URL using in the Web Part properties and make certain to specify the path correctly in both the script and the web part properties. If you noticed the views fail (I did many times) then double check the note above about the ~sitecollection token.
Secondly because we are using the out-of-the-box Risks list we must add this JS Link script reference to every view and web part display of our Risks list.
Thirdly clear your browser cache! This one had me stumped as it seemed like none of my changes were working when in fact the script changes were not being refreshed, I found disabling the cache (easy in F12 mode in Chrome) made testing this super easy.
Finally for a bunch of cool examples of JSLink in action don’t forget to have a look at:
http://code.msdn.microsoft.com/office/Client-side-rendering-JS-2ed3538a
I hope you find this useful.
by Martin Laukkanen | Oct 21, 2013 | How to, Project 2013
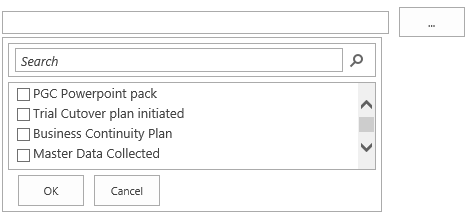
If you’ve worked with large lookup tables in Project Server before you know how unwieldy they can get very quickly, in 2013 the page control you use now includes a nice search feature to help but the default four lines displayed really doesn’t show much! See this example where you can see the scroll bar on the right is already very cramped:
Modifying the List Size with JavaScript
To give some more flexibility with the size I have written the following JavaScript (jQuery actually) to increase the size of a list of specific lookup tables when opened on the PDP:
<script src="//ajax.googleapis.com/ajax/libs/jquery/1.10.2/jquery.min.js">
</script>
<script>
function resizeLKTables() {
	setTimeout(function () {
		var incHeight = 150;
		var ltId = ['Blueprint Deliverables', 'Definition Deliverables'];

		for (var i = 0; i < ltId.length; i++) {
			var ltDiv = $("input[title='" + ltId[i] + "']").parent().children("div");

			ltDiv.height(175 + incHeight);
			ltDiv.find('div.outer-container').height(168 + incHeight);
			ltDiv.find('div.outer-container').find('div.results-padder').height(88 + incHeight);
			ltDiv.find('div.outer-container').find('div.general-results').height(86 + incHeight);
		}
	},50);
}

$('button').on("click", resizeLKTables);
</script>
The result

Much better.
Script Usage
To use this script copy the script source above and save into notepad as something like “resizetables.js“, now on lines 6 and 7 you need to update the two variables used:
- incHeight is the number of pixels to add to all of the specified lookup tables.
- ltId is a comma separated list of Custom Field names to increase the size of.
Once updated, upload the script somewhere in PWA (Site Assets maybe) then edit your PDPs and add a content editor webpart to the bottom of the page which links to your uploaded resizetables.js file.
Enjoy!
by Martin Laukkanen | Aug 23, 2013 | Apps, Development, How to, Project 2013
As follow-up to my Updating Project Server custom fields via JSOM post I figured that as I only covered part of the problem a second post was needed to cover lookup table values.
In fact working out how to update Project Server lookup table based custom fields was actually much harder than I expected, so hopefully this saves someone else out there all the time I wasted!
Overview
Updating lookup table based custom field values uses the same method as normal custom fields:
PS.DraftProject.setCustomFieldValue(FieldName, Value);
Firstly you need to follow the instructions from part 1 to get the InternalName to use for the FieldName parameter, however what is completely different when updating lookup values is the second Value parameter.
If you’ve used PSI (or even just Reporting) before you probably recall how each lookup table value has a UID which represents its value, so what we need to do for custom fields with lookup table values is actually the following;
- Identify the internal name of the lookup table entry for the table.
- Pass the name to setCustomFieldValue in an acceptable format.
So a quick example should look something like this:
  PS.DraftProject.setCustomFieldValue(
    'Custom_x005f_d2bb8d78a1f5e211940b00155d000a03',
    ['Entry_fea76e70a1f5e211940b00155d000a03']);
Note: For those skim-reading pay attention to the [] or read on!
Obtaining a Lookup Table Entry Name
In the previous post I wrote we used JSOM to create an array containing all of our custom field details, now for our lookup table values we need need to create a another array to store the Lookup Entry properties.
Note: Using CSOM this is actually really easy: http://msdn.microsoft.com/en-us/library/office/microsoft.projectserver.client.lookupentrycollection_di_pj14mref.aspx
However due to the asynchronous nature of JSOM it is a little more complex.
Here’s an example JavaScript method which builds on top of the previous post code:
var fieldName = 'Programme';
var lookupEntries = [];

function getCFComplete(response) {
    var cfEnumerator = customFields.getEnumerator();

    while (cfEnumerator.moveNext()) {
        var cf = cfEnumerator.get_current();

        // Is this our custom field with lookup table values?
        if (cf.get_name() === fieldName) {
            var lookupTable = cf.get_lookupTable();

            // 2nd async request - load the LookupTable data
            projContext.load(lookupTable);
            projContext.executeQueryAsync(function () {
                var ltEntries = lookupTable.get_entries();

                // 3rd async request - load the lookup table entries
                projContext.load(ltEntries);
                projContext.executeQueryAsync(function () {
                    var ltEnum = ltEntries.getEnumerator();

                    while (ltEnum.moveNext()) {
                        var ltEntry = ltEnum.get_current();

                        lookupEntries.push({
                            InternalName: ltEntry.get_internalName(),
                            Value: ltEntry.get_value(),
                            FullValue: ltEntry.get_fullValue(),
                            Description: ltEntry.get_description()
                        });
                    }

                    // Done, now do something with the values
                    var myJsonString = JSON.stringify(lookupEntries)
                }, getCFFailed);
            }, getCFFailed);
        }
    }
}
If your following that then basically what we’re doing is the following:
- First enumerate all custom fields to find the field we want (in this example a custom field named ‘Programme’).
- Now asynchronously load the LookupTable data for that custom field.
- And then asynchronously load the LookupEntry data for the LookupTable and enumerate though it saving the values into our Array lookupEntries.
To give you an idea of what this looks like for the purpose of this guide in the code I have JSON’ified the result and saved it to a variable called myJsonString, which in my case looks like this:
[{"InternalName":"Entry_fda76e70a1f5e211940b00155d000a03",
"Value":"IT BAU","FullValue":"IT BAU","Description":""},
{"InternalName":"Entry_fea76e70a1f5e211940b00155d000a03",
"Value":"New Products","FullValue":"New Products","Description":""},
{"InternalName":"Entry_ffa76e70a1f5e211940b00155d000a03",
"Value":"Efficiency","FullValue":"Efficiency","Description":""}]
Setting the Custom Field Value
Now that we have our entry names we can use them in the setCustomFieldValue method. However there is one last thing to trip you up; the format. Simply passing the value as a string (e.g. ‘Entry_fea76e70a1f5e211940b00155d000a03’) will not work, and give no error. MSDN doesn’t help much either other than specifying the parameter as type “Object”.
So after a bit of trial and error I have found that you must pass the entry name value(s) in an Array, clearly this is to support multi-value custom fields, but it would be nice if MSDN mentioned this. :)
So now if we extend the updateProject() method from part 1, we get something like this;
function updateProject() {
    var projectId = "9C585CC0-3FC0-4133-9F2A-1FB96587CF0D";
    var project = projects.getById(projectId);
    var draftProject = project.checkOut();
    var fieldName = "My Custom Field";
    // Update custom field
    var cfData = $.grep(customFieldData, function (val) {
        return val.Name === fieldName;
    });

    // New part - get the lookup entry
    var leData = $.grep(lookupEntries, function (val) {
        return val.Name === "Some new value";
    });

    // If this value is in our lookup entry list then use it
    if (leData.length > 0 && cfData.length > 0) {
        draftProject.setCustomFieldValue(cfData[0].InternalName, leData[0].InternalName);
    }
    // Else handle the non-lookup table value
    else if (cfData.length > 0) {
        draftProject.setCustomFieldValue(cfData[0].InternalName, "Some new value");
    }

    //Publish the change
    var publishJob = draftProject.publish(true);
    //Monitor the job
    projContext.waitForQueueAsync(publishJob, 30, function (response) {
        if (response !== 4) {
            // handle errors
        }
    }
}
(Please note that code is written to demonstrate this concept and actually doesn’t make much sense as we have hard coded the custom field name and then are doing an if / else on the lookup entries being found!)
That’s it you should now be able to update any custom field including multi-value lookup tables using JSOM (or similarly with CSOM).
Is there a better way?
I set out originally to do this using purely JSOM, however it quickly becomes obvious that enumerating each custom field and caching all of the properties is quite tedious.
Fortunately there is a much better way using the REST interface, for example try the following URL on your project server:
http://[changethistoyourserverurl]/pwa/_api/ProjectServer/CustomFields
- <entry>
  <id>http://project2013test/PWA/_api/ProjectServer/CustomFields
  ('d2bb8d78-a1f5-e211-940b-00155d000a03')</id>
  <category  term="PS.CustomField"
    scheme="http://schemas.microsoft.com/ado/2007/08/dataservices/scheme" />
  <link rel="edit" href="ProjectServer/CustomFields('d2bb8d78-a1f5-e211-940b-00155d000a03')"/>
  <link rel="http://schemas.microsoft.com/ado/2007/08/dataservices/related/EntityType"
    type="application/atom+xml;type=entry" title="EntityType"
    href="ProjectServer/CustomFields('d2bb8d78-a1f5-e211-940b-00155d000a03')/EntityType" />
  <link rel="http://schemas.microsoft.com/ado/2007/08/dataservices/related/LookupEntries"
    type="application/atom+xml;type=feed" title="LookupEntries"
    href="ProjectServer/CustomFields('d2bb8d78-a1f5-e211-940b-00155d000a03')/LookupEntries" />
  <link rel="http://schemas.microsoft.com/ado/2007/08/dataservices/related/LookupTable"
    type="application/atom+xml;type=entry" title="LookupTable"
    href="ProjectServer/CustomFields('d2bb8d78-a1f5-e211-940b-00155d000a03')/LookupTable" />
  <title  />
  <updated>2013-08-23T03:58:20Z</updated>
- <author>
    <name  />
  </author>
- <content type="application/xml">
- <m:properties>
      <d:AppAlternateId m:type="Edm.Guid">d2bb8d78-a1f5-e211-940b-00155d000a03
      </d:AppAlternateId>
      <d:Description  />
      <d:FieldType m:type="Edm.Int32">21</d:FieldType>
      <d:Formula  m:null="true" />
      <d:Id m:type="Edm.Guid">d2bb8d78-a1f5-e211-940b-00155d000a03</d:Id>
      <d:InternalName>Custom_d2bb8d78a1f5e211940b00155d000a03</d:InternalName>
      <d:IsEditableInVisibility m:type="Edm.Boolean">false</d:IsEditableInVisibility>
      <d:IsMultilineText m:type="Edm.Boolean">false</d:IsMultilineText>
      <d:IsRequired m:type="Edm.Boolean">false</d:IsRequired>
      <d:IsWorkflowControlled m:type="Edm.Boolean">false</d:IsWorkflowControlled>
      <d:LookupAllowMultiSelect m:type="Edm.Boolean">false</d:LookupAllowMultiSelect>
      <d:LookupDefaultValue m:type="Edm.Guid">fea76e70-a1f5-e211-940b-00155d000a03
      </d:LookupDefaultValue>
      <d:Name>Programme</d:Name>
      <d:RollsDownToAssignments m:type="Edm.Boolean">false</d:RollsDownToAssignments>
      <d:RollupType m:type="Edm.Int32">11</d:RollupType>
  </m:properties>
  </content>
</entry>
Note, that’s not the ODATA URL, it’s; /_api/ProjectServer/ and not /_api/ProjectData/!
Browsing the REST interface directly is a great way of learning about CSOM / JSOM, and for this example, you can quickly see the related link at the top titled ‘LookupEntries’, browse that and this is what you get:
http://[changethistoyourserverurl]/pwa/_api/ProjectServer/CustomFields(‘d2bb8d78-a1f5-e211-940b-00155d000a03’)/LookupEntries
- <entry>
      <id>http://project2013test/PWA/_api/ProjectServer/LookupTables
       ('fca76e70-a1f5-e211-940b-00155d000a03')/Entries('fda76e70-a1f5-e211-940b-00155d000a03')
      </id>
      ...
      <title  />
      <updated>2013-08-23T05:08:14Z</updated>
    - <author>
      <name  />
      </author>
    - <content type="application/xml">
    - <m:properties>
          <d:AppAlternateId m:type="Edm.Guid">00000000-0000-0000-0000-000000000000
          </d:AppAlternateId>
          <d:Description  />
          <d:FullValue>IT BAU</d:FullValue>
          <d:Id m:type="Edm.Guid">fda76e70-a1f5-e211-940b-00155d000a03</d:Id>
          <d:InternalName>Entry_fda76e70a1f5e211940b00155d000a03</d:InternalName>
          <d:SortIndex m:type="Edm.Decimal">1.0000000000</d:SortIndex>
          <d:HasChildren m:type="Edm.Boolean">false</d:HasChildren>
        - <d:Mask m:type="PS.LookupMask">
          <d:Length m:type="Edm.Int32">0</d:Length>
          <d:MaskType m:type="Edm.Int32">3</d:MaskType>
          <d:Separator>.</d:Separator>
          </d:Mask>
          <d:Value>IT BAU</d:Value>
      </m:properties>
      </content>
  </entry>
I’ve cut all but the first Entry from the data but as you can see it’s all there, in a nice XML format ready for use.
(I’ll leave that code to you!)
by Martin Laukkanen | Aug 5, 2013 | Apps, Development, How to, Project 2013
After a few busy weeks working on my first 100% JavaScript 2013 App (watch this space for more!!) I’ve come to realise that the MSDN documentation on JSOM and CSOM still is pretty sparse!
A couple of simple examples exist in the usual place (e.g. JSOM CreateProjects) but when you get to the details you’ll find a lot missing. For example updating Custom Fields; if you look at the MSDN page covering PS.DraftProject, the method you need (draftProject.setCustomFieldValue()) is not even listed! (UPDATE 7/08: It is covered here but with no detail; PS.Project.setCustomFieldValue)
JavaScript PS.DraftProject.setCustomFieldValue Method
Here’s the missing method definition that you’ll see when using PS.debug.js:
PS.DraftProject.setCustomFieldValue(FieldName, Value);
Hey wow, that simple hey? No, unfortunately the definition is a bit misleading; easy to assume that FieldName references the custom field name used else where like in the OData fields, but in fact this refers to the InternalName from the PS.CustomField object.
An example InternalName is: Custom_a1737ae3b4fce211940b00155d000a03
So first thing you need to do is get that name, it is just the field GUID prefixed with “Custom_”, but I like to do things more dynamically so I’ll use projContext.get_customFields(); to cache that information.
Example JavaScript update of Custom Field Value
Firstly lets get those InternalName values into an array for later use.
Cache the field details with a GetCustomFields Function
var projContext;
var customFields;
var customFieldData = [];


SP.SOD.executeOrDelayUntilScriptLoaded(GetCustomFields, "PS.js");


function GetCustomFields() {
    // Initialize the current client context and get the projects collection
    projContext = PS.ProjectContext.get_current();


    customFields = projContext.get_customFields();
    projContext.load(customFields);

    // Run the request on the server.
    projContext.executeQueryAsync(getCFComplete, getCFFailed);
}

function getCFComplete(response) {
    var cfEnumerator = customFields.getEnumerator();


    // Save the details of each CF for later
    while (cfEnumerator.moveNext()) {
        var cf = cfEnumerator.get_current();


        customFieldData.push({
            Id: cf.get_id(),
            Name: cf.get_name(),
            InternalName: cf.get_internalName()
        });
    }

    // Now update the project
    updateProject();
}
Note the last line there; updateProject() as this is all asynchronous you need to call the update only once you have the customFieldData array ready.
Update the Project Custom Field Function
function updateProject() {
    var projectId = "9C585CC0-3FC0-4133-9F2A-1FB96587CF0D";
    var project = projects.getById(projectId);
    var draftProject = project.checkOut();
    var fieldName = "My Custom Field";


    // Update custom field
    var cfData = $.grep(customFieldData, function (val) {
        return val.Name === fieldName;
    });

    if (cfData.length > 0) {
        draftProject.setCustomFieldValue(cfData[0].InternalName, "Some new value");
    }

    //Publish the change
    var publishJob = draftProject.publish(true);


    //Monitor the job
    projContext.waitForQueueAsync(publishJob, 30, function (response) {
        if (response !== 4) {
            // handle errors
        }
    }
}
This simple example assumes the FieldType is text, but you get the idea, also to work with Lookup Tables you’ll need to look at the cf.get_lookupEntries() values in the getCFComplete() function but hopefully the above will get you started.
by Martin Laukkanen | Jul 23, 2013 | Apps, Development, How to, SharePoint 2013
One of the noticeable gaps that comes up immediately when you start planning any significant SharePoint 2013 deployment with requirements such as multi-tenancy and SAML based authentication (ADFS, ACS, etc) are the some of the limitations with the new features of 2013.
One such limitation is the new App Store which only supported Windows Authentication and didn’t support hostheaders at RTM! Fortunately Microsoft fixed the hostheader limitation in the March PU release (KB2768001), however the SAML limitation remains.
Steve Peschka wrote about one solution to part of this problem here: Using SharePoint Apps with SAML and FBA Sites in SharePoint 2013, however that only covers the Provider hosted (or Autohosted) apps, which leaves a big gaping hole where the simplest Apps of all are not supported.
The Problem with SharePoint hosted Apps
Basically the problem is in the the App Domain configuration and authentication requirements, take a typical example:
- First tenant:
App Domain: https://tenant1-*******.contosoapps.com
- Second tenant:
App Domain: https://tenant2-*******.contosoapps.com
As you know those App Domains are auto created for each installed app with a unique name per app. (Note that you need March PU to configure the above App Domains)
So with that in mind, when a user is authenticated to tenant1.contoso.com that does not automatically authenticate them to tenant1-******.contosoapps.com forcing re-authentication, that’s where we hit our problem.
Azure ACS and ADFS – No Apps??
Unfortunately Azure ACS and ADFS don’t work at all in this scenario. The problem:

UseWReplyParameter while supported by both is restricted to sub sites only (e.g. reply to , as a result in our scenario above what you end up with is this annoying authentication loop:

The reason for this is for security, as allowing any arbitrary WReply parameter could potentially allow an attacker from one Relaying Party (RP) to be redirected with a valid authentication token to a second RP.
So in my scenario above it may be possible for tenant1 users to authenticate not only with tenant1*** apps, but also tenant2 sites!
Solutions?
Unless Microsoft changes ACS and ADFS (unlikely) or they modify the SPTrustedIdentityTokenIssuer (maybe?), then the only option right now is to roll your own STS Identity Provider based on the the Windows Identity Framework SDK!
Fortunately you’re not alone, plenty of examples of this exist;
And my favourite:
Lots of good examples to work with but for this blog I’m going to extend the last one on the list by Steve Peschka using SAML with Microsoft Accounts (LiveID). So if you want to implement my changes below, you’ll need to start by reading the last article above and download and get familiar with the source for that one.
Changes to WindowsLiveOauthSts Solution
In summary we need to make the following changes to the solution:
- Firstly we need to update the Custom STS to accept and use the WReplyParameter.
- Secondly we need to capture the original request WReplyParameter in the PassiveSTS.cs and send it to the Custom STS.
- Finally we need to ensure that we maintain the security of our solution in with all changes.
That’s it, simple hey?
Updates to CustomSecurityTokenService.cs
First add somewhere to store the parameter to the class:
protected String WReplyParameter { get; set; }
Next extend the constructor to accept the parameter:
    public CustomSecurityTokenService(CustomSecurityTokenServiceConfiguration configuration,
        Dictionary<string, string> ClaimValues, String wReplyParameter = "")
        : base(configuration)
    {
        this.oAuthValues = ClaimValues;
        this.WReplyParameter = wReplyParameter;
    }
And finally use the saved value in the GetScope() method:
        // Set the ReplyTo address for the WS-Federation passive protocol (wreply).

        // Use the provided WReplyParameter if it exists
        if (String.IsNullOrEmpty(WReplyParameter))
            scope.ReplyToAddress = scope.AppliesToAddress;
        else
            scope.ReplyToAddress = WReplyParameter;

        return scope;
Updates to PassiveSTS.cs
First we have to get the Query String parameter from the request:
string wReplyParameter = HttpUtility.ParseQueryString(HttpUtility.UrlDecode(state))["wreply"];
Then we make sure to pass the parameter to the CustomSTS when instantiated:
    //create an instance of our sts and pass in the dictionary of values we got from Windows Live oAuth
    SecurityTokenService sts =
        new CustomSecurityTokenService(CustomSecurityTokenServiceConfiguration.Current, values,
            wReplyParameter);
Security Considerations
The risk arises if we allow any ‘wreply’ parameter to be be used as our returned ReplyToAddress in the Custom STS, in this example implementation a simple validation is included using an array of allowed URL’s (unmodified code quoted here);
    // TODO: Set enableAppliesToValidation to true to enable only the RP Url's specified in the
    // PassiveRedirectBasedClaimsAwareWebApps array to get a token from this STS
    static bool enableAppliesToValidation = false;
Obviously for a production multi-tenanted environment you would need something more sophisticated, but I’ll leave that to you. Also another thing that particular solution does not allow for is our dynamically created App Domains, so that too will require some changes.
But hang on..
However it is worth saying here that in our simple example when using only Live ID across all Web Apps we have not exposed anything extra (yet) with this change! Think about it; if an attacker in wants to login to Tenant2 then all they need to do is open and login! Our STS is passing only identity and user related claims so all of the securing of resources is left to the tenant. IE; John from Tenant 1 has no site collection SPUser rights to Tenant 2 sites! So as it stands this scenario is similar to an equivalent Azure ACS implementation using multiple Relaying Parties.
Final Words
It’s worth mentioning that this likely will become redundant after a future service pack, assuming Microsoft fixes this by changing SharePoint that is.
A good indication is to look at how Office365’s doing it right now, and a quick Fiddler trace shows that the two cookies (rtFa and FedAuth) are passed directly to the AppDomain from the tenant Web App, so clearly MS is handling this in the initial Auth.
That may be a topic for investigation another time.
Hope this is useful for someone out there.
by Martin Laukkanen | May 1, 2013 | How to, PowerShell, Project 2013
A few people have written about PowerShell provisioning of PWA in 2013, see here and here, both reference this TechNet source. However if you’re anything like me you might find these confusing! Coming from 2010 it seems that everything has changed, so after struggling a bit using the above three references trying to update my old automated PWA deployment scripts I figured that it can’t hurt to have one more guide online covering the process.
Look No Site Collection
Firstly though, one of the great things about 2013 is that PWA is now uncoupled from its Site Collection, basically /PWA no longer needs to be a Site Collection but can be any regular site.
Esoteric as that may sound it means that we no longer have this odd divide where Project data such as Project Sites live in various “SharePoint Intranet” site collections and PWA has to be in it’s own isolated space with different users, permissions, features, etc. Clearly this is geared towards supporting SharePoint permissions mode and generally making Project more SharePoint friendly, but combined with those nifty new license management features things become very much easier for many of us dealing with real world deployment scenarios.
This also has the added bonus of making it easier to provision PWA at the root site collection (in a more standard way – ick Site Collection host headers!).
Get to the setup
The challenge I had with the scripted setup links above was that they seemed to be missing something, for instance the TechNet article misses the whole site collection creation part and so then confuses things by splitting off into a separate article on creating PWA in an existing site collection? Is it just me or was that really confusing?
Anyway here’s my PowerShell script for provisioning a new PWA instance in a new Site Collection where the root site collection contains a Team Site and PWA is in the familiar location /PWA.
$SiteUrl = "https://"+$HostHeader
$PWASiteUrl = "https://"+$HostHeader+$PWAPath
$SiteCollectionOwner="i:0#.w|domain$($AdminUser)"
$SecondaryOwnerAlias=""
$PWADatabase="ProjectWebAppDB"
$DatabaseServer = "sqlservername"
$PWAAbbreviation = "PWAInstance1"

$svcApp = Get-SPServiceApplication | ? {$_.TypeName -eq 'Project Application Services'}
$webapp = Get-SPWebApplication -Identity $SiteUrl


Write-Host "Creating Project Server database:" $PWADatabase
New-SPProjectDatabase -Name $PWADatabase -ServiceApplication $svcApp `
    -DatabaseServer $DatabaseServer -Tag $PWAAbbreviation `
    -ErrorVariable err
if ( $err ) {
    write-host "An Error Occured: " $err -ForegroundColor Red
    break
}


Write-Host "Creating Team Site root for PWA" $SiteUrl " Owner:" $SiteCollectionOwner
$site = New-SpSite -url $SiteUrl `
    -owneralias $SiteCollectionOwner `
    -SecondaryOwnerAlias $SecondaryOwnerAlias `
    -ErrorVariable err
if ( $err ) {
    write-host "An Error Occured: " $err -ForegroundColor Red
    break
}

Write-Host "Creating PWA Web: " $PWASiteUrl " Owner:" $SiteCollectionOwner
$web = New-SPweb -URL $PWASiteUrl -Template pwa#0

$web=Get-SPWeb $SiteUrl
$web.Properties["PWA_TAG"] = $PWAAbbreviation
$web.Properties.Update()

Write-host "Enabling PWASite features..."
Enable-SPFeature pwasite -URL $SiteUrl
I lifted that from my mass deployment script (woo 2,600 lines and counting) so after my little rant above please excuse me if I forgot to declare one of the variables or something.
Hope this helps someone!
This article is republished with permission here: EPMonDemand Blog

