This is the first part of a three part series on extending project online / on-prem using JSOM, see this post for an index of all three parts to this as I write them.
Part 1: Getting started creating the Holiday Sync App
Let’s begin with a user story:
I want to import holiday exceptions into my enterprise calendars
Our solution:
We’re going to create a SharePoint hosted App for Project Server to do the following:
- List enterprise calendars in PWA
- Get holiday data from an external web service
- Allow us to select holidays to we want to import
- Provide an import button to perform the import
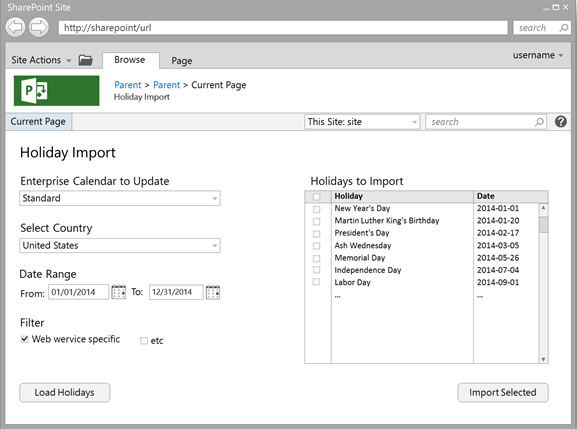
Here’s a quick wireframe created in PowerPoint to demonstrate what we’re trying to achieve (picture worth a dozen design docs?):
Software Requirements
To get started you’ll need a few things:
- Visual Studio 2012 (or higher)
I’m going to use VS2013 so you will need Visual Studio to work with the attached source files, but it would be possible to use the “Napa” Office 365 development tools or other tools for this.
- Web Essentials for Visual Studio
Highly recommended but not required.
- Development environment (either of these):
- Project Online subscription
- Local Project Server 2013 development server
Wherever you’re debugging, make sure to enable “sideloading” of apps on PWA via PowerShell.
And finally note that Project Online is not currently included in the Office365 developer subscription so you’ll need a Project Online tenant in that case, and I’d recommend creating a separate PWA instance for development as enabling side-loading changes the homepage and enables features which should not be enabled on Production sites.
Getting Started with our App in Visual Studio
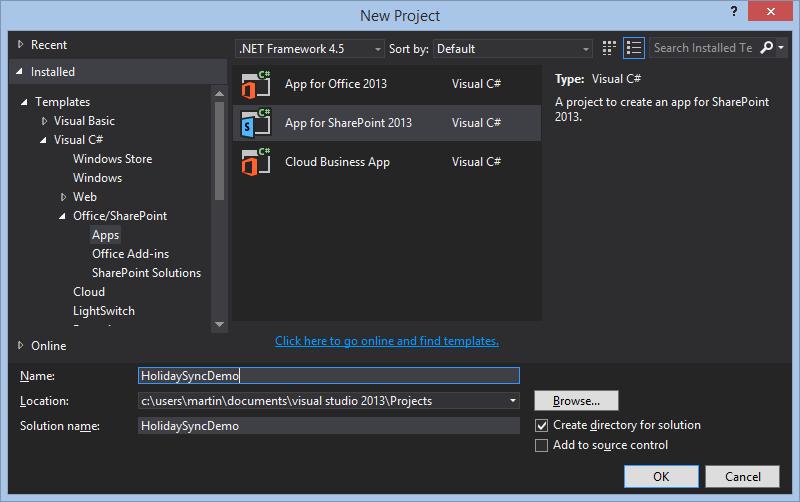
The first step is to create our blank SharePoint app in Visual Studio:
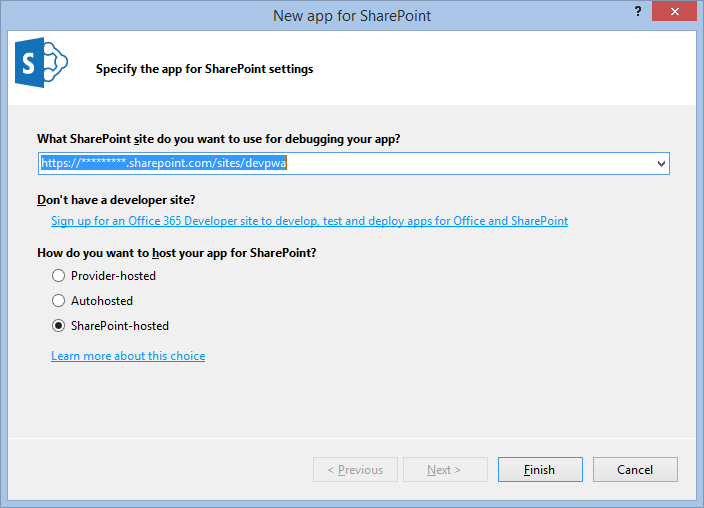
Second, I’m using a Project Online instance for debugging, but wherever you use make sure to set SharePoint-hosted for the hosting type:
This will give you the vanilla SharePoint App template, setup for our SharePoint-hosted JavaScript app, great now let’s start adding what we need, first up libraries and add-ins.
Libraries and Add-in’s
For our app we will be adding the following:
- Project Server JSOM library (ps.js)
- jQuery – Used extensively throughout solution.
- jQuery UI – Used for the date picker UI controls.
- Slick Grid – Used for our results grid.
Plus a few miscellaneous plugins:
- toISOString shim for IE8
- xml2json for working with XML
The main extra library used is the grid control (Slick Grid) where actually any grid would do here as our requirements are really simple (JS Grid maybe?), but I like Slick Grid as it’s free (MIT license) and it’s fast and super easy to setup and use.
So with that list in mind let’s update our Default.aspx file, insert the following below the sp.js script line:
<script type="text/javascript" src="/_layouts/15/ps.js"></script>
<script type="text/javascript" src="../Scripts/libs/jquery-ui-1.10.3.custom.min.js"></script>
<script type="text/javascript" src="../Scripts/libs/jquery.xml2json.js"></script>

<link type="text/css" href="../Content/jquery-ui-1.10.3.custom.css" rel="stylesheet" />
<link type="text/css" href="../Content/slick.grid.css" rel="stylesheet" />

<script type="text/javascript" src="../Scripts/libs/jquery.event.drag-2.2.js"></script>
<script type="text/javascript" src="../Scripts/libs/slick.core.js"></script>
<script type="text/javascript" src="../Scripts/libs/slick.grid.js"></script>
<script type="text/javascript" src="../Scripts/libs/slick.checkboxselectcolumn.js"></script>
<script type="text/javascript" src="../Scripts/libs/slick.rowselectionmodel.js"></script>
<script type="text/javascript" src="../Scripts/libs/slick.dataview.js"></script>
To download the files in the libs folder see the bottom of this article, or you could even download them directly from the links above.
HTML and Stylesheets
I’m not a front end developer so I’ll freely admit that the following two parts took me longer than the rest of this App to write! But looks are important so it’s time well spent I’d say.
HTML for our Single Page App
Add this to the ContentPlaceHolderID=”PlaceHolderMain” section of the Default.aspx file;
<div class="HalfPage">
	<div class="ContentPane">
		<h2>Enterprise Calendar to Update</h2>
		<select id="eCalendarSelect">
		</select>

		<h2>Select Country</h2>
		<select id="countrySelect">
		</select>

		<h2>Date Range</h2>
		<div class="DatePickers">
			<div class="HalfPage">
				<label>From:</label>
				<input type="text" id="fromDatePicker" />
			</div>

			<div class="HalfPage">
				<span class="RightHalf">
					<label>To:</label>
					<input type="text" id="toDatePicker" />
				</span>
			</div>
		</div>

		<h2>Filter</h2>
		<div id="filterInputs" class="FilterOpts">
			<ul class='listColumns'>
				<li><input id='Recognized' type='checkbox' value='Recognized' checked='checked' />Recognized</li>
				<li><input id='NotRecognized' type='checkbox' value='NotRecognized' />Not Recognized</li>
			</ul>
		</div>
	</div>
</div>

<div class="HalfPage">
	<h2>Holidays to Import</h2>
	<div id="grid" class="grid"></div>
</div>

<div>
	<input type="button" id="importBtn" class="ImportButton" value="Import Selected" />
	<input type="button" id="getDataBtn" class="RetrieveButton" value="Get Holidays" />
</div>
So in our HTML, we need a two column page with our required select and input elements with labels to identify them and also I’ve included the required filter options based on our holiday web service which will come back to later. That should be dynamic like the other controls which will be created in the JavaScript but that suits our purposes for now. Finally we have Div place holder for our grid control and some action buttons.
Most of the base styling including headers, fonts and labels are borrowing the SharePoint default styles available so the intention is to have our app look like native SharePoint / Project functionality. For the grid and other classes used I have a bit of CSS to add to the SlickGrid Excel style css theme that is available for that library, but I have modified it a bit as you can see in the CSS.
CSS Style Sheet
Place the following in the App.css:
.HalfPage {
    width:50%;
    float:left;
}
.HalfPage h2 {
    clear: left;
    padding: 16px 0 4px;
}

.ContentPane {
    margin: 0 32px 16px 0;
}
.ContentPane select {
    width:100%;
}

.DatePickers label {
    margin-right: 16px;
}
.DatePickers input {
    width: 45%;
}
.RightHalf {
    float:right;
    text-align: right;
}

.ui-datepicker-trigger {
    vertical-align: middle;
    padding-left: 4px;
}

.FilterOpts input {
    margin: 0 8px;
}

.ImportButton {
    margin-top: 24px;
    float:right;
}

.RetrieveButton {
    margin-top: 24px;
    float:left;
    margin-left: 0px !important;
}

.listColumns {
    -moz-columns:  2;
    -webkit-columns:  2;
    columns:  2;
    list-style: none;
    padding-left:0px;
}

#grid {
  outline: 0;
  border: 1px solid lightgrey;
  height: 280px;
}

.slick-viewport {
    overflow-x: hidden !important;
}

.slick-header-column.ui-state-default {
    padding-top: 6px;
    height: 26px;
}

.slick-header-columns {
    border-bottom: 1px solid silver;
}

.ui-state-default {
    border: none;
    background: none;
    font-family: "Segoe UI","Segoe",Tahoma,Helvetica,Arial,sans-serif;
    font-size: 13px;
}

.ui-widget {
    font-family: "Segoe UI","Segoe",Tahoma,Helvetica,Arial,sans-serif;
    font-size: 13px;
}
Before you comment on my ugly CSS, lets just move along! :)
Helper.js JavaScript helper script
I’ve separated out our App code into just two files to keep this simple, the Helper.js file includes a number of functions that do as the name suggests, things like browser compatibility shims are ideal here as we will load this file before our main JS file.
Summary of helper functions:
- Date.prototype.toISOString() – Used to support IE8 as it doesn’t support the ISO date string format.
- Helpers.urlToArray() – Used to convert our URL query strings into an array of key / values.
- Helpers.setupGrid() – The first part of our Slick Grid code used to setup the grid and required plug-ins.
- Helpers.bankHolidayFilter() – Our Slick Grid filter function.
- Helpers.dateTimeFormatter() – Our grid date formatter, for this I have hard coded to US format, but I would suggest using a library like Moment.js to help do this properly for all regions.
- Helpers.updateGridContents() – Used to update our grid once we have transformed our holiday data as required.
Create a new file in your solution called Helpers.js and add the following;
'use strict';

///
/// Helpers
///
// Shim for IE8 to support date formatter
if (!Date.prototype.toISOString) {
    (function () {

        function pad(number) {
            if (number < 10) {
                return '0' + number;
            }
            return number;
        }

        Date.prototype.toISOString = function () {
            return this.getUTCFullYear() +
              '-' + pad(this.getUTCMonth() + 1) +
              '-' + pad(this.getUTCDate()) +
              'T' + pad(this.getUTCHours()) +
              ':' + pad(this.getUTCMinutes()) +
              ':' + pad(this.getUTCSeconds()) +
              '.' + (this.getUTCMilliseconds() / 1000).toFixed(3).slice(2, 5) +
              'Z';
        };

    }());
}

// Static helper class
var Helpers = function () { };
Helpers.urlToArray = function (url) {
    var request = {};
    var pairs = url.substring(url.indexOf('?') + 1).split('&');
    for (var i = 0; i < pairs.length; i++) {
        var pair = pairs[i].split('=');
        request[decodeURIComponent(pair[0])] = decodeURIComponent(pair[1]);
    }
    return request;
};

/// Grid helpers
// Setup our Grid
// Using https://github.com/mleibman/SlickGrid
Helpers.setupGrid = function (grid, options, columns, data) {
    var checkboxSelector = new Slick.CheckboxSelectColumn({
        cssClass: "slick-cell-checkboxsel"
    });
    columns.unshift(checkboxSelector.getColumnDefinition());

    grid = new Slick.Grid("#grid", data, columns, options);
    grid.setSelectionModel(new Slick.RowSelectionModel({ selectActiveRow: false }));
    grid.registerPlugin(checkboxSelector);
    data.setFilter(Helpers.bankHolidayFilter);

    return grid;
}

// Grid filter function
Helpers.bankHolidayFilter = function (item, args) {
    var inArray = $.grep(args.BankHoliday, function (value) { return value === item.BankHoliday; });

    if (inArray.length > 0) {
        return true;
    }
    return false;
};
Helpers.dateTimeFormatter = function (row, cell, value, columnDef, dataContext) {
    // Basic US date formatter with fallback to ISO
    var dt = new Date(value);
    if (isNaN(dt))
        return value.split("T")[0];
    else
        return dt.format("MM/dd/yyyy");
};

// Update the grid contents
Helpers.updateGridContents = function (holidays, gridData, grid) {
    // Setup grid filters
    gridData.setFilterArgs({
        BankHoliday: $("#filterInputs input:checked").map(function () { return this.value; }).get()
    });

    // First need to add a uniquie identifier to the data set (to support SlickGrid filtering)
    for (var i = 0; i < holidays.length; i++) {
        holidays[i].id = i;
    }

    // Now use the data
    gridData.setItems(holidays);

    // Redraw the grid
    gridData.refresh();
    grid.invalidateAllRows();
    grid.render();
    grid.resizeCanvas();
}
Finally we have a remove duplicates function that I will go into a little more detail on as it relates to our JSOM import that we’ll be adding later, so add the following function to the end of the Helper.js file.
// Remove duplicate calendar exceptions
Helpers.removeDuplicates = function (selectedRows, data) {
    var exceptionsToImport = [];

    // Use jQuery grep function to get our selected enterprise calendar
    var entCalendar = $.grep(data.entCalendars, function (cal) {
        return cal.Id === data.calendarId;
    })[0];

    // Prepare the array of exceptions excluding duplicates
    for (var i = 0; i < selectedRows.length; i++) {
        // Get this selected row from the Grid
        var selectedHoliday = data.holidayData.getItem(selectedRows[i]);

        // Ensure that our exception date does not overlap with any existing exceptions
        var alreadyExist = $.grep(entCalendar.BaseCalendarExceptions.results, function (excep) {
            return excep.Finish <= selectedHoliday.Date && excep.Start >= selectedHoliday.Date;
        });

        if (alreadyExist.length === 0) {
            // Last check to make sure we don't add the same date twice
            var newException = $.grep(exceptionsToImport, function (item) {
                return item.Date === selectedHoliday.Date;
            });

            if (newException.length === 0)
                exceptionsToImport.push(selectedHoliday);
        }
    }

    return exceptionsToImport;
}
From testing it was clear that the following preconditions in Project Server exist which affect our app;
- No exceptions can overlap in a single base calendar.
- All exceptions must have a unique name in a single base calendar.
So our remove duplicates function ensures the above by doing the following;
- First looping through our selected rows array.
- Getting the item in each row and getting a reference to our enterprise calendar.
- Comparing the Start and Finish dates of our exception to ensure they do not overlap with any existing BaseCalendarExceptions (note that we’ll be populating this data in Part 2 of this series) – I’m using the jQuery Grep function for this as it’s quite flexible for this kind of thing.
- Then finally add this exception to our output array, after a quick check to ensure that we haven’t already added it with another name.
Now that we have all of our helpers in add a reference to the Helper.js file in the Default.aspx pointing to wherever you created your file, for example:
<script type="text/javascript" src="../Scripts/Helpers.js"></script>
Note: Ensure that the above line is placed ABOVE the App.js script reference!
App.js Main JavaScript file outline
For now we only have our basic structure and functionality in here, specifically I’m using the constructor prototype pattern in JavaScript here to clearly define our namespace and structure our code accordingly, trust me it might look more complex compared with many examples out there, but once you start working with asynchronous event based functions you really need to know where your this is! (Not to mention keeping the global context clean)
///
/// Namespace & constructor
///
var HolidaySync = function () {
    // Instance data
    this.urlTokens = Helpers.urlToArray(location.href);
    this.data = new HolidaySync.DataModel();

    // Grid configuration
    this.grid = undefined;
    this.columns = [
        { id: "Name", name: "Name", field: "Descriptor" },
        { id: "Date", name: "Date", field: "Date", formatter: Helpers.dateTimeFormatter },
        { id: "BankHoliday", name: "BankHoliday", field: "BankHoliday" }
        ];
    this.options = {
        enableCellNavigation: true,
        syncColumnCellResize: true,
        forceFitColumns: true
    };
};
So our first few lines to add to App.js declare our namespace and some instance properties, most of which relates to our Slick Grid (options and columns etc). We also have an instance of our DataModel instantiated which is done using the following function;
///
/// Data Model
///
HolidaySync.DataModel = function () {
    this.entCalendars = {};
    this.countryCodes = {};

    this.calendarId = '';
    this.country = '';
    this.fromDate = '';
    this.toDate = '';

    // Grid data
    this.holidayData = new Slick.Data.DataView();
};
Now that we have our “Public properties” I have a main function at the top with just a few lines for the moment:
///
/// Main code block, begin once the DOM is loaded
///
$(document).ready(function () {
    // Instantiate our object
    var holidaySync = new HolidaySync();

    // Setup our Grid
    // Using https://github.com/mleibman/SlickGrid
    holidaySync.grid = Helpers.setupGrid(holidaySync.grid, holidaySync.options, holidaySync.columns, holidaySync.data.holidayData);

    // Setup our page controls and events
    holidaySync.setupPageControls();

});
In there we instantiate our namespace defined above, then start calling some helper functions to setup our grid (defined in Helpers.setupGrid()) and then to setup our page using the following function:
// Function to wire-up our UI
HolidaySync.prototype.setupPageControls = function () {

    // Create our jQuery UI Date picker controls
    $("#fromDatePicker").datepicker({
        showOn: "button",
        buttonImage: "/_layouts/15/images/calendar.gif",
        buttonImageOnly: true,
        onSelect: Function.createDelegate(this, function (dateText) {
            this.data.fromDate = dateText;
        })
    });

    $("#toDatePicker").datepicker({
        showOn: "button",
        buttonImage: "/_layouts/15/images/calendar.gif",
        buttonImageOnly: true,
        onSelect: Function.createDelegate(this, function (dateText) {
            this.data.toDate = dateText;
        })
    });

    // Setup our page event handlers
    $("#countrySelect").change(Function.createDelegate(this, function (event, data) {
        this.data.country = $("#countrySelect option:selected")[0].value;
    }));
    $("#eCalendarSelect").change(Function.createDelegate(this, function (event, data) {
        this.data.calendarId = $("#eCalendarSelect option:selected")[0].value;
    }));
};
This function is all jQuery and creates our date pickers and change events on our drop-down select boxes. Note the context here, ie this.data.*** as we are on our prototype these controls asynchronously update our DataModel in this instance (hence why this is not in the static helper class).
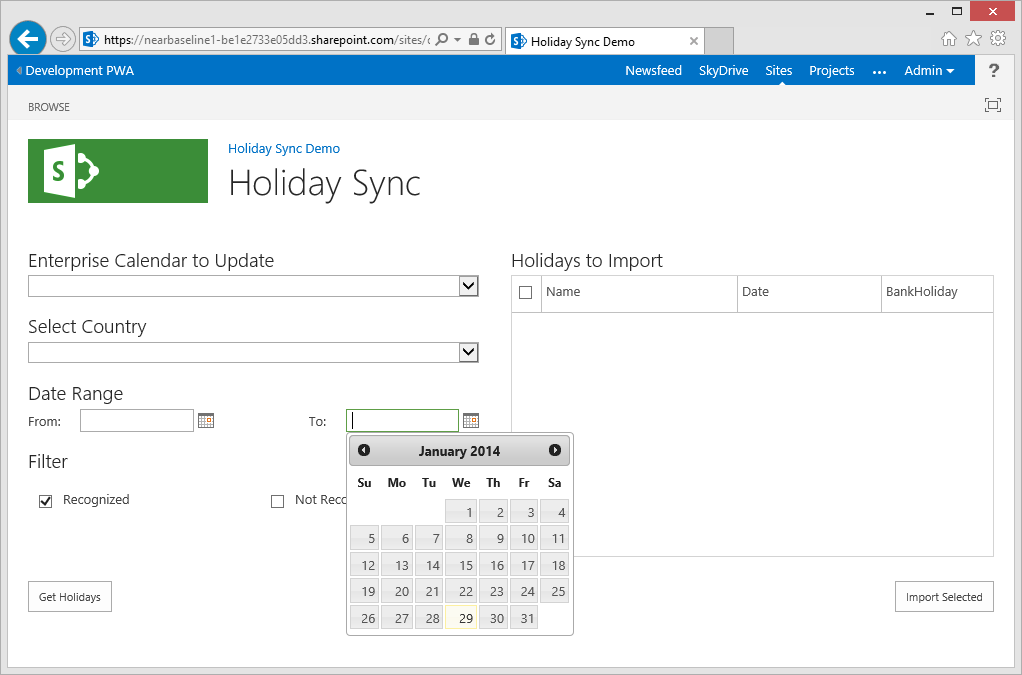
With the above added you should now be able to preview the app! Nothing much will happen yet, but it should look pretty complete visually and all of our controls should function:
Next up, part 2: Getting data into our Holiday Sync App
Now that we have our App structure, next we need to work with some data, so check back in the next day or so for Part 2 of this series.
Source Download / Repository
Download the complete source to the above code here:
Additionally for those of you who like to skip to the end of this series, you can browse or download the full source code for the completed app on the following GitHub repository:
https://github.com/martinlaukkanen/holidaysync