by Martin Laukkanen | Sep 30, 2016 | BulkEdit
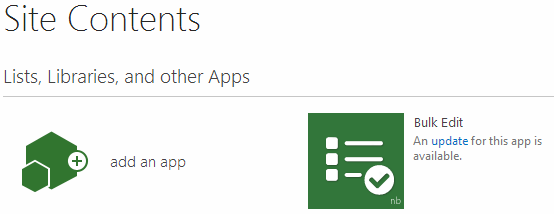
A new version of BulkEdit is available now on the App Store, check site contents in PWA for the upgrade link to install it.
Bug Fixes
- Fixes to non-English language users who see “Loading data” that never ends.
- Fixes to some cases where custom field updates error with “Sorry the update failed, ensure that the project is not checked out”
Note: Some cases still exist where Bulk Edit does not detect which projects are checked out, and so will fail to update those fields. This appears to affect non-English Project Online users only, but if you see this please report it in the Support forum.
Additionally I am working on a workaround to address an issue which appears to cause approximately 1 in 5 Project Online field updates (ie Office365 JSOM API calls) to fail due to too many requests which the Microsoft servers cannot handle. The only workaround available at the moment is to retry. Fortunately this problem does not affect on-prem 2013 or 2016 Project Server customers.
If you are affected by this like most of my European Project Online customers are, then do what I do and speak to your Microsoft account manager (or customer’s account manager) about the poor performance of Project Online next chance you get! (feel free to quote me: Martin Laukkanen)
Changes
- Updates to fully support Microsoft changes in Project Online API to support Project Server 2016.
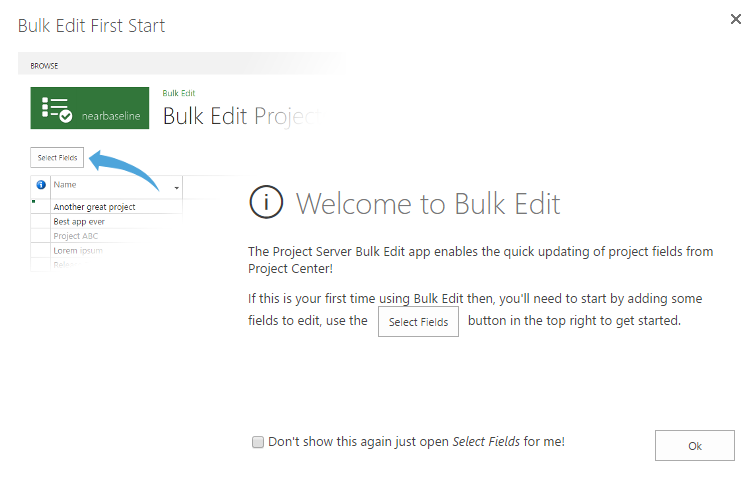
- New Welcome Screen for first time users.
Installation
Open site contents in PWA to find the update link:
by Martin Laukkanen | Feb 10, 2016 | Development, Project Online
After reading all about the new SharePoint CSOM release but unfortunately not being able to read about the changes to the Project Online CSOM library included in the SharePoint release, I decided to take a sneak-peek myself to see what’s new.
Fortunately my favourite .Net Reflector tool (JetBrains dotPeek) came in handy here in addition to a diff tool (WinMerge) it is possible to identify the changes to the Microsoft.ProjectServer.Client.dll file immediately!
What’s new?
Well, below I have extracted from the differences the new properties and methods available, the list is probably not 100% complete as I focused most on the areas I use: Projects, Tasks, Assignments, Workflows and Timesheets, err so let’s say it’s pretty complete, however I may have missed some things.
In short the obvious new items relate to previously announced changes, such as the Project ID feature now available in Project Online; DraftProject.ProjectIdentifier, and the Create Project Site from workflow feature; PublishedProject.CreateProjectSite(string siteName).
However notably missing is the bulk update of custom fields method I would have expected (previously released for Project Online workflows), that’s slightly annoying if say you have an App that updates projects in bulk or something similar (*ahem*).
What else is interesting?
Some new Public Properties made available to developers:
- (DateTime) DraftProject.UtilizationDate
- (ProjectUtilizationType) DraftProject.UtilizationType
- (ProjectSummaryTask) Project.ProjectSummaryTask
- (StatusApprovalType) StatusAssignment.ApprovalStatus
- (StatusAssignmentHistoryLineCollection) StatusAssignment.History
- (Guid) StatusText.ProjectTaskId
As well as one new Public Method made available:
- ProjectContext.GetDeletedPublishedAssignments(deletedDate)
Based on the names I think it’s safe to assume that most of those relate to the new 2016 Resource Engagements feature which is already available on Project Online, however apart from the new ProjectSummaryTask property unfortunately there doesn’t seem to be any breaking news here to report! :(
I guess we’ll just have to wait for the official announcement to hear any more..
(Mostly) Complete list of modified classes
Note: I’ve ignored a lot of minor changes that appear to be simple refactoring’s and focused only on the new Public Properties and Methods while ignoring a few Internal methods and such.
Assignment.cs
DraftProject.cs
-
public string ProjectIdentifier
-
public DateTime UtilizationDate
-
public ProjectUtilizationType UtilizationType
Project.cs
ProjectContext.cs
ProjectServer.cs
PublishedProject.cs
-
public string ProjectIdentifier
-
public DateTime UtilizationDate
-
public ProjectUtilizationType UtilizationType
-
public void CreateProjectSite(string siteName)
StatusAssignment.cs
StatusText.cs
(Mostly) Complete list of new classes and enumerations
-
public class DeletedPublishedAssignment : ClientObject
-
public class DeletedPublishedAssignmentCollection : ClientObjectCollection
-
public class ProjectSummaryTask : Task
-
public enum ProjectUtilizationType
-
public class StatusAssignmentHistoryLine : ClientObject
-
public class StatusAssignmentHistoryLineCollection : ClientObjectCollection
-
public enum StatusUpdateType
-
public enum WorkContourType
Hope that satisfied your curiosity…
by Martin Laukkanen | Oct 29, 2015 | How to, Workflow
A lot has changed in Project Server workflows in the past few years, with the release of SharePoint 2013 and Office 365 the world of workflow completely changed. Fortunately SharePoint Designer’s (SPD) evolution into an actual usable tool for creating Project Server workflows filled the huge gap that previously existed for Project Server consultants and implementers, however at the same time the changes created a new major gap by completely blocking any sort of custom code in any workflows!
All is not lost though, with the changes in workflow we also received a handy set of new RESTful API’s to use so in theory at least we should be able to do a fair bit that previously required C# code via pure non-code-based SharePoint Designer workflows.
Putting the theory to the test
I have a theory with working with customers, that whatever is possible through the out-of-the-box features of a Microsoft product will never be enough after the first workshop. It seems that I like saying yes to customers. ;)
Scenario
My customer’s business process dictates that based on the result of an approval gateway the Microsoft Project schedule will require changes, specifically additional tasks need to be added to the schedule based on custom fields (or even a SharePoint list).
As there are no SharePoint Designer workflow actions that update project tasks, this would fall into the category of workflow built with Visual Studio (based on the MSDN: Decision tree: SharePoint Designer vs. Visual Studio), however the reality is that when you get down to it Visual Studio workflows share fundamentally the same limitation as those built in SPD i.e. declarative, no code workflows only (See the bottom of this article about some more practical limitations).
Solution
Let’s use my new favourite workflow action – the Call HTTP Web Service activity – in conjunction with the RESTful CSOM API for Project Server to actually create some tasks directly from SPD as follows;
- Get our task data – We’ll need task name, duration, start date, etc.
- Prepare our REST request – a bit of HTTP request header / body knowledge will be required but can be borrowed from some other examples like this one: Create a project site based on a custom field value.
- Post the http request and handle the result.
I’m going to skip a lot of details for this article and just focus on the above interesting bits, of course in the real world you’ll have to worry about publishing and checking out the project and although I don’t include those I will discuss check-out at least below as it is important. Additionally I will just create a single static task in this example, ideally you would get the values from custom fields, or better yet get a list of tasks to create using a separate OData http request then loop through creating each one.
PWA Workflow Configuration
Let’s keep this simple, you can use your imagination as to how this would fit into your requirement but I will even omit the approval and any other normal phases and stages.
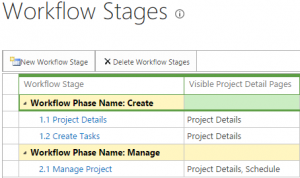
Phases (Using Defaults):
1. Create
2. Manage
Stages:
1.1 Project Details – where we will get basic project details.
1.2 Create Tasks – where we will create the task(s) in the workflow.
2.1 Manage – we’re done, as you were..
Begin the SharePoint Designer Workflow
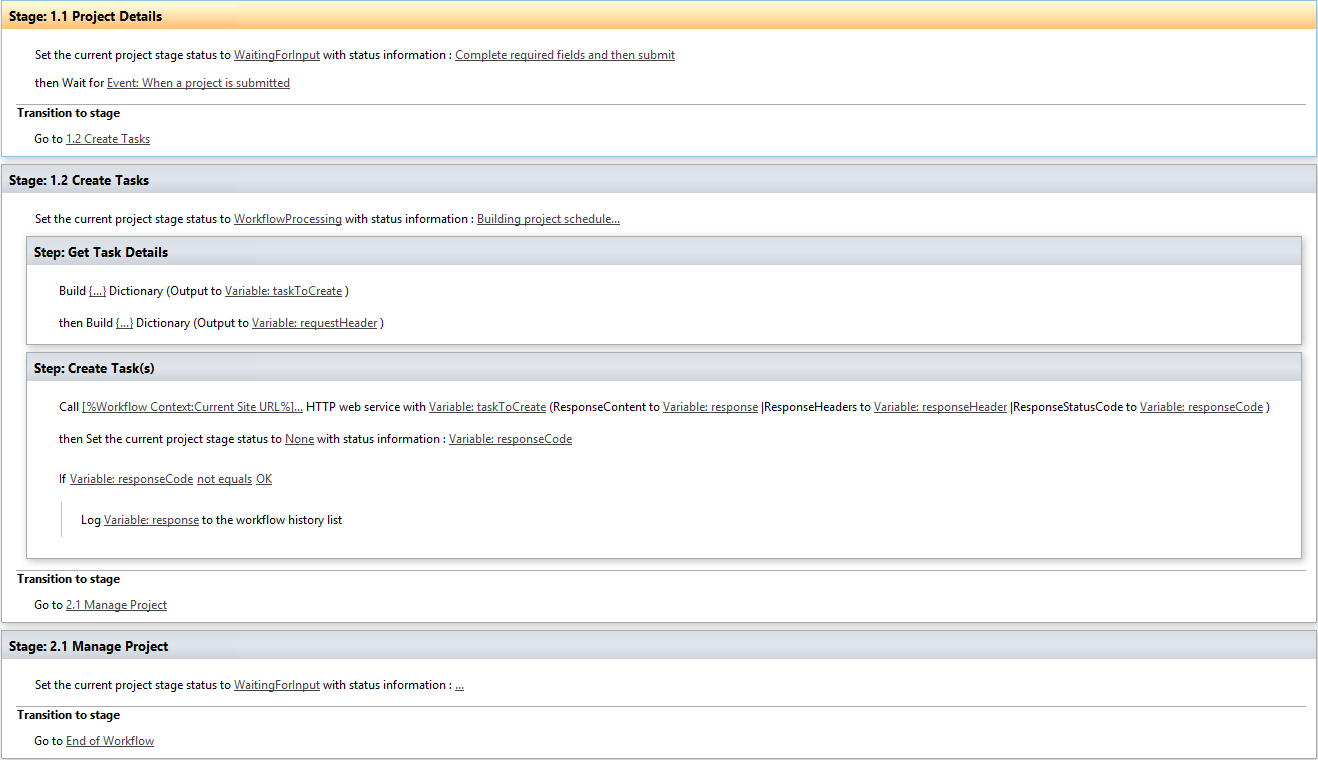
Here’s one I prepared earlier:
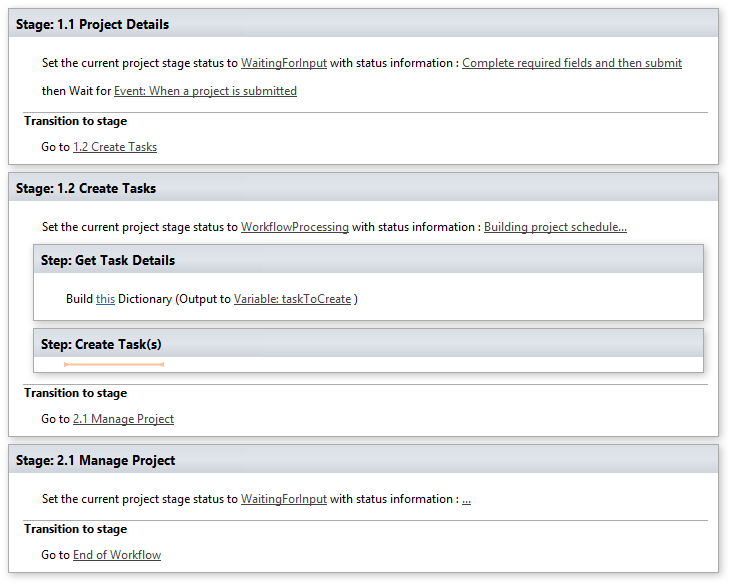
Okay so I’m assuming that this is not your first ever workflow, so the above is the following: Stage transition including basic history / status messages, plus in [stage 1.2] we are manually (and statically!) creating a dictionary of properties for the task we are going to add. (This is static and as per my comment above you probably want to dynamically populate this dictionary even by just setting the value(s) to the value of specific custom fields.)
Note on Check-in / Check-out
The project will need to be checked out to update the schedule, fact. However SPD workflow runs in the context of the user who started it, i.e. the PM in most cases. So in this example I’m going to assume that the project is currently checked-out by the PM and just go ahead and do the update. You may be surprised but this will actually work, of course in reality you will have to check for this and if an error occurs then retry after checking-out – or conversely you could require the project be checked in before submitting and then do the check-out / check-in every time.
Preparing the new task dictionary
SPD uses extensively the Dictionary object in the HTTP Activity, both for the headers, body and return values, so to create our task we are going to need a dictionary formatted in the format expected by the Project Server REST API for creating new tasks. This is where it starts getting interesting.
It turns out that this is easier that you might have guessed, see those properties of the task; Name, Duration, ParentId, etc? Guess what dictionary values we’ll need? :)
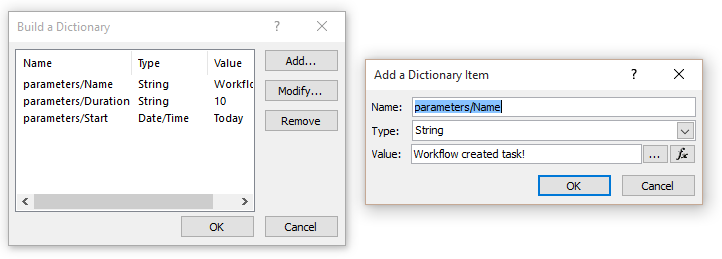
On the left is the complete dictionary, and on the right is the properties of the first “Name” row expanded. Surely it’s not that simple? For once yes it is.
So create the dictionary from the menu Action – Build Dictionary, populate the dictionary with the fields you want, specifically you’ll need Task Name as a minimum, and importantly pay attention to the data-type, for this the MSDN link above is handy, names are strings, dates are dates, parent task Id is a GUID, etc. (Note: Duration is text! Hello manual tasks!)
Prepare the HTTP request
Now we’ll need another dictionary for the request header, if you’ve previously read the MSDN article on using the Bulk update of custom field values, or my article on creating a Project Site based on a custom field, then you’ll see here we need the same thing.
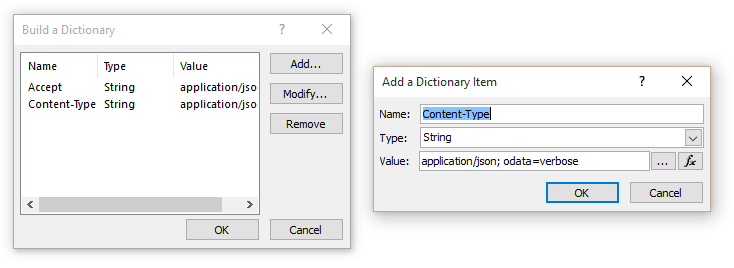
Two string entries needed:
Accept: application/json; odata=verbose
Content-Type: application/json; odata=verbose
The great thing about SPD workflows is that it takes care of the authentication and any other headers, so that is everything that we need.
Submitting the HTTP request
Now we get to use my favourite activity: Call HTTP Web Servie.
Insert the activity, first click the this URL and we’ll build the request URL by basically calling the following REST resource endpoint: MSDN: PS.DraftTaskCollection.add Method, note from MSDN the syntax is as follows:
POST http://<sitecollection>/<site>/_api/ProjectServer/Projects('projectid')/Draft/Tasks/add(parameters)
So we need to dynamically create the URL as follows;
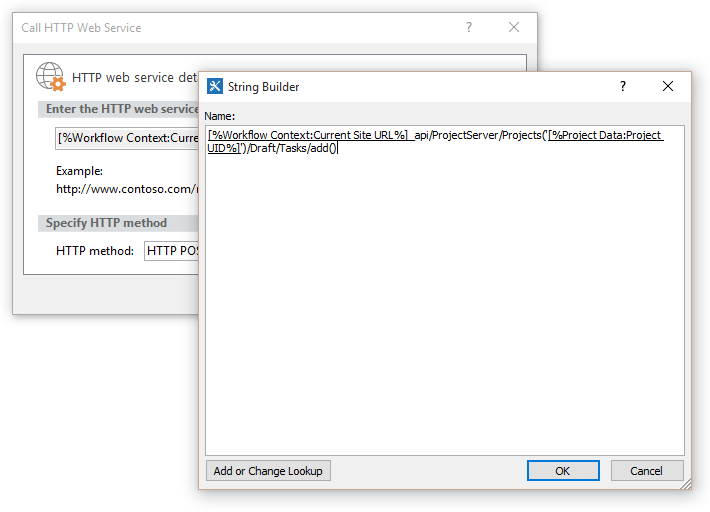
- Use lookup params to insert the Workflow context: Current Site URL
- Append the text “_api/ProjectServer/Projects(”)/Draft/Tasks/add()“
- Then insert the Project Data:Project UID into the text.
- Finally (importantly) Select HTTP POST as the HTTP method.
Next right click the activity and open properties to assign the request header and body, and while there specify something for at least the response content (so we can check the return http code).
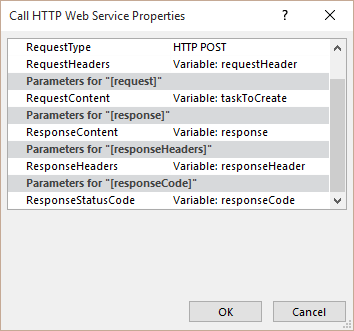
Check the Response
Okay we’ve made our REST call, now we just log the response to the status field, and to help with troubleshooting in the case where “responseCode” is not equal to “OK”, I actually log the full response to the history list.
(Warning! Logging to the history list like this has a max length of 255 characters, so if the error message exceeds that you will get another error and the workflow will fail! Use the Extract Substring activity to avoid this.)
You should now have something looking like this:
Finally save and publish the workflow and you’re ready to go.
Time to test
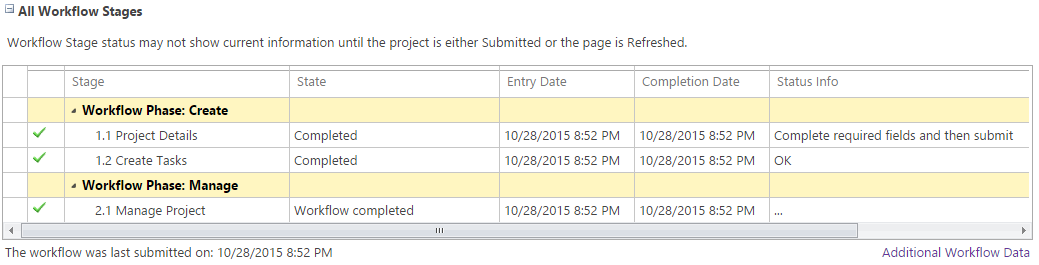
Associate the workflow to an EPT, then create a project. As we’re not doing anything special in the first stage submit and you should see the workflow status info as “Building project schedule…” (looking good so far!).
Give it a minute and then refresh the page:
Better yet, open the Schedule PDP and you will see our new task:
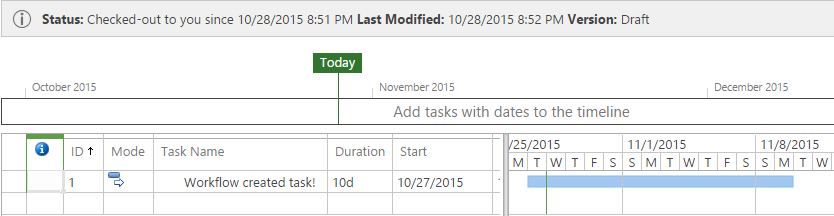
Neat.
Further Thoughts, Experiences and Limitations
This method opens up quite a few options when it comes to SharePoint Designer workflows, the ability to interact with all levels of the Project Server API via a workflow opens the possibility of working with any aspect of project data (tasks, assignments, resources, etc?).
However my experience of pushing this to the limit does raise some significant limitations:
- SPD Workflows can contain a maximum of 50 local variables.
This sounds like a lot but it doesn’t take long before you’re needing to re-use variables, especially if you’re like me and you like nice verbose and unmistakable variable names. (Fifty max is killing me! ;))
- Dictionaries are great but you can’t dynamically update them.
This is where we see the true limitations of SPD vs Visual Studio, doing a simple loop in code then adding the results to the end of a collection (array / dictionary etc) is pretty basic stuff, but with SPD can’t be done. You can loop yes sure, but you can only build a dictionary either statically (like I did above), or from the results of a query such as a http OData request.
- Finally as a developer I’m going to call out this as a major limitation; single concern / no source control. (Ahhh!)
While creating some large workflows you don’t know how many times I have panic’ed thinking that an overly-long and unresponsive save or publish of my work has just crashed SPD and corrupted the whole workflow (it actually happened at least once), give me source control and a proper separation of concerns and let me sleep at night, please. :)
Recommended Reading
Here’s a great article on working with SPD dictionaries that I’d recommend: How to work with dictionaries in SharePoint 2013 and Office 365 workflow)
Complete basic operations using SharePoint 2013 REST endpoints
PS namespace MSDN reference (want to know what REST endpoints are available for Project Server?)
Download the solution
Create-Project-Tasks-Workflow.zip
Enjoy!
by Martin Laukkanen | Aug 29, 2015 | How to
Despite the best efforts of Microsoft with the UI design of SharePoint / PWA, I frequently get requests from customers to make changes / additions to the standard UI elements such as the ribbon menu, which – if you’re reading Microsoft – people very often still just “don’t get”.
So a small thing I came across while digging around in the internals of the Project Server undocumented JavaScript was an easy way to re-use the standard functions of the ribbons in your own html / JavaScript.
(Note this is not a post about ribbon customisation, see Alex’s great post series here if that’s what you’re after.)
Example: ever wanted buttons at the bottom of a long form?
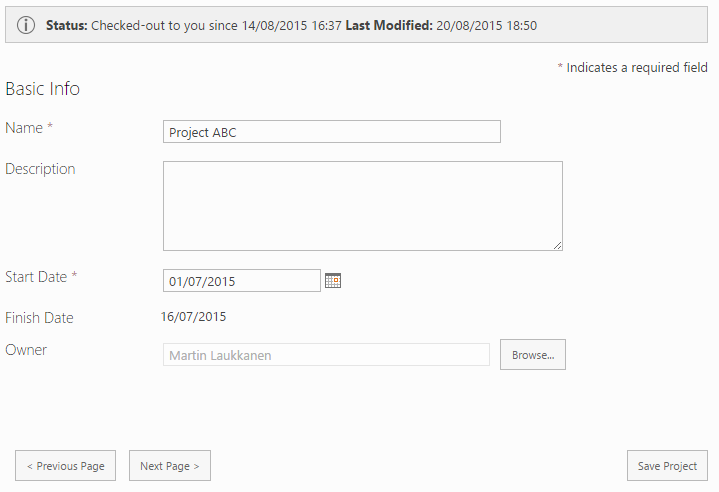
Simple yet effective.
Source html
<div id="myFooterBtns"><span>
    <input type="button" value="< Previous Page" onclick="PDPInfrastructure.GotoPreviousPDP();">
    <input type="button" value="Next Page >" onclick="PDPInfrastructure.GotoNextPDP();">
</span>
<span style="float: right;">
    <input type="button" value="Save Project" onclick="PDPButton.SaveData();">
</span></div>
Note the JavaScript function calls which are quite self explanatory: PDPInfrastructure.GotoNextPDP(); etc. As you might guess you can find a similar method for most options (although some are not so simple).
To use: simply save this as a html file somewhere in your site collection and then reference it in a Content Editor Web Part, see here for an example of how to do that.
Disclaimer
It may go without saying but I will anyway: This is using undocumented and unsupported internal functions that will undoubtedly change at some point in the future whenever Microsoft feels like it.
You have been warned. But in the meantime keep giving customers what they ask for. :)
by Martin Laukkanen | May 29, 2015 | How to, Project 2016, Project Online, Workflow
One of the nice new features recently released on Project Online that will also be available for on-prem sometime in the future (PS 2016 or maybe if we’re lucky 2013 sp2?) is the ability to create custom fields via workflow using the new API CreateProjectSite. While on its own this may be a rather small change what it opens up is the possibility to completely control the Project Site creation which previously had only the out-of-the-box options i.e.; on or off!
So using this new feature I have created a walk-through here to resolve an often asked customer requirement:
How can we create the Project Site using a name other than the Project Name, e.g. a Project Number?
Solution Overview
Note: This solution can be used today on Project Online, but as of yet will not work on Project Server 2013 on-premises.
In order to fulfill this requirement we will need to create a simple two stage workflow and associated Enterprise Project Type to be the default project type.
Stage 1: Project Registration
Used to collect project details including “Project Number” which will be a required field. Other PDP’s such as the project schedule will not be available.
In this stage no project site is available.
Stage 2: Project Execution
First thing upon entering this stage the project site is created using the details from the previous stage (site URL = “Project Number”), then other PDP’s, etc are shown to allow for the project to continue.
Project Online Configuration
I will go through the configuration of PWA for the workflow in brief, if you are not familiar with creating workflows or need further information then I’d recommend the following MSDN How to: How to: Create a Project Server workflow for Demand Management.
Firstly you will need a custom field called “Project Number” that is configured as a Project entity, type Text and Workflow-controlled enabled, as so:

Next create / edit the “New Project” PDP, and add the Project Number field to the PDP.
Optionally leave the field out of the PDP and go and install the Nearbaseline ID App which will set the project number in the background once the project is created (ahem shameless plug).
Now create the required Stages and Phases as follows:
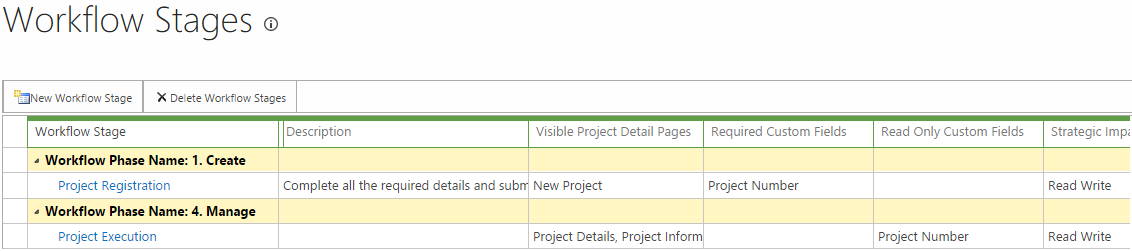
Note that in the Project Registration stage the “Project Number” field must be marked required.
Now create an Enterprise Project Type using the New Project Page created above and for now leaving everything else default / blank as you’ll have to come back and associate the EPT with your workflow after the next steps.
Finally configure the default settings to NOT create project sites automatically from PWA Settings > Connected SharePoint Sites > Settings, as follows:

With that all setup we’re ready to create our workflow in SharePoint Designer.
Workflow Creation in SharePoint Designer
The workflow creation is based on the steps documented in the MSDN guide: Project Online: Bulk update custom fields and create project sites from a workflow, as such I will skip some of the details and suggest you review that article if you have any problems.
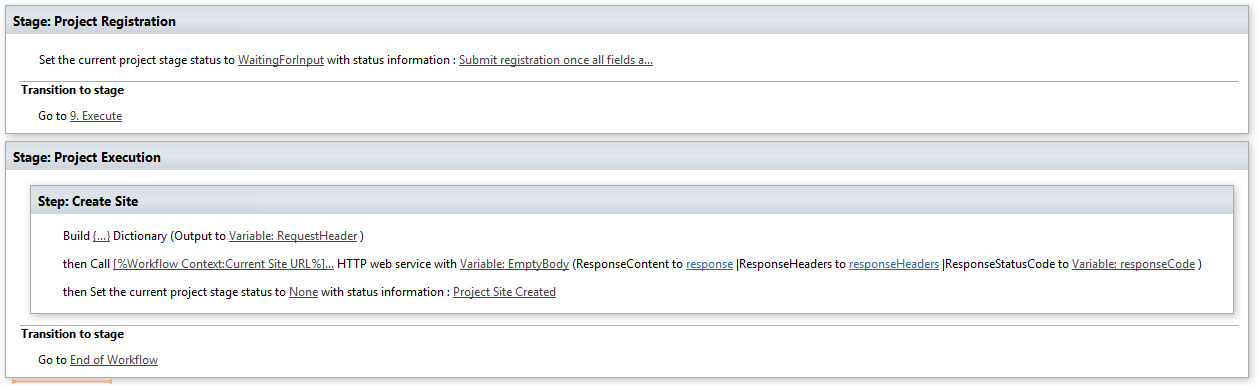
Open SharePoint Designer, create a new SharePoint 2013 Workflow – Project Server workflow and add the following:
- Insert two stages Project Registration & Project Execution
- Optionally set the stage status in the Project Registration stage to WaitingForInput.
- Set the transition to go to the Project Execution stage.
No additional wait for submit event is really required here as the workflow will automatically wait for all required custom fields to be entered before allowing submit.
- Now in the Project Execution stage add a step in which you can add the Create Project Site call as documented in the MSDN article.
- Finally terminate the workflow as the final transition.
Your workflow should look something like this:
The only change from the steps outlined in the MSDN article is in the forth step where the URL is constructed for the CreateSite call, in our case we want that to reference our “Project Number” custom field in the parameter in CreateProjectSite(parameter), so your URL should look like:
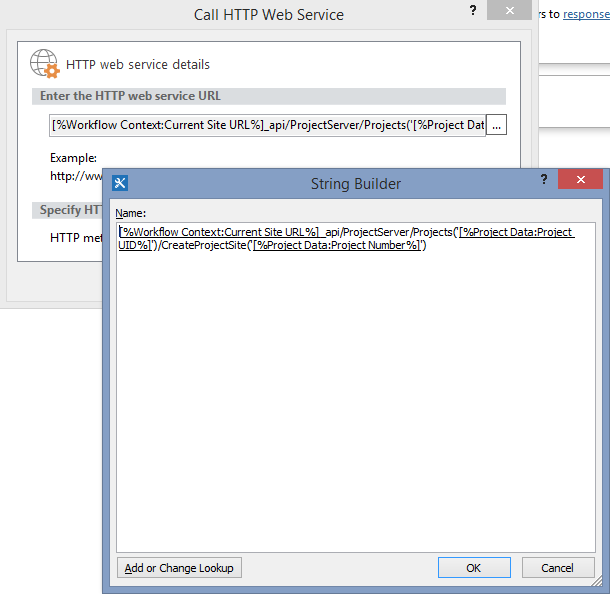
Note: Don’t try to cut and paste those URLs if you do so you will lose the special [%tags%], use the Add or Change Lookup button to insert the tags.
Once your workflow is done, save, publish and return to PWA and associate it with your EPT that you created then test!
Solution Download
Find attached below the SharePoint Designer Workflow solution created above exported as a Visio diagram, note that I cannot provide any guarantees or support for this downloaded Visio file.
Download: Demo Create Project Site from ECF
Screen shot of the workflow in Visio:

Hope this is useful to someone out there!
